ELECTRICAL SYSTEM TROUBLESHOOTING
Test Procedures
12
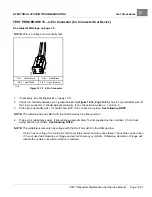
TEST PROCEDURE 19 – 4-Pin Connector (for Connected Car Device)
See General Warnings on page 1-2.
NOTE:
This is a voltage and continuity test.
Pin 1 – Yellow/Black
Pin 4 – White/Black
Pin 2 – Red/White
Pin 3 – Open (No wire)
2786
Figure 12-18
4-Pin Connector
1.
If necessary, see Testing Basics on page 12-11.
2.
Check for continuity between pin 1 (yellow/black wire)
and pin 3 (purple/white wire) of
the 16-pin connector. It should indicate continuity. If not, check sonic welds no. 1 and no. 2.
3.
Probe pin 2 (red/white wire). It should show BPV. If not, check 2-amp fuse.
See following NOTE.
NOTE:
The red/white wire has BPV with the Run/Tow switch in either position.
4.
Probe pin 4 (white/black wire). It should show approximately 13 volts supplied by the controller. If not, check
wiring and then controller.
See following NOTE.
NOTE:
The white/black wire only has voltage with the Run/Tow switch in the RUN position.
If pin 4 has no voltage, the controllers LIN (Local Interconnect bus) may have failed. The vehicle can be driven
if it is not used with Guardian or Visage and will not show any symptoms. Otherwise, Guardian or Visage will
disable the vehicle until communication is restored.
2019 Transporter Maintenance and Service Manual
Page 12-41
Summary of Contents for TransPorter 4
Page 2: ......
Page 271: ...ELECTRIC MAIN HARNESS Wiring Diagrams Electric Main Harness 18 ...
Page 272: ... Page intentionally left blank ...
Page 273: ...ELECTRIC INSTRUMENT PANEL HARNESS Wiring Diagrams Electric Instrument Panel Harness 18 ...
Page 274: ... Page intentionally left blank ...
Page 275: ...ELECTRIC ACCESSORIES HARNESS Wiring Diagrams Electric Accessories Harness 18 ...
Page 276: ... Page intentionally left blank ...
Page 282: ...NOTES ...
Page 283: ...NOTES ...
Page 284: ...NOTES ...
Page 285: ......
Page 286: ......


