FUEL SYSTEM
Fuel Pump
Page 14-22 2001 Pioneer 900 Gasoline Vehicle Maintenance and Service Manual
14
Fuel Pump Assembly, Continued:
∆ CAUTION
• If the valve assembly is not installed exactly as shown, the impulse fuel pump will not operate properly.
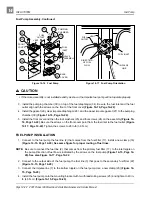
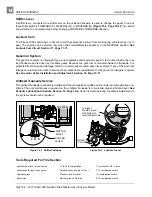
3. Install the pumping chamber (30) on top of the fuel diaphragm (34). Be sure the fuel inlet and the fuel
outlet align with the arrows on the front of the front cover (Figure 14-16, Page 14-22).
4. Install the gasket (29), clear impulse diaphragm (28), and the paper impulse gasket (27) to the pumping
chamber (30) (Figure 14-16, Page 14-22).
5. Install the front cover and then the lock washers (25) and four screws (24) on the assembly (Figure 14-
16, Page 14-22). Be sure the arrows on the front cover point from the fuel inlet to the fuel outlet (Figure
14-17, Page 14-22). Tighten the screws to 26 in-lb (3.0 N·m).
FUEL PUMP INSTALLATION
1. Connect to the fuel pump the fuel line (2) that comes from the fuel filter (17). Install a new clamp (16)
(Figure 14-15, Page 14-20). See same figure for proper routing of fuel lines.
NOTE: Be sure to connect the fuel line (2), that comes from the primary fuel filter (17), to the inlet nipple on
the pump. Direction of fuel flow is indicated by the arrows on the fuel pump (Figure 14-15, Page 14-
20). See also Figure 14-17, Page 14-22.
2. Connect to the output side of the fuel pump, the fuel line (3) that goes to the secondary fuel filter (22)
3. Connect the impulse line (7) to the bottom nipple on the fuel pump. Use a new clamp (20) (Figure 14-
4. Install the fuel pump onto the mounting bracket with two thread-rolling screws (25) and tighten to 40 in-
lb (4.5 N·m) (Figure 14-15, Page 14-20).
Figure 14-16 Fuel Pump
Figure 14-17 Fuel Pump Orientation
24
25
32
33
31
30
34
27
28
29
35
36
FUEL
INLET
VALVE
ASSEMBLY
PUMPING
CHAMBER
BACK
COVER
FRONT
COVER
VENT
FUEL
OUTLET
FUEL
OUTLET
VENT
DIRECTION
OF FUEL
FLOW
IMPULSE
LINE
FUEL INLET

