


SECTION 6 — WHEEL BRAKE ASSEMBLIES
6
Wheel Brake Assemblies
DANGER
• See General Warnings on page 1-1.
WARNING
• See General Warnings on page 1-1.
Asbestos Dust Warning
• Some aftermarket brake shoes contain asbestos dust. Asbestos dust is created when these brake
mechanisms are handled. Wear approved eye and respiratory protection when disassembling and
cleaning brake mechanisms. Inhalation of asbestos could result in severe personal injury or death. Do
not use compressed air or aerosol sprays to clean the brake mechanism. Clean brake mechanism
using the negative pressure enclosure/hepa vacuum system or low pressure/wet cleaning method per
OSHA/29 CFR - 1910.1001.
GENERAL INFORMATION
This vehicle is equipped with self-adjusting mechanically-expanding shoe drum brakes on each rear wheel.
BRAKE SHOE REMOVAL
See General Warnings on page 1-1. See also Asbestos Dust Warning on page 6-1.
1.
Disconnect the battery cables and either discharge the controller or disconnect the spark plug wire.
Disconnect the Batteries – Electric Vehicles, Section 1, Page 1-5.
See Disconnect the Battery- Gasoline Vehicles on page 1-4.
2.
Place chocks at the front wheels. Loosen, but do not remove, lug nuts on rear wheels and lift the rear of the
vehicle with a chain hoist or floor jack. Place jack stands under the axle tubes to support the vehicle.
See
WARNING “Lift only one end...” in General Warnings on page 1-1.
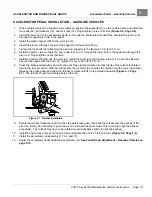
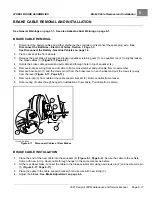
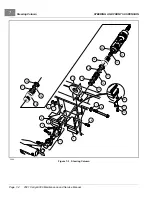
3.
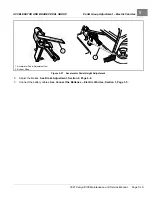
Loosen the equalizer retaining nuts (1) on the equalizer rod (2) to loosen the brake cable
4.
Remove the rear wheels and brake drums. If the brake drums were easily removed, go to step 6.
See following
CAUTION and NOTE.
CAUTION
• Worn or damaged brake drums cannot be machined to refinish them. Replace as necessary.
NOTE:
When servicing vehicles with severely worn brake shoes and when the drums cannot be removed by normal
methods, proceed to step 5 to minimize damage to the brake assemblycomponents.
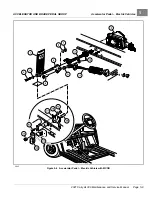
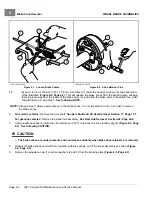
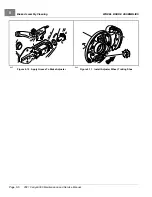
5.
Remove brake drums and badly worn brake shoes.
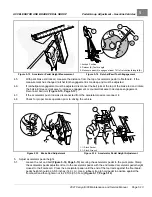
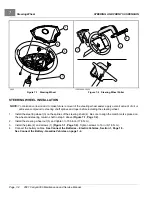
5.1.
On the back of each brake cluster assembly, locate the heads of two brake shoe retainer pins. It may be
necessary to remove sealant material around the head of each pin.
2021 Carryall 300 Maintenance and Service Manual
Page 6-1
Summary of Contents for Carryall 300 2021
Page 2: ......
Page 16: ......
Page 551: ...80 2018 by Kohler Co All rights reserved KohlerEngines com 17 690 15 Rev...
Page 565: ...GASOLINE ENGINE HARNESS Wiring Diagrams Gasoline Engine Harness 26...
Page 566: ...Page intentionally left blank...
Page 567: ...GASOLINE KEY START MAIN HARNESS Wiring Diagrams Gasoline Key Start Main Harness 26...
Page 568: ...Page intentionally left blank...
Page 569: ...GASOLINE PEDAL START MAIN HARNESS Wiring Diagrams Gasoline Pedal Start Main Harness 26...
Page 570: ...Page intentionally left blank...
Page 571: ...GASOLINE INSTRUMENT PANEL HARNESS Wiring Diagrams Gasoline Instrument Panel Harness 26...
Page 572: ...Page intentionally left blank...
Page 573: ...GASOLINE FNR HARNESS Wiring Diagrams Gasoline FNR Harness 26...
Page 574: ...Page intentionally left blank...
Page 575: ...ELECTRIC MAIN HARNESS Wiring Diagrams Electric Main Harness 26...
Page 576: ...Page intentionally left blank...
Page 577: ...ELECTRIC INSTRUMENT PANEL HARNESS Wiring Diagrams Electric Instrument Panel Harness 26...
Page 578: ...Page intentionally left blank...
Page 579: ...ELECTRIC ACCESSORIES HARNESS Wiring Diagrams Electric Accessories Harness 26...
Page 580: ...Page intentionally left blank...
Page 588: ...NOTES...
Page 589: ...NOTES...
Page 590: ...NOTES...
Page 591: ...NOTES...
Page 592: ...NOTES...
Page 593: ...NOTES...
Page 594: ...NOTES...
Page 595: ......
Page 596: ......


