


WHEELS AND TIRES
Tires
8
NOTE:
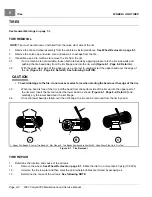
An air leak could be due to a punctured casing, faulty valve core, improperly seated valve stem, or improperly
seated tire bead.
Small holes in the casing can be plugged using a standard automotive tubeless tire repair kit available
at auto supply stores.
2.
When the cause of the air leak has been determined, remove tire from the rim and repair as required.
TIRE INSTALLATION
WARNING
• While mounting or inflating tire, keep hands, fingers, etc. from exposed areas between the tire bead
and rim.
1.
Clean both tire beads to remove dirt or other foreign matter.
2.
Where the tire beads seat, clean the rim with a wire brush. Wipe away any debris with a clean cloth.
See
following NOTE.
NOTE:
Because tubeless tires require a perfect seal in order to seat, keeping the tire and rim clean is very important.
3.
Apply a liberal amount of tire-mounting lubricant (soap and water solution) to both tire beads and rim flanges.
4.
Install the tire on the rim from the valve stem side. If there is no tire machine available, use a rubber mallet
and tire iron.
5.
Remove the valve core, and position the tire so that both beads are on the rim flange narrow bead seats.
6.
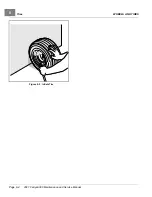
Place the tire and wheel assembly against a wall in an upright position and push it against the wall while inflating
the tire to the recommended pressure.
See Vehicle Specifications on page 2-1.
The three-point contact
(wall, floor, and hand) will help ensure that beads snap into place and form a proper seal as the tire is inflated
.
See following WARNING.
WARNING
• Do not use a compressed air source with pressure over 100 psig (689 kPa). Due to the low pressure
requirements of a small tire, over-inflation could be reached almost instantly when using a high
pressure air supply. Over-inflation could cause the tire to explode, possibly resulting in personal injury.
7.
Quickly remove the air nozzle and install the valve core.
8.
Adjust air pressure in the tire to recommended pressure.
See Vehicle Specifications on page 2-1.
9.
Immerse the wheel and tire assembly in water to make sure there are no leaks.
2021 Carryall 300 Maintenance and Service Manual
Page 8-3
Summary of Contents for Carryall 300 2021
Page 2: ......
Page 16: ......
Page 551: ...80 2018 by Kohler Co All rights reserved KohlerEngines com 17 690 15 Rev...
Page 565: ...GASOLINE ENGINE HARNESS Wiring Diagrams Gasoline Engine Harness 26...
Page 566: ...Page intentionally left blank...
Page 567: ...GASOLINE KEY START MAIN HARNESS Wiring Diagrams Gasoline Key Start Main Harness 26...
Page 568: ...Page intentionally left blank...
Page 569: ...GASOLINE PEDAL START MAIN HARNESS Wiring Diagrams Gasoline Pedal Start Main Harness 26...
Page 570: ...Page intentionally left blank...
Page 571: ...GASOLINE INSTRUMENT PANEL HARNESS Wiring Diagrams Gasoline Instrument Panel Harness 26...
Page 572: ...Page intentionally left blank...
Page 573: ...GASOLINE FNR HARNESS Wiring Diagrams Gasoline FNR Harness 26...
Page 574: ...Page intentionally left blank...
Page 575: ...ELECTRIC MAIN HARNESS Wiring Diagrams Electric Main Harness 26...
Page 576: ...Page intentionally left blank...
Page 577: ...ELECTRIC INSTRUMENT PANEL HARNESS Wiring Diagrams Electric Instrument Panel Harness 26...
Page 578: ...Page intentionally left blank...
Page 579: ...ELECTRIC ACCESSORIES HARNESS Wiring Diagrams Electric Accessories Harness 26...
Page 580: ...Page intentionally left blank...
Page 588: ...NOTES...
Page 589: ...NOTES...
Page 590: ...NOTES...
Page 591: ...NOTES...
Page 592: ...NOTES...
Page 593: ...NOTES...
Page 594: ...NOTES...
Page 595: ......
Page 596: ......


