36-50 Installation and User Guide V1.0
9
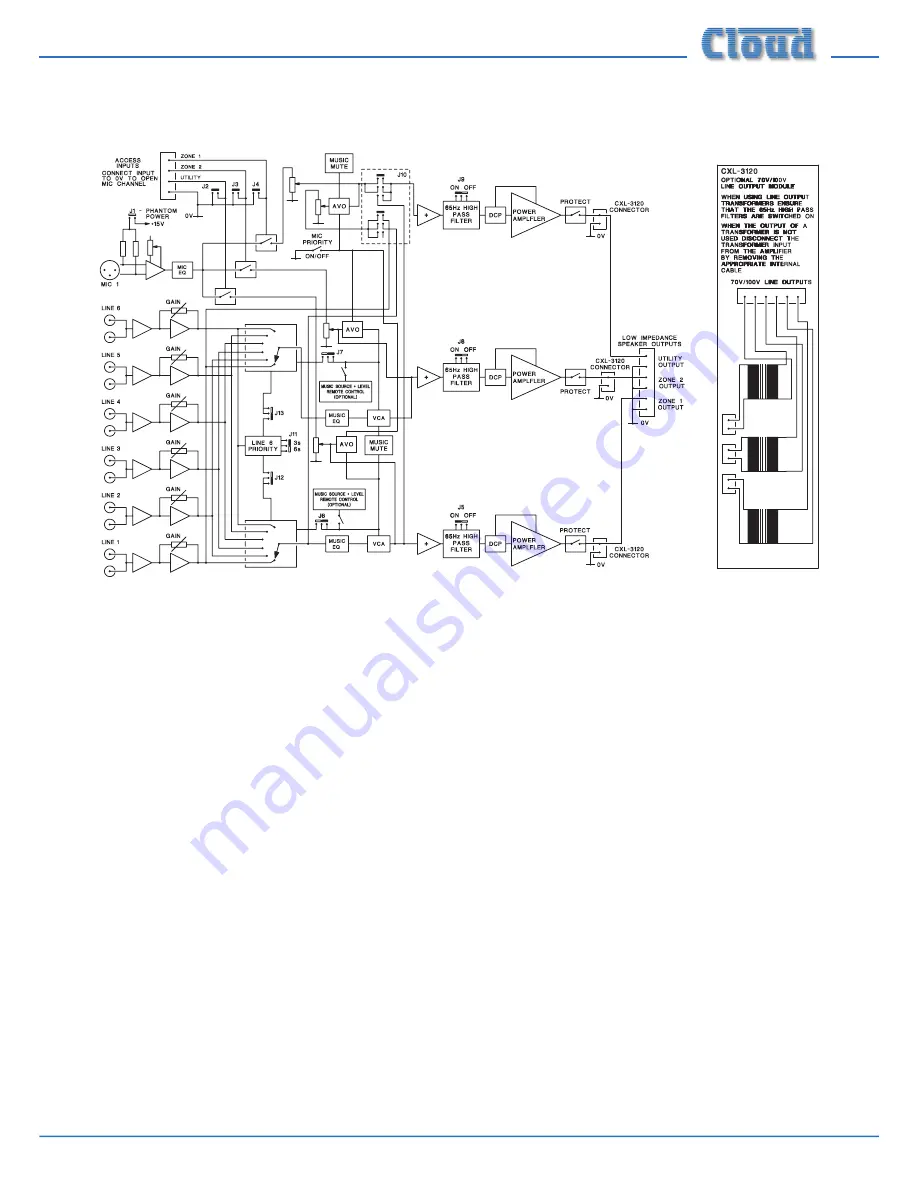
Block Diagram
The simplified block diagram above illustrates the basic signal architecture of the 36-50.
Page 1: ...36 50 Installation and User GuideV1 0 36 50 MULTI ZONE MIXING AMPLIFIER Installation and User Guide...
Page 2: ...N AVIS RISQUE DE CHOC ELECTRIQUE NE PAS OUVRIR The lightning flash with the arrowhead symbol within an equilateral triangle is intended to alert you to the presence of uninsulated dangerous voltages w...
Page 3: ...ing storms or when unused for long periods of time 14 Refer all servicing to qualified service personnel Servicing is required when the apparatus has been damaged in any way such as power supply cord...
Page 4: ...in the box 7 36 50 Main features 7 Optional system components 8 RL 1 Series Remote Music Level Control 8 RSL 6 Series Remote Music Level Source Control 8 PM Series microphones 8 Block Diagram 9 Front...
Page 5: ...7 Priorities 18 Mic over Music priority 18 Line 6 priority 18 OPTIONS AND ADDITIONAL INFORMATION 19 RL 1 and RSL 6 Series remote control plates general considerations 19 Control of music source and le...
Page 6: ...ters overhead power lines etc the performance of the unit may be degraded The product conforms to the following European electrical safety standard BS EN 60065 2012 Safety Considerations and Informati...
Page 7: ...again for placing your confidence in Cloud products What s in the box Unpack the 36 50 and its accessories with care It is always a good idea to store all packaging if practical in case you ever need...
Page 8: ...4 5 6 1 2 3 7 9 10 0 8 The RSL 6 Series is a range of plates allowing local per zone music source selection as well as music level control They are the same size as the RL 1s and connect in a similar...
Page 9: ...36 50 Installation and User GuideV1 0 9 Block Diagram The simplified block diagram above illustrates the basic signal architecture of the 36 50...
Page 10: ...evel of the microphone connected to the rear panel mic input in each zone See page 16 4 Power rocker switch with internal illumination 5 Zone idents a space is provided above each zone s controls for...
Page 11: ...e 17 9 UTILITY MIC MUSIC two pre set controls adjusting the level of the microphone input and chosen music source respectively at the Utility Output See page 17 10 REMOTE SOURCE LEVEL 3 pin 5 mm pitch...
Page 12: ...he correct fuse types VERSION RATING FUSE TYPE 230V 3 15 A 20 mm x 5 mm slo blo T3 15AH 115V 6 3 A 20 mm x 5 mm slo blo T6 3AH The fuseholder may be accessed by prising the slide below the connector o...
Page 13: ...cements automatically reduce the music level in that zone while the announcement is in progress see page 18 for more details Paging system connections Cloud PM Series paging microphones may be connect...
Page 14: ...lowing diagram shows the connections between a PM1 and a 36 50 Use of 2 pair cable is assumed the same wiring principle is adopted if separate cables are being used for audio and control PAGING MIC IN...
Page 15: ...l i e music should be muted in an emergency to ensure that any emergency messages are clearly audible The MUSIC MUTE input is on a 2 pin 5 mm pitch screw terminal connector It should be connected to t...
Page 16: ...so that there is no appreciable difference in volume between any of the sources With a typical music source setting the gain on its channel to mid way is a good starting point Note that consideration...
Page 17: ...have different models of loudspeaker installed The 36 50 is fitted with HF and LF EQ adjustments 8 on page 11 for the music signal of each primary zone output to enable the audio frequency response to...
Page 18: ...to all music ducking regardless of whether initiated by the mic input or Line 6 priority see below See page 4 for location of the internal jumpers Line 6 priority It may sometimes be necessary for on...
Page 19: ...source is not isolated from the power earth there is a small risk of creating a ground loop by linking the mixer technical ground 0V to the ground 0V of the equipment supplying the control voltages To...
Page 20: ...with the hex spacer 6 Use the screw from step 3 to secure the adaptor to the spacer 7 Plug the EQ card into the 12 pin socket on the adaptor 8 Replace the top panel See theAppendix section PCB jumper...
Page 21: ...nse ON 65 Hz hi pass filter enabled for Zone 1 OFF J6 Music source selection Zone 1 SW Source follows rear panel MUSIC CONTROL switch FR Always via front panel only Z1 SW J7 Music source selection Zon...
Page 22: ...ional problems and under normal circumstances no special precautions need to be taken If the unit is to be used within close proximity to potential sources of HF disturbance such as high power communi...
Page 23: ...dB 1 kHz Headroom 20 dB Noise 126 dB EIN 22 Hz to 22 kHz Rs 150 ohms Equalisation HF 10 dB 5 kHz LF 10 dB 100 Hz Outputs Low Impedance Outputs 4 ohm load s 1ch driven 60 W 2chs driven 52 W 3chs drive...
Page 24: ...ngland Tel 44 0 114 244 7051 Fax 44 0 114 242 5462 email info cloud co uk web www cloud co uk Cloud Electronics USA 2065 Sidewinder Drive Suite 200 Park City Utah 84060 United States of America Toll F...