background image

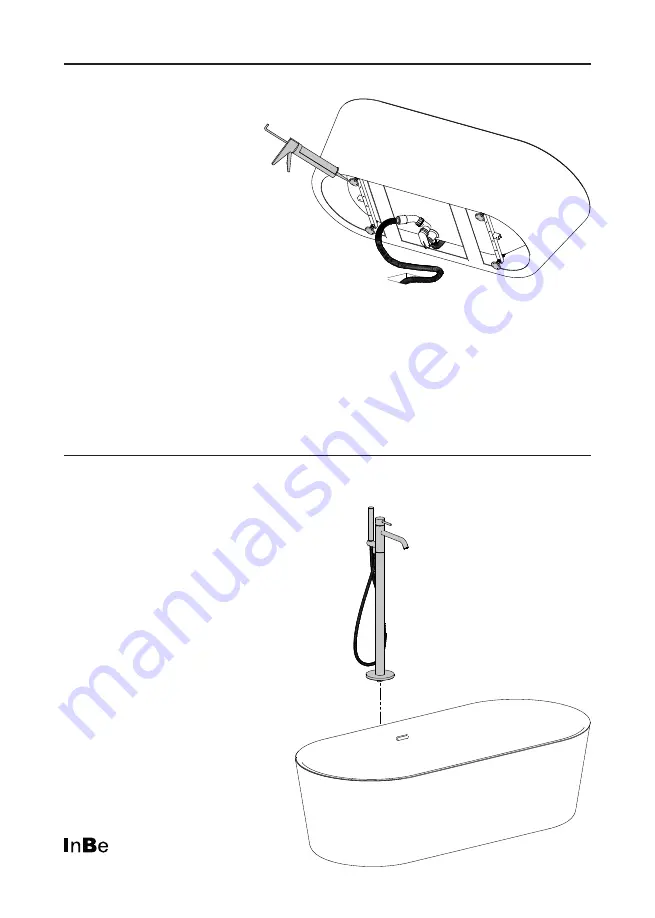
7

Bevestig het bad aan de 
vloer met siliconenkit op de 
stelpootjes.

Fixate the bathtub to the 
floor with caulk on the feet. 

Fixez la baignoire au 
plancher avec du mastic 
silicone sur les pieds. 

Fixieren Sie die Badewanne 
zum Fußboden mit Silikone 
auf die Füße.

8

Installeer de kraan (niet 
inbegrepen) op de vloer en 
sluit deze aan op de waterlei-
ding.

Install the tap (not included) 
on the floor and connect it to 
the water supply.

Installer le robinet (non 
inclus) sur le plancher et le 
raccorder à la conduite 
d’eau. 

Befestigen Sie die Armatur 
(nicht im Lieferumfang 
enthalten) am Fußboden und 
schließen Sie ihn an der 
Wasserleitung an.

Summary of Contents for InBe IB/05.40300

Page 1: ...IB 05 40300 Montage instructies Installation instructions Notice de montage Montageanweisungen REV 05 22 12 2021 InBe bathtub Freestanding with stop go drain oval overflow acrylic gloss white chrome...

Page 2: ...tage dient uitgevoerd te worden door 2 personen waarvan minstens n vakkundig opgeleid persoon Alle maten zijn in mm Before starting the installation check whether the delivery is complete At the same...

Page 3: ...Toutes les mesures affich es sont en mm Bevor Sie die Montage durchf hren kontrollieren Sie bitte ob das gelieferte Artikel vollst ndig ist Auch kontrollieren Sie m gliche durch den Transport verursac...

Page 4: ...gereedschap Required tools Outils requis Erforderliche Werkzeuge Tijdens de installatie moet men voorkomen dat het oppervlak van het product beschadigd raakt door harde voorwerpen op het product te l...

Page 5: ...445 1145 1610 535 475 660 545 800 905 460 1780 560 470 525 30 15 flat 60 70 IB 05 40300 Dimensions in mm for reference only 19 07 2021 rev_01...

Page 6: ...1 www clou nl InBe bathtub With stop go drain oval overflow gloss white chrome IB 05 40300 IB 05 40302 IB 05 40305 IB 05 40402 IB 05 40507 CL 1077 5005 CL 1077 5001 CL 1077 5002 CL 1077 5000 Reserve o...

Page 7: ...en Sie den Aussparung im Boden 450 x 200 mm breit und 70 mm tief 1 Bepaal de positie van de uitsparing aan de hand van de positie van de afvoer van het bad Decide on the position of the cut out accord...

Page 8: ...4 Bevestig de overloop en afvoer inbegrepen in het bad volgens diens bijgevoegde handleiding Gebruik de explosietekening op p 6 om alles correct te installeren Mount the overflow and drain included in...

Page 9: ...den Siphon an der Abflussleitung 6 Laat het bad vol met water lopen en controleer op eventuele lekkages Fill the bathtub completely with water and check for leaks Remplissez la baignoire compl tement...

Page 10: ...dewanne zum Fu boden mit Silikone auf die F e 8 Installeer de kraan niet inbegrepen op de vloer en sluit deze aan op de waterlei ding Install the tap not included on the floor and connect it to the wa...

Page 11: ......

Page 12: ...ermiekstraat 1 NL 6361 HB Nuth T 31 0 45 524 56 56 info clou nl www clou nl Looking for inspiration Clou Bath findings Clou bv Thermiekstraat 1 NL 6361 HB Nuth T 31 0 45 524 56 56 info clou nl www clo...

Reviews: