background image

3_

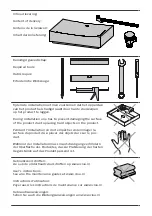
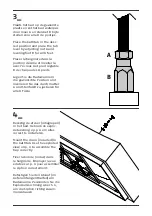
Plaats het bad op de gewenste 
plaats en zet het bad waterpas 
door moer A en stelvoet B bij te 
stellen voor alle 8 de pootjes. 

Place the bathtub in the desi-
red position and place the tub 
level by adjusting nut A and 
leveling foot B for all 8 feet. 
 
Placer la baignoire dans la 
position désirée et niveller la 
avec l’écrous A et pied réglable 
B de chaque des 8 pieds. 

Legen Sie die Badewanne in 
die gewünschte Position und 
nivelieren Sie das durch mutter 
A und Stellfuß B zu justieren für 
alle 8 Füße.

4_

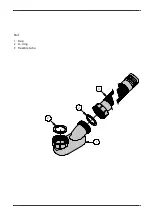
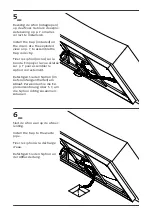
Bevestig de afvoer (inbegrepen) 
in het bad. Gebruik de explo-
sietekening op p. 6 om alles 
correct te installeren.

Mount the drain (included) in 
the bathtub. Use the exploded 
view on p. 6 to assemble the 
trap correctly.
 
Fixer la bonde (inclus) dans 
le baignoire. Employer la vue 
éclatée sur p. 6 pour assembler 
le siphon correctement.

Befestigen Sie den Ablauf (im 
Lieferumfang enthalten) am 
Badewanne. Verwenden Sie die 
Explosionzeichnung über S. 6, 
um die Siphon richtig zusam-
menzubauen.

A

B

Summary of Contents for Hammock CL/05.60020

Page 1: ...Hammock_freestanding bathtub CL 05 60020 Montage instructies Installation Instructions Notice de montage Montageanweisungen b a t h f i n d i n g s...

Page 2: ...ge dient uitgevoerd te worden door 3 personen waarvan minstens n vakkundig opgeleid persoon Alle maten zijn in mm Before starting with the mounting check whether the delivery is complete At the same t...

Page 3: ...Toutes les mesures affich es sont en mm Bevor Sie die Montage durchf hren kontrollieren Sie bitte wenn der gelieferte Artikel vollst ndig ist Auch kontrollieren Sie m gliche durch den Trans port verur...

Page 4: ...bjects on the product Pendant l installation on doit emp cher endommager la surface du produit d placer des objets durs sur le pro duit W hrend der Installation muss man Sch digung verhindern der Ober...

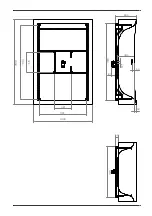
Page 5: ...746 1125 2000 1400 475 81 421 acrylic CL 05 60020 Dimensions in mm for reference only 07 05 2015 rev_01 1210 80 50 50 400 51 500 1810 1746 1125 2000 1400 475 81 421 CL 05 60020 Dimensions in mm for re...

Page 6: ...tub_drain set CL 1075 5000 CL 1075 5002 Part 1 2 3 4 5 6 7 8 9 outer body O ring outer body O ring inner body inner body stop go system O ring top cap top cap O ring flexible tube flexible tube 6 7 5...

Page 7: ...InBe_bathtub trap IB 05 40100 IB 05 40105 IB 05 40200 IB 05 40205 CL 05 60010 CL 05 60020 Part 1 2 3 trap O ring flexible tube 2 1 3 2...

Page 8: ...anne 2_ Voorzie op deze plek een uit sparing in de vloer 250 x 250 mm breed en 90 mm diep Make at this position a cut away in the floor 250 x 250 mm wide 90 mm deep Faire cette position un coup dans l...

Page 9: ...nne in die gew nschte Position und nivelieren Sie das durch mutter A und Stellfu B zu justieren f r alle 8 F e 4_ Bevestig de afvoer inbegrepen in het bad Gebruik de explo sietekening op p 6 om alles...

Page 10: ...Fixer le siphon inclus sur la bonde Employer la vue clat e sur p 7 pour assembler le siphon correctement Befestigen Sie den Siphon im Lieferumfang enthalten am Ablauf Verwenden Sie die Ex plosionzeich...

Page 11: ...cher avec du mastic sili cone sur les pieds berpr fen Sie ob der Abfluss und die Siphon richtig ange bracht sind Fixieren Sie dann die Badewanne zum Fu boden mit Silikone auf die F e 8_ Installeer de...

Page 12: ...Clou bv Thermiekstraat 1 NL 6361 HB Nuth T 31 0 45 524 56 56 F 31 0 45 524 60 00 info clou nl www clou nl b a t h f i n d i n g s...

Reviews: