background image

6

© 

2019 

ClosetMaid 

LLC

 | Ocala, FL 34471 | 1-800-874-0008 | www.closetmaid.com | www.closetmaid.ca

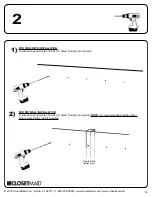
Measure Closet Wall

NOTE:

 The installation instructions detailed in this manual are based on 16” wood stud spacing (on 

center) which is representative of residential single family building code specifications. ClosetMaid is 

not responsible for misplaced wooded studs in walls that do not follow the standard 16 inch spacing 

requirements. The advertised load capacity is invalid if the wall studs do not follow the standard 16 inch 

wall stud spacing requirements.

NOTE:

 To meet the advertised weight load specifications, this pantry organizer requires a minimum wall 

area or pantry width of 4 feet. It can also be easily installed on a wall area or pantry wider than 4 feet. 

However, in the case of a wall area or pantry which is smaller that 4 feet, the Hang Track and /or the 

Shelves will require cutting.

If the Hang Track does require cutting, then the advertised weight load specifications are no longer 

valid. Measure wall area or pantry width to determine if cutting of the Hang Track and/or shelving will be 

required. If cutting is required, turn to page 15 in this manual for alternative installation instructions

CAUTION:

 To avoid personal injury, use care and a safe, sturdy stepping stool to position Hang Track.

Top
Haut
Parte 

Superior

Bottom
Bas
Parte Inferior

MEASURE AND FIT (WIDTH)

Mesurer le Mur de Garde-Robe 

NOTE:

 The installation instructions detailed in this manual 

are based on 16” wood stud spacing (on center) which is 

representative of residential single family building code 

specifications. ClosetMaid is not responsible for misplaced 

wooded studs in walls that do not follow the standard 16 inch 

spacing requirements. The advertised load capacity is invalid if 

the wall studs do not follow the standard 16 inch wall stud spacing 

requirements.

NOTE:

 To meet the advertised weight load specifications, this 

pantry organizer requires a minimum wall area or pantry width of 

4 feet. It can also be easily installed on a wall area or pantry wider 

than 4 feet. However, in the case of a wall area or pantry which is 

smaller that 4 feet, the Hang Track and /or the Shelves will require 

cutting.

If the Hang Track does require cutting, then the advertised weight 

load specifications are no longer valid. Measure wall area or 

pantry width to determine if cutting of the Hang Track and/or 

shelving will be required. If cutting is required, turn to page 15 in 

this manual for alternative installation instructions

CAUTION:

 To avoid personal injury, use care and a safe, sturdy 

stepping stool to position Hang Track.

Medidas para la Pared del Clóset 

NOTE:

 The installation instructions detailed in this manual 

are based on 16” wood stud spacing (on center) which is 

representative of residential single family building code 

specifications. ClosetMaid is not responsible for misplaced 

wooded studs in walls that do not follow the standard 16 inch 

spacing requirements. The advertised load capacity is invalid if 

the wall studs do not follow the standard 16 inch wall stud spacing 

requirements.

NOTE:

 To meet the advertised weight load specifications, this 

pantry organizer requires a minimum wall area or pantry width of 

4 feet. It can also be easily installed on a wall area or pantry wider 

than 4 feet. However, in the case of a wall area or pantry which is 

smaller that 4 feet, the Hang Track and /or the Shelves will require 

cutting.

If the Hang Track does require cutting, then the advertised weight 

load specifications are no longer valid. Measure wall area or 

pantry width to determine if cutting of the Hang Track and/or 

shelving will be required. If cutting is required, turn to page 15 in 

this manual for alternative installation instructions

CAUTION:

 To avoid personal injury, use care and a safe, sturdy 

stepping stool to position Hang Track.

Summary of Contents for SHELFTRACK 2845

Page 1: ...ons as advertised please read the following At least 3 screws in the noted location on pg 7 must hit studs in the hang track as well as the 3 screws in the middle standards for this kit to be considered installed properly and have guaranteed weight holding capacity If any components are altered not used and or removed the weight load specifications are no longer valid Unit MUST be installed as per...

Page 2: ...ndeur pour toute demande de conseils ou d informations relatives à la garantie du produit s il vous plaît appelez le Service Consommateurs au 1 800 874 0008 Garantie du Fabricant Le fabricant remplacera toute pièce manquante ou endommagée en raison d un défaut de fabrication dans l année suivant l achat S il vous plaît rapportez une preuve d achat pour les réclamations de garantie Por favor no dev...

Page 3: ...ovoquer des blessures graves ou des dommages matériels Ne pas surcharger les modules Lorsqu une étagère ou encore le haut ou le bas d un module plie ou arque cela indique une surcharge L étagère ou les panneaux supérieur ou inférieur pourraient s affaisser provoquant des blessures graves ou des dommages matériels Ne pas grimper ou se tenir debout ou assis sur le module Le module risque de devenir ...

Page 4: ...etMaid LLC Ocala FL 34471 1 800 874 0008 www closetmaid com www closetmaid ca PARTS PIÈCES PIEZAS AA BB CC DD EE A E F F F F E E E E E E E E E E E B C C C D D D B B x14 x14 x14 x40 x14 274 00 688 00 603 00 650 00 ...

Page 5: ...ts in this organizer per the following installation instructions Before moving on to the system installation instructions please take the time to review the stud installa tion requirements below A B C Locate studs Must hit studs in 3 holes STUD STUD STUD TOGGLE TOGGLE Use the supplied toggle bolts on the two holes indicated here which are not in studs If you are unable to install per the stud inst...

Page 6: ...nch wall stud spacing requirements NOTE To meet the advertised weight load specifications this pantry organizer requires a minimum wall area or pantry width of 4 feet It can also be easily installed on a wall area or pantry wider than 4 feet However in the case of a wall area or pantry which is smaller that 4 feet the Hang Track and or the Shelves will require cutting If the Hang Track does requir...

Page 7: ...inimum height with standards installed 5x Align Hang Track with studs as noted in the recommended stud installation instructions on page 5 Use level to assure Hang Track is straight before marking holes When track is at desired height and level mark each screw hole on the wall using a pencil A 81 MIN A A ...

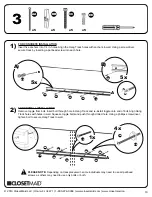
Page 8: ...74 0008 www closetmaid com www closetmaid ca 2 A Locate each pencil mark and drill a hole Only drill holes 2 and 4 1 2 diameter for supplied drywall toggles No predrill for stud mounting No predrill for stud mounting No predrill for stud mounting ...

Page 9: ...ll the bolt only in the holes where there are no studs Insert the toggle bolts through the holes in the hang track where there will not be studs then thread the toggle anchor onto the bolt once it is through the track Align the Hang Track holes with pre drilled holes in wall Using a screw driver secure track by inserting a panhead screw into each hole where a stud is located B A 3x 2x CC CC CC CC ...

Page 10: ...id LLC Ocala FL 34471 1 800 874 0008 www closetmaid com www closetmaid ca 4 Attach 3 standards to the Hang Track by placing each piece into the top groove as shown below A 3x A A B B B B In stud Not in stud Not in stud ...

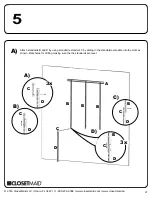
Page 11: ...cala FL 34471 1 800 874 0008 www closetmaid com www closetmaid ca 5 Attach standards B and D by using standard extenders C Slide the standard extenders C into the slots as shown A A B C D 3x 3x B B B B B A C C C C C D D D D D ...

Page 12: ...Make sure each standard is level then secure each standard as shown below Use a phillips screw driver to tighten each panhead screw Standards must be placed at 18 from the center of one standard to the center of the next standard as shown below A CC x3 CC 6x 3x A B C D C D C D B B 18 18 AA BB x6 x6 ...

Page 13: ...13 2019 ClosetMaid LLC Ocala FL 34471 1 800 874 0008 www closetmaid com www closetmaid ca 7 14 Insert shelf brackets into standards at desired height for each shelf A 12x A A B B B B E E ...

Page 14: ...14 2019 ClosetMaid LLC Ocala FL 34471 1 800 874 0008 www closetmaid com www closetmaid ca 8 C A B DD x40 DD DD DD DD DD 40x 4x E E A F F F B B B ...

Page 15: ...te It is recommended to use the stud mount installation option The following installation options shown below are for drywall and concrete installation only If you decide to use this method of installation as shown below the advertised weight load requirements are no longer valid DRYWALL MURO SECO FRENCH CONCRETE CONCRETO FRENCH DRYWALL CONCRETE INSTALLATION ...

Page 16: ...antry which is smaller that 4 feet the Hang Track and or the Shelves will require cutting Measure wall area or pantry width NOTE The Hang Track is 40 inches long and can be centered on the wall or can be flush to one side If you wish it to be centered determine the center point of the wall by dividing the overall width by two If you wish to have it flush to one side position the Hang Track against...

Page 17: ...ww closetmaid ca 1 PLEASE NOTE Minimum height with standards installed 5x Measure Hang Track to desired height use level to assure track is straight before marking holes When track is at desired height and level mark each screw hole on the wall using a pencil A 81in MIN A A ...

Page 18: ...FOR CONCRETE INSTALLATION Locate each pencil mark and drill 1 4 holes if drilling into concrete FOR DRYWALL INSTALLATION Locate each pencil mark and drill 1 2 holes if drilling into drywall NOTE It is recommended that the center hole is scured into a stud if possible 2 No predrill in center stud ...

Page 19: ... and push through drilled hole Using a phillips screw driver tighten bolt to secure Hang Track to wall FOR CONCRETE INSTALLATION Insert five anchors into 1 4 in holes Align the Hang Track holes with anchors in wall Using a screw driver secure track by inserting a panhead screw into each hole 2 5x A B 5x 1x 4x EE CC CC CC CC AA AA AA AA AA BB BB BB BB BB CC CC CC PLEASE NOTE Depending on track plac...

Page 20: ... 4 Attach 3 standards to the Hang Track by positioning each piece into the top groove as shown Space standards equal distance apart and at a minimum 2 from the end of the handtrack making sure that the end of a shelf is no more than 6 unsupported by a bracket from the edge A 3x A A B B B B ...

Page 21: ...osetmaid com www closetmaid ca 5 A B C D 3x 3x B B B B B A C C C C C D D D D D Attach standards B and D by using standard extenders C by sliding in the standard extenders into the slots as shown Mark holes for drilling making sure the the standards are level A ...

Page 22: ...ors if installing on a concrete wall or toggle bolts if installing on drywall Secure each standard to wall using recommended hardware as shown in previous drywall and concrete illustration Use a phillips screw driver to tighten each panhead screw or bolt A CC AA BB 9x 9x A B C D C D C D B B EE x9 AA BB CC x9 DRYWALL CONCRETE x9 x9 EE 9x ...

Page 23: ...23 2019 ClosetMaid LLC Ocala FL 34471 1 800 874 0008 www closetmaid com www closetmaid ca 7 Insert shelf brackets into standards at desired height for each shelf A 12x A A B B B B E E ...

Page 24: ...24 3 2019 ClosetMaid LLC Ocala FL 34471 1 800 874 0008 www closetmaid com www closetmaid ca 8 C A B DD x40 DD DD DD DD DD 40x 4x E E A F F F B B B ...

Reviews: