


4
Connections
1. Install the ARM motorised microphone as per separate instructions given with
the product.
2. Ensure that the Control box power supply is
NOT
switched on until all wiring
and connections have been completed.
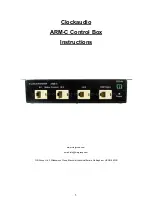
3. Connect the ARM motorised microphone plug/s to any of the M1
– M4 motor
outlet ports on the Control box. It does not matter which port is used as they are
connected in parallel.
4. Connect the DSP logic signal output terminals to the DSP input socket on the
Controller box. Use the Link port to connect to other Control boxes.
5. Connect the microphone audio output cable to your mixer / DSP.
6. Power up the DSP and check that the programming has been set for use on the
ARM using +2.5V to +12V logic high to raise the microphone. The microphone
should be muted whilst in the upward or downward transition to prevent
unwanted motor noise pickup (3 second transition).
7.
Connect the 12V DC power supply to the DC +/- input terminals of the Controller
box observing the correct polarity
Warning under no circumstances connect or disconnect an ARM
microphone with the ARM C box powered up. Failure to do so may
cause erratic operation.
-
+
8. Turn on the DC supply to the controller box. The coloured power indicator will
illuminate confirming that a supply is present. The motorised microphone may
initially very slowly fully extend and then retract. This is normal as it will be auto-
calibrating.


