background image

HCS Optional Features User Manual

15

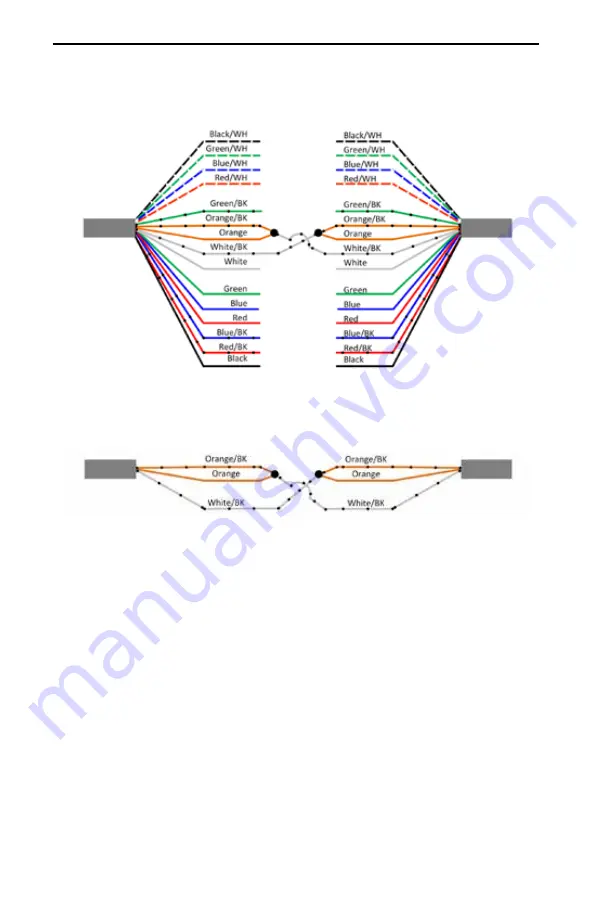
Figure 5: Share2: 15 Wire Harness

Two-station wiring for Share2 (15 Wire Harness)

15 Wire Harness Simplified

15 Wire 

Harness

15 Wire 

Harness

15 Wire 

Harness

15 Wire 

Harness

HCS #1

HCS #2

HCS #1

HCS #2

Verify Share2 Function is Working Properly

After wiring is complete use a DC volt meter to test functionality. 

Connect the volt meter negative lead to ground, then connect the 

volt meter positive lead to the White/BK wire. A measurement 

greater than 4V DC should be seen when a vehicle is not connected 

or not charging. A voltage less than 1V DC will be measured on the 

White/BK wire when a vehicle is charging. 

 NOTE:

 There is a 5 second delay once one vehicle stops  


charging before the White/BK wire returns to greater than  


4V DC and an additional 10 seconds before full circuit  


power will be available to the other vehicle.

Summary of Contents for HCS 1

Page 1: ...ClipperCreek Inc Innovative Infrastructure for Electric and Hybrid Vehicles Model HCS HCS Optional Features User Manual KEEP THIS MANUAL Use in conjunction with the HCS User Manual...

Page 2: ...y may void the product warranty Contact a Customer Service Representative with any questions about the use of this product 877 694 4194 WARNING This product can expose you to chemicals including Carbo...

Page 3: ...Share2 Operating Instructions 17 COSMOS Load Management Enabled HCS 19 COSMOS Wiring Instructions 15 Wire Harness 20 COSMOS Wiring Instructions 8 or 10 Wire Harness 22 COSMOS Digital Interface Connect...

Page 4: ...face 15 Wire 21 11 COSMOS Serial and Digital Interface 8 or 10 Wire 23 12 COSMOS Power Level Wiring 15 Wire 25 13 COSMOS Power Level Wiring 8 or 10 Wire 27 14 COSMOS ChargeGuard EX Controls 15 Wire 30...

Page 5: ...ons equipment etc could affect operation If interference to the EVSE is suspected the following steps should be taken before consulting a ClipperCreek Sales or Service Representative for assistance 1...

Page 6: ...instructions provided in the HCS User Manual This manual provides information on configuring and operating optional features such as ChargeGuard Share2 and COSMOS included with some HCS models A digit...

Page 7: ...nalities would best suit specific requirements Contact a Customer Service Representative at 877 694 4194 for additional information Installation instructions for each expanded functionality follow Tab...

Page 8: ...ning the communication wires When using Share2 HCS stations can be placed up 100 feet 30 5 m apart ClipperCreek utilizes 24 AWG American Wire Gauge Belden cable for the communication harness Other 24...

Page 9: ...tch located on the right side of the HCS EVSE b Turn the key 90 clockwise to the vertical position as shown in the Figure 1 c The CHARGING LED light will illuminate green on the front panel indicating...

Page 10: ...ey c If a vehicle is connected and charging that vehicle will continue to charge as long it remains connected to the EVSE d Once the vehicle is disconnected from the EVSE the EVSE will require the key...

Page 11: ...Share2 option is desired to work in conjunction with the ChargeGuard option these two options must be ordered and built at the same time Share2 and ChargeGuard are factory installed options and cannot...

Page 12: ...EVSE is ON and ready to charge a vehicle When the wires are disconnected the station is OFF and requires a valid activation through the access control system in order to begin charging again Refer to...

Page 13: ...enabled HCS EVSE 1 Connect the HCS EVSE to the vehicle with the SAE J1772 connector 2 Enable charging by using access control 3 The CHARGING LED light will illuminate green on the front panel indicat...

Page 14: ...erent color wires so it is important to follow the correct instructions per 15 8 or 10 wire counts CAUTION DO NOT STRIP WIRES THAT ARE UNUSED ATTENTION NE PAS D POUILLER LES FILS INUTILIS S ATENCI N N...

Page 15: ...t functionality Connect the volt meter negative lead to ground then connect the volt meter positive lead to the White BK wire A measurement greater than 4V DC should be seen when a vehicle is not conn...

Page 16: ...X X X BLUE BROWN WHITE BLUE BROWN WHITE Figure 6 Share2 8 or 10 Wire Harness Verify Share2 Function is Working Properly After wiring is complete use a DC volt meter to test functionality Connect the v...

Page 17: ...1 or HCS 2 with the corresponding SAE J1772 connector Vehicle 1 will have access to the full power available through that circuit 2 Connect Vehicle 2 to the remaining EVSE with the SAE J1772 connector...

Page 18: ...Half Circuit Power Available 50 Vehicle 2 Half Circuit Power Available 50 Figure 8 Share2 Connect Vehicle 2 HCS 1 HCS 2 Vehicle 1 Not Charging 0 Vehicle 2 Full Circuit Power Available 100 Figure 9 Sh...

Page 19: ...l Interface 2 The Serial Interface if the Serial Interface is used it will take precedence over the Digital Interface The COSMOS enabled EVSE will have either a 15 8 or 10 wire harness Please refer to...

Page 20: ...utput Interface Wire Color Ratings Isolated Ground Input Black WH Ground TxD Output Green WH RxD Input Blue WH Isolated 3 3 5V Input Red WH 3 3 5V DC 20mA Ground Output Green BK Ground Load Management...

Page 21: ...HCS Optional Features User Manual 21 Figure 10 COSMOSSerial and Digital Interface 15 Wire Digital Interface Serial Interface Isolated UART Optional Application Features...

Page 22: ...ound Input Black Ground TxD Output Yellow RxD Input Orange Isolated 3 3 5V Input Red 3 3 5V DC 20mA Ground Output Green Ground Load Management 0 Input Blue 5V DC Load Management 1 Input Brown 5V DC Op...

Page 23: ...llow TxD Orange RxD Red Isolated 3 3 5V DC Green Ground Blue Load Management 0 Brown Load Management 1 White Open Collector Output 0 Grey ChargeGuard Enable Blue LED2 or B Button Violet External Activ...

Page 24: ...determined by the Digital Interface If Serial Communication is lost for a period of 10 seconds or greater the EVSE operation will revert to the Digital Input Condition An active Serial Interface take...

Page 25: ...Input Load Management 0 Load Management 1 Power Level Color Orange BK Orange Not Grounded Not Grounded 100 Grounded Grounded 50 Not Grounded Grounded 25 Grounded Not Grounded 0 Off State of max contin...

Page 26: ...puts are designed to be compatible with the 12V 1k Load Management High Low or High Off input terminal of the ClipperCreek CS series products as well as the 5V 10k Load Management 0 or Load Management...

Page 27: ...ng for 25 Power Level Black Yellow Orange Red Green Blue Brown White Wiring for 0 Power Level OFF Table 7 COSMOSLoad Management Digital Inputs 8 or 10 Wire Power Level is returned from a lower power s...

Page 28: ...l of the ClipperCreek CS series products as well as the 5V 10k Load Management 0 or Load Management 1 of another ClipperCreek HCS equipped with the COSMOS interface This output operates as shown in Ta...

Page 29: ...unit can be enabled with items such as 1 An RFID key card 2 An External button 3 A Remote connection The two harnesses have different color wires so it is important to follow the correct instructions...

Page 30: ...9 and shown in the Figure 15 Figure 15 Enable COSMOS ChargeGuard EX 15 Wire COSMOS ChargeGuard EX Activation Instructions 15 Wire 1 Connect the charge cord to the vehicle 2 Momentarily 0 1 second grou...

Page 31: ...failure one charge session will be allowed to accommodate for power outages Figure 16 COSMOS ChargeGuard EX Controls 10 Wire Figure 17 Enable COSMOS ChargeGuard EX 10 Wire Table 10 COSMOS ChargeGuard...

Page 32: ...to ground Green and Grey This activation will make the station available for charging until it is disconnected from the vehicle This allows for higher vehicle functionality such as delayed charging an...

Page 33: ...s printed on the label on the side of the HCS enclosure If a call is made after business hours or on weekends please leave a name telephone number the unit serial number and a brief description of the...

Page 34: ...HCS Optional Features User Manual 34 This page is intentionally blank...

Page 35: ...HCS Optional Features User Manual 35 This page is intentionally blank...

Page 36: ...ClipperCreek Inc 11850 Kemper Rd Suite E Auburn CA 95603 www ClipperCreek com 877 694 4194...

Reviews: