3
3. When DCSV-29 receives programming command from the Control Panel, the LED will first turn off,
and then turn brighter and turn dark. Material & Sensitivity level setting are now complete.
Walk Test
After the Door Contact / Shock Sensor is learned-in, place the Control Panel into (
Walk Test
) mode,
hold the Door Contact / Shock Sensor in the desired location, and press the Test Button to transmit test
signal to Control Panel. If the Control Panel is within Door Contact / Shock Sensor signal range, the
panel will display Door Contact / Shock Sensor information accordingly.
Proceed with mounting and installation once you are satisfied that the Door Contact / Shock Sensor
functions properly in the desired location.
Installation
Mounting the Door Contact / Shock Sensor
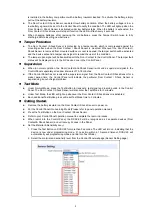
Mounting as Door Contact:
The Door Contact / Shock Sensor should be installed with the rib-marked side facing the magnet.
The distance between Door Contact / Shock Sensor and the magnet should be no more than 15 mm
when the door is closed.
Mount the device as high as possible.
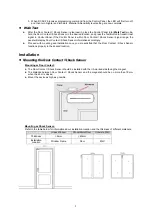
Mounting as Shock Sensor:
Refer to the table below for information about installation location and the thickness of different materials:
Glass Window
Wood/Metal Door
Concrete Wall
Thickness
>5mm
<40mm
-
Installation
Location
Window Frame
Door
Wall


