background image

Disassembly

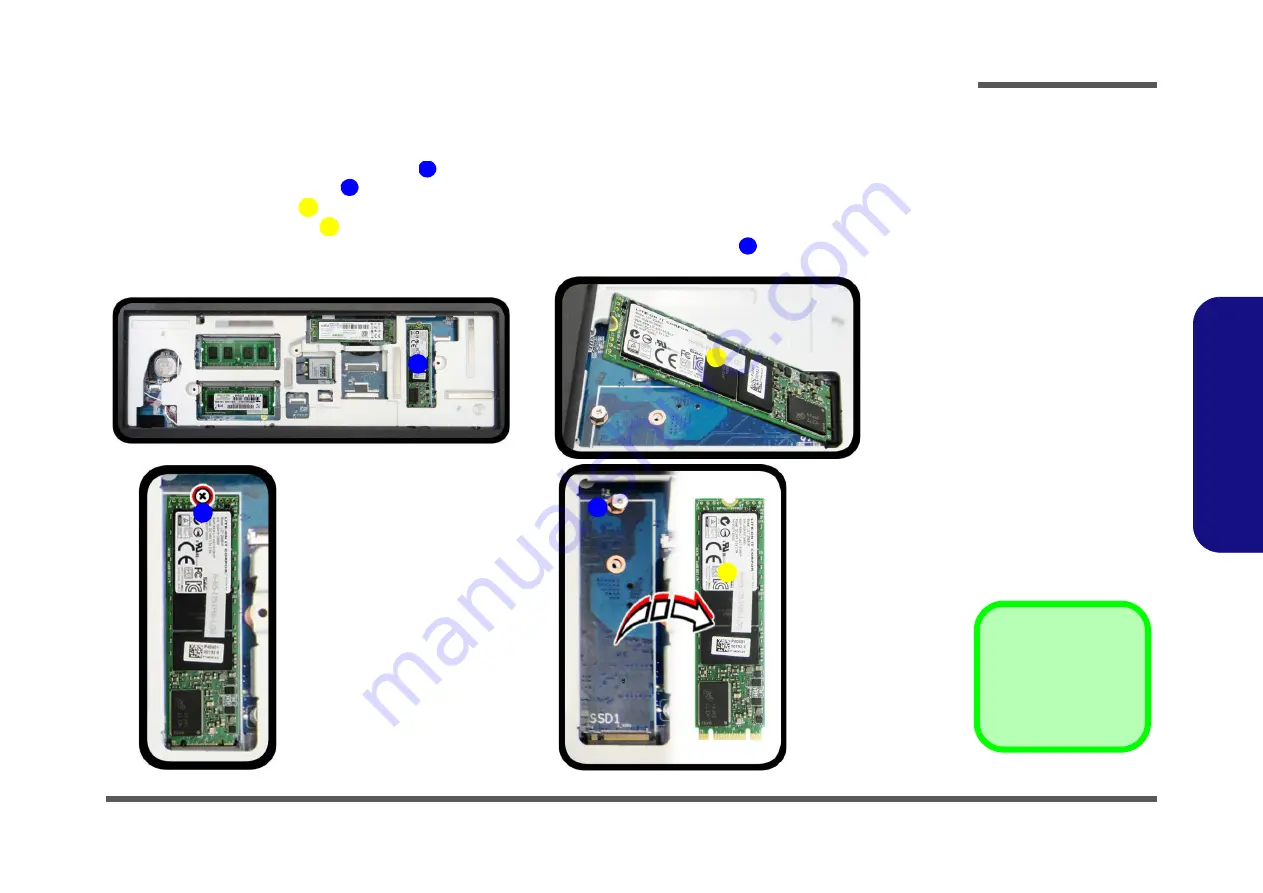
Removing the M.2 SSD-1 Module 2 - 23

2.Disassembly

Removing the M.2 SSD-1 Module

1.

Turn 

off

 the computer, remove the battery (

page 2 - 5

), and component bay cover (

page 2 - 10

).

2.

Locate the module; it is visible at point 


(

Figure 17a

)

.

3.

Carefully remove the screw 

 from the module 

(

Figure 17b

)

.

4.

The M.2 SSD module 

 will pop-up (

Figure 17c

)

.

5.

Lift the M.2 SSD module 

 up and off the computer (

Figure 17d

)

.

6.

Reverse the process to install a new module (make sure that the hexagonal screw 


is in the correct location).

Figure 17

 M.2 SSD-1 Module 

Removal 


a. Locate the module.
b. Remove the screw.
c. The module will pop-up.
d. Lift the module up off  the

socket.

1

2

6

3

6

3

4

a.

b.

1

3

2

3

c.

d.

4

3. M.2 SSD Module

1  Screw

Summary of Contents for P870DM

Page 1: ...P870DM P870DM G ...

Page 2: ...le or in part be reproduced translated transmitted or reduced to any machine readable form without prior consent from the vendor manufacturer or creators of this publica tion except for copies kept by the user for backup purposes Brand and product names mentioned in this publication may or may not be copyrights and or registered trademarks of their respective companies They are mentioned for ident...

Page 3: ...void using a telephone other than a cordless type during an electrical storm There may be a remote risk of elec trical shock from lightning 3 Do not use the telephone to report a gas leak in the vicinity of the leak 4 Use only the power cord and batteries indicated in this manual Do not dispose of batteries in a fire They may explode Check with local codes for possible special disposal instruction...

Page 4: ... down properly and don t forget to save your work Remember to periodically save your data as data may be lost if the battery is depleted Do not expose the computer to any shock or vibration Do not place it on an unstable surface Do not place anything heavy on the computer Do not expose it to excessive heat or direct sunlight Do not leave it in a place where foreign matter or mois ture may affect t...

Page 5: ...be sure to disconnect it by the plug head not by its wire Make sure the socket and any extension cord s you use can support the total current load of all the connected devices Before cleaning the computer make sure it is disconnected from any external power supplies Use only approved brands of peripherals Unplug the power cord before attaching peripheral devices Do not plug in the power cord if yo...

Page 6: ...ur hands or metal objects Battery Guidelines The following can also apply to any backup batteries you may have If you do not use the battery for an extended period then remove the battery from the computer for storage Before removing the battery for storage charge it to 60 70 Check stored batteries at least every 3 months and charge them to 60 70 Battery Disposal The product that you have purchase...

Page 7: ...the computer e g keyboard and mouse to their ports 5 Attach the AC DC adapter to the DC In jack at the rear of the computer then plug the AC power cord into an outlet and connect the AC power cord to the AC DC adapter make sure you use the adapter when first setting up the computer as to safe guard the computer during shipping the battery will be locked to not power the system until first con nect...

Page 8: ...ogy NVIDIA GeForce GTX 980 PCIe Video Card 8GB GDDR5 Video RAM LCD Options 17 3 43 94cm 16 9 QFHD 3840x2160 FHD 1920x1080 Core Logic Intel Z170 Chipset BIOS AMI BIOS 64Mb SPI Flash ROM Memory Four 260 Pin SO DIMM Sockets Supporting DDR4 2133MHz Memory The real memory operating frequency depends on the FSB of the processor Memory Expandable from 4GB minimum up to 64GB maximum Pointing Device Built ...

Page 9: ...h 4 0 Factory Option Intel Wireless AC 3165 Wireless LAN 802 11ac Bluetooth 4 0 Factory Option Intel Wireless AC 8260 Wireless LAN 802 11ac Bluetooth 4 1 Factory Option Qualcomm Atheros Killer Wireless AC 1535 Wireless LAN 802 11ac Bluetooth 4 1 Factory Option Third Party Wireless LAN 802 11b g n Bluetooth 4 0 Card Reader Embedded Multi In 1 Push Push Card Reader MMC MultiMedia Card RS MMC SD Secu...

Page 10: ...roduction External Locator Top View with LCD Panel Open Figure 1 Top View 1 PC Camera 2 PC Camera LED 3 Built In Array Microphone 4 LCD 5 Speakers 6 Power Button 7 LED Indicators 8 Keyboard 9 TouchPad and Buttons 10 Fingerprint Reader Optional 2 1 8 9 7 6 5 4 5 3 10 3 7 ...

Page 11: ...nal Locator Front Right side Views Figure 2 Front Views 1 LED Power Indicators 2 Vents Figure 3 Right Side Views 1 Multi in 1 Card Reader 2 USB 3 0 Port 3 USB 3 1 Port Thunderbolt Port 4 Mini Display Port 2 5 Mini Display Port 1 6 Security Lock Slot 1 Front 2 2 Right 1 2 3 4 5 6 ...

Page 12: ...Left Side Rear View Figure 4 Left Side View 1 RJ 45 LAN Jacks 2 USB 3 0 Ports 3 Powered USB 3 0 Port 4 Line In Jack 5 Microphone Jack 6 Headphone Jack 7 S PDIF Out Jack 3 4 1 1 2 Left 2 5 6 7 Figure 5 Rear View 1 Vent Fan Intake 2 HDMI Out Port 3 USB 3 0 Port 4 DC In Jack Rear 4 1 2 3 1 ...

Page 13: ...m View 1 7 1 Introduction External Locator Bottom View Figure 6 Bottom View 1 Vents 2 Sub Woofer Overheating To prevent your com puter from overheating make sure nothing blocks the vent fan in takes while the com puter is in use 2 1 1 1 ...

Page 14: ...c ing the connection make sure the connector is oriented in the same way The pin1 side is usually not indicated Pressure sockets for multi wire connectors To release this connector type grasp it at its head and gently rock it from side to side as you pull it out Do not pull on the wires themselves When replacing the connection do not try to force it The socket only fits one way Pressure sockets fo...

Page 15: ...o not pull on the wire 6 Peripherals Turn off and detach any peripherals 7 Beware of static discharge ICs such as the CPU and main support chips are vulnerable to static electricity Before handling any part in the computer discharge any static electricity inside the computer When handling a printed circuit board do not use gloves or other materials which allow static electricity buildup We suggest...

Page 16: ...e 2 5 2 Remove the keyboard page 2 12 3 Remove the system memory page 2 13 To remove and install the Video Card 1 Remove the battery page 2 5 2 Remove the video card 2 page 2 14 2 Remove the video card 1 page 2 15 2 Remove the video card 3 page 2 16 3 Install the video card page 2 17 To remove and install the Processor 1 Remove the battery page 2 5 2 Remove the video card page 2 14 3 Remove the pr...

Page 17: ...ws Figure 1a 3 Carefully lift the bottom case up in the direction of the arrow and remove it Figure 1b 4 The battery will be visible at point on the computer Figure 1c 1 9 10 11 12 Figure 1 Battery Removal a Remove the screws b Remove the bottom case c Locate the battery 2 a b 3 4 5 10 12 6 7 9 c 10 1 8 11 10 Bottom Case 9 Screws ...

Page 18: ... bottom case starting from point as shown Figure 2f to avoid damaging the rear eSATA USB 3 0 port Tighten the screws to secure the bottom case in place 13 16 17 18 Figure 2 Battery Removal cont d d Remove the screws e Lift the battery off the computer f Reinsert the bottom case and tighten the screws d e 17 13 14 16 15 18 f 18 17 Battery 4 Screws ...

Page 19: ...omputer and remove the battery page 2 5 2 The HDD s will be visible at point on the mainboard Figure 3a 3 Remove screws from the HDD assembly Figure 3b Figure 3 HDD Assembly Removal a Locate the HDD b Remove the screws 2 Screws 1 2 3 HDD System Warning New HDD s are blank Before you begin make sure You have backed up any data you want to keep from your old HDD You have all the CD ROMs and FDDs req...

Page 20: ...ote that the hard disks pictured on the following pages are all 7mm h hard disk drive There are two hard disk drive options Two changeable 2 5 6cm 7 0mm h SATA Serial Hard Disk Drives Solid State Drives SSD supporting RAID level 0 1 Or One changeable 2 5 6cm 9 5mm h SATA Serial Hard Disk Drive Solid State Drive SSD For more information contact your distributor supplier and bear in mind your warran...

Page 21: ... on these pages are all 9 5mm H hard disk drives In some cases 7mm H hard disk drives will be installed Figure 5 Foam Rubber Insert for 7mm H HDDs If you are replacing a 9 5mm H HDD with a 7mm H HDD then insert the foam rubber insert If you are replacing a 7mm H HDD with a 9 5mm H HDD then remove the foam rubber insert HDD 2 HDD 1 ...

Page 22: ... user upgradable If you are installing only two RAM modules then they should be installed in the primary memory sockets under the component bay cover Note that the RAM located under the keyboard is not user upgradable Memory Upgrade Process 1 Turn off the computer and turn it over remove the battery page 2 5 2 The modules will be visible at point Figure 6a 3 Gently pull the two release latches on ...

Page 23: ...d as far into the slot as it will go DO NOT FORCE the module it should fit without much pressure 8 Press the module in and down towards the mainboard until the slot levers click into place to secure the module 9 Replace the bay cover and screws 10 Restart the computer to allow the BIOS to register the new memory configuration as it starts up Contact Warning Be careful not to touch the metal pins o...

Page 24: ...d If you are installing only two RAM modules then they should be in stalled in the primary memory sockets under the component bay cover Memory Upgrade Process 1 Turn off the computer and turn it over remove the battery page 2 5 2 Remove the screw Figure 7a 3 Open it up with the LCD on a flat surface before pressing at point to release the keyboard module use an eject stick with a diameter no bigge...

Page 25: ...it to only fit one way Make sure the module is seated as far into the slot as it will go DO NOT FORCE the module it should fit without much pressure 12 Press the module in and down towards the mainboard until the slot levers click into place to secure the module 13 Replace the keyboard bay cover and screws 14 Restart the computer to allow the BIOS to register the new memory configuration as it sta...

Page 26: ... Carefully disconnect cables then remove screw from the module socket Figure 16b 4 The Wireless LAN module will pop up Figure 16c 5 Lift the Wireless LAN module Figure 16d up and off the computer 1 2 3 4 5 5 b a d 2 3 5 c 4 1 5 WLAN Module 1 Screw Figure 16 Wireless LAN Module Removal a The Wireless LAN mod ule will be visible at point under the keyboard b Disconnect the cables and remove the scre...

Page 27: ...E modules are not labelled The cables covers each cable will have either a black or transparent cable cover are color coded for iden tification as outlined in the table below Cable 1 is usually connected to antenna 1 Main on the module and cable 2 to antenna 2 Aux Module Type Antenna Type Cable Color Cable Cover Type WLAN WLAN Bluetooth Combo WM 1 Black Transparent WM 2 Gray WM 3 White ...

Page 28: ...move the screw from the module Figure 17b 4 The M 2 SSD module will pop up Figure 17c 5 Lift the M 2 SSD module up and off the computer Figure 17d 6 Reverse the process to install a new module make sure that the hexagonal screw is in the correct location Figure 17 M 2 SSD 1 Module Removal a Locate the module b Remove the screw c The module will pop up d Lift the module up off the socket 1 2 6 3 6 ...

Page 29: ...SSD Figure 18a 4 The M 2 SSD module will pop up Figure 18b 5 Lift the M 2 SSD module up and off the computer Figure 18c 6 Reverse the process to install a new module make sure that the hexagonal screw is in the correct location depending upon the size of the module 3 M 2 SSD Module 1 Screw Figure 18 M 2 SSD 2 Module Removal a Locate the module b Remove the screws c The module will pop up d Lift th...

Reviews: