background image

2

INSTRUCTIONS FOR SUPERVISING ADULTS:

 this toy is suitable for children aged 8 years and over. Adult 

supervision is recommended during assembly and when handling and installing electrical components.

INSERTING THE BATTERIES


Ask an adult for help!

Power supply:

 6V DC 

Batteries:

 4 x 1.5V AA/LR6

Batteries not included. 

OTHER RECOMMENDATIONS: 


• Batteries are dangerous if swallowed; keep away from children. 

• Always remove batteries prior to long-term storage.

• Do not try to open the batteries. 

• Do not throw batteries into a fire.

INSTRUCTIONS FOR BATTERY DISPOSAL

The symbol indicates that dead batteries must be disposed of in accordance with current regulations 

for waste disposal. Chemical symbols for mercury (Hg), cadmium (Cd) and/or led (Pb) which appear 

below the crossed out wheelie bin symbol indicate that there is a significant percentage of the relative 

substance in the battery. These substances are highly damaging to the environment and human health. The 

correct disposal of batteries allows their isolation and the targeted treatment of harmful substances, and 

allows recycling of precious primary materials, reducing negative effects on persons and the environment. 

The disposal of worn-out batteries in landfills or the environment significantly increases the risk of water 

pollution. Pursuant to European Directive 2013/56/EU, it is prohibited to dispose of batteries and accumulators 

as urban waste and consumers are obliged to participate in separated waste collection so as to facilitate the 

treatment and recycling of the same.

INSTRUCTIONS FOR CORRECT USE OF PRODUCTS WITH REPLACEABLE BATTERIES


WARNING!  

• Batteries must be installed by an adult. 

• The + and - symbols on the batteries must be lined up correctly. 

• Old batteries must be removed from the product. 

• The power terminal block must not be short-circuited.

• Never touch the contacts inside the battery case, as this could cause a short circuit. 

• The rechargeable batteries must be removed prior to being charged. Only recharge under adult supervision. 

• Never attempt to recharge non-rechargeable batteries. 

• Different types of batteries or new and used batteries should not be used at the same time.

REMOVING AND INSTALLING THE BATTERIES


Make sure that the equipment is switched off.

1

 Use a screwdriver to loosen the screw that secures the cover to the battery chamber.

Remove the old batteries.

Insert (4 x 1.5V AA/LR6). Make sure the positive and negative ends of the batteries match the direction indi-

cated on the battery chamber.

The batteries must be inserted by an adult.

Close the battery chamber and tighten the screw.

Make sure that the equipment is working properly.

Summary of Contents for Science & Play TechnoLogic Mechanics Laboratory 75025

Page 1: ...In order to ensure correct function of the electric motor a small quantity of grease is added during the manufacturing process As grease can melt at high temperatures it may dirty the motor However i...

Page 2: ...r the environment significantly increases the risk of water pollution Pursuant to European Directive 2013 56 EU it is prohibited to dispose of batteries and accumulators as urban waste and consumers a...

Page 3: ...its life It is therefore important for each user to be aware of their role and to always dispose of electrical electronic waste in accordance with current legislation thereby contributing to the corr...

Page 4: ...peg 32 pcs Short single peg 32 pcs Long single peg 32 pcs Cogwheel with 10 teeth 1 pc Cogwheel with 18 teeth 5 pcs Cogwheel with 26 teeth 1 pc Cogwheel with 41 teeth 1 pc Double beam 11 holes 4 pcs Do...

Page 5: ...n the assembly steps different icons indicate when the model needs to be rotated when to tighten the pieces when to use a beam with pins or one with pegs WARNING Take care when detaching the parts fro...

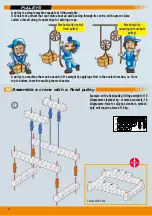
Page 6: ...y is a machine that can be used to lift a weight by applying effort in the easier direction i e from top to bottom therefore making the work easier Mechanically neutral fixed pulley Mechanically advan...

Page 7: ...X8 4 X1 X2 X1 X1 X1 X1 X2 X1 X4 X1 X1 X3 X1 3 2 Cutapieceofstringofasuitablelength Fastenoneendofthepieceofstringtothe spoolthroughthehole Passitoverthe pulleyandtietheotherendtothehook Final assemble...

Page 8: ...Example in this case lifting a weight of 10 kilogrammes symbol kg or more accurately 10 kilogramme force for all you scientists symbol kgf will require a force of 5 kg It is a simple machine that pro...

Page 9: ...X6 X1 X1 X2 X4 2 Cutapieceofstringofa suitablelength Fastenoneendofthepiece ofstringtothespoolthrough theholeandthenpassitover thepulleys Tietheotherendtotherodas showninthefinalassembled model Final...

Page 10: ...in Activity 2 This is a way of transmitting motion remotely The two pulleys the drive pulley and the driven pulley are connected by a belt which can be made of leather or rubberised fabric Final asse...

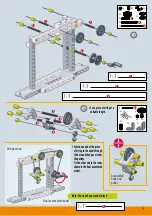
Page 11: ...speed of rotation of the motor axle Electric motor switch Sliding the switch to the central position turns the motor OFF Sliding the switch to the side positions turns the motor ON Connecting the batt...

Page 12: ...12 2 4 3 X1 X1 X2 X4 X4 X8 X4 X2 X2 X1 Assembled motor...

Page 13: ...13 5 90 6 90 1 1 3 1 1 5 3 5 41 10 X1 X1 X1 X2 X3 X4 X3 X2 X1 X3 X2 X1 X1 X1 X1 3 5 41 10...

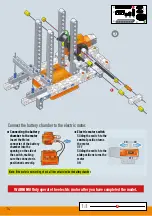
Page 14: ...motor ON Connecting the battery chamber to the motor Insert the Molex connector of the battery chamber into the opening on the side of the switch making sure the connector is positioned correctly WARN...

Page 15: ...15 8 9 1 1 6 6 6 X4 X4 X4 X6 X2 6 Slide four collars onto the rear rod two on the inside of the frame and two on the outside Front Bottom of the assembled crane...

Page 16: ...16 10 11 12 3 3 1 1 3 X4 X7 X2 X1 X1 X2 X4 X8 X8 X2 X3 X2 X2 X2 X4 3 Top of the assembled crane...

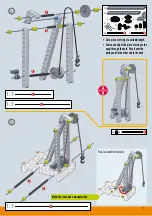
Page 17: ...overthepulleysandtiethe otherendtothehook Technical and scientific information The tower crane has an electric motor winch which raises or lowers the weight The electric motor which converts electrica...

Page 18: ...l assembled model Electric motor switch Sliding the switch to the central position turns the motor OFF Sliding the switch to the side positions turns the motor ON Hook stop Take care when operating th...

Page 19: ...19 1 1 1 2 3 3 3 X6 X1 X2 3 X2 X1 X4 X2 X4 X4 Assembled base 46 In the gym with a barbell...

Page 20: ...20 3 4 5 1 1 2 2 3 3 1 1 6 6 1 1 3 X6 X2 X1 2 3 X10 X1 X1 6 X1 X1 X1 Final assembled model...

Page 21: ...21 1 2 2 2 1 1 2 3 1 1 3 3 3 3 2 X16 X2 X4 X1 X1 X2 3 Final assembled model Base assembled in Activity 5 47 In the gym with a barbell...

Page 22: ...22 1 2 3 2 2 26 3 1 1 1 3 2 1 1 2 1 1 1 X1 X1 X1 X2 X1 X2 X2 X4 X2 X2 X2 3 2 26 X1 X1 X1 X2 X2 X3 3 X1 2 X1 X1 1 48 Assemble an exercise bike...

Page 23: ...1968 The bike without wheels found in homes and gyms around the world is a recent invention The mastermind behind it was American inventor Keene P Dimick who came up with the idea of a stationary bik...

Page 24: ...of the aeroplane the shape of the wing section and the density of the air Lift is generated by the air particles above the wing moving faster than those below creating a lower pressure over the top s...

Page 25: ...25 3 4 1 1 1 1 3 3 3 A 3 1 1 2 1 2 1 1 X1 X1 X2 X2 X2 X2 X1 X2 X6 3 2 1 X2 X2 X1 X1 X1 X2 X2 X3 X1 3 Collar serves to secure the rod of the propeller once you have inserted it into the aeroplane A...

Page 26: ...with two propellers wingspan 12metres length 6 50 metres and weight 275 kg Their first flight lasted 12 seconds during which time they travelled 36 metres at a height of 3 metres 1927 The first New Yo...

Page 27: ...generate lift see the Technical and scientific information for Activity 49 and as a propeller to provide thrust or drive As the main rotor turns in a clockwise direction for example a counter force i...

Page 28: ...28 3 4 1 1 4 4 18 X6 X1 X2 X1 X2 X2 X2 X1 X1 4 18 Front...

Page 29: ...29 5 6 1 1 3 3 3 X1 X1 X1 X1 X3 X1 X1 X2 X2 3 X1 X1 X1 X1 X1 X1 X2 Front components...

Page 30: ...30 1 1 1 1 7 8 6 6 2 2 6 X2 X1 X1 X4 X1 X3 X1 X1 2 X8 X2 X2 X2 X2 X2 X4 X4 6 X4 Assembled helicopter base and landing skids Assembled tail rotor...

Page 31: ...31 9 1 1 4 4 41 X4 X1 X1 X1 X4 X2 X1 4 41 Assembled helicopter rotor and blades...

Page 32: ...ter French engineer Paul Cornu built a machine with propellers on independent axles The helicop ter lifted the Frenchman 30 centimetres off the ground for about 20 seconds 1925 Dutch inventor Albert G...

Reviews: