background image

CB780/CB784 RELAY MODULES

32-00207—01

26

Selectable Site-Configurable 
Jumpers

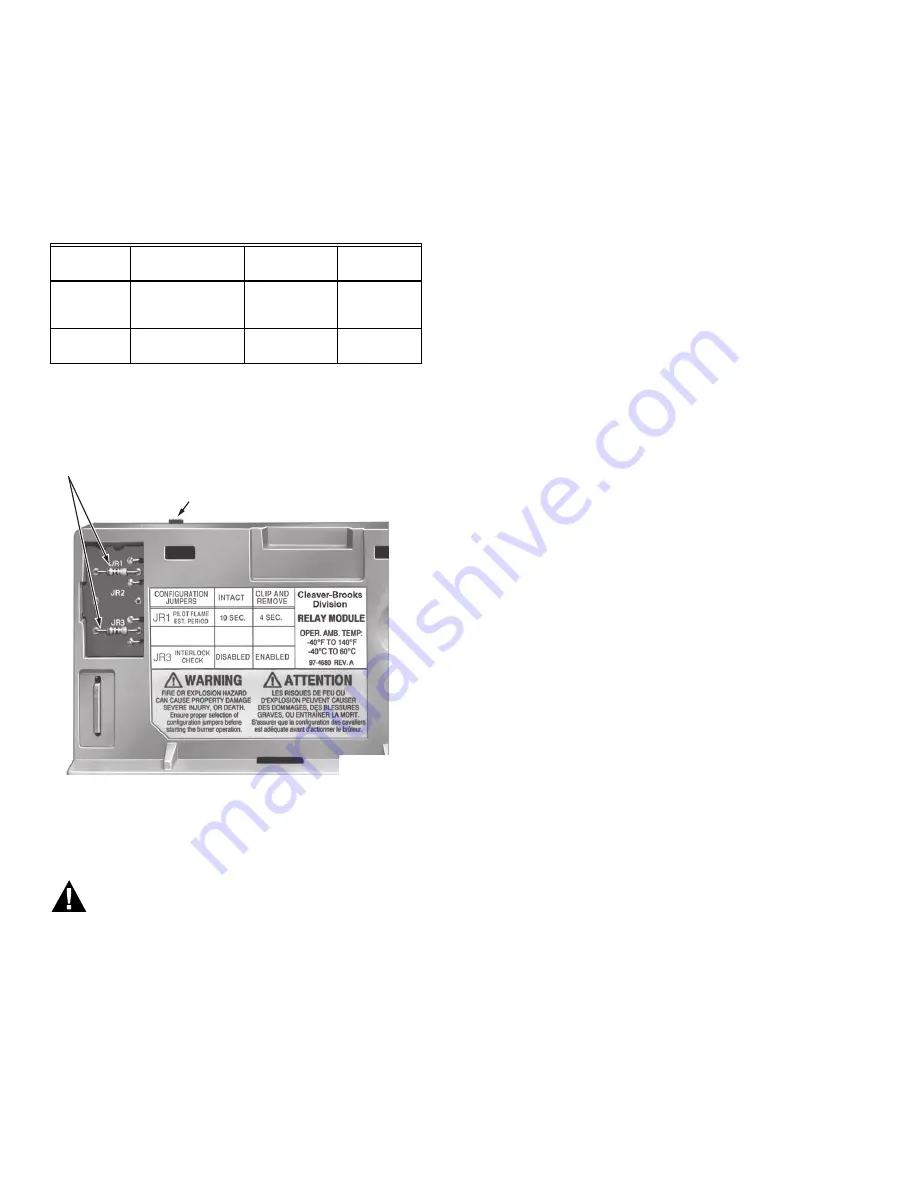
The CB780/CB784 has two site-configurable jumper 
options; see Fig. 24 and Table 7. The site-configurable 
jumpers should be clipped with side cutters and the 
resistors removed from the Relay Module. 

Table 7. Site Configurable Jumper Options.

NOTE:

For all standard installations, these jumpers 
should be left intact, unless otherwise indicated 
on wiring diagram. Removal after 200 hours of 
operation will result in a hard lockout, Code 110.

Fig. 23. Selectable site-configurable jumpers.

STATIC CHECKOUT

WARNING

Electrical Shock Hazard and Explosion Hazard.
Can cause severe injury, death or property 
damage.

1.  Use extreme care while testing the system. Line 

voltage is present on most terminal connections 
when power is on.

2.  Open the master switch before installing or 

removing a jumper on the subbase. 

3.  Before continuing to the next test, be sure to 

remove test jumper(s) used in the previous test. 

4.  Replace all limits and interlocks that are not 

operating properly. Do not bypass limits and 
interlocks.

5.  Close all manual fuel shutoff valve(s) before 

starting these tests. 

After checking all wiring, perform this checkout before 
installing the CB780/CB784 on the subbase. These tests 
verify the Wiring Subbase is wired correctly, and the 
external controllers, limits, interlocks, actuators, valves, 
transformers, motors and other devices are operating 
properly. 

NOTE:

Do not perform a dielectric test with 
theCB780/CB784 installed. Internal surge pro-
tectors will break down and conduct a current. 
This could cause the CB780/CB784 to fail the 
dielectric test or possibly destroy the internal 
lightning and high current protection. 

Equipment Recommended

1.

Voltmeter (1 megohm/volt minimum sensitivity) set 
on the 0-300 Vac scale. 

2.

Two jumper wires; no. 14 wire, insulated, 12 inches 
(304.8 mm) long with insulated alligator clips at 
both ends. 

General Instructions

1.

Perform all applicable tests listed in Static Checkout, 
Table 8, in the order listed. 

2.

Make sure all manual fuel shutoff valve(s) are closed.

3.

Raise the setpoint of the operating controller to sim-
ulate a 

call for heat

4.

For each test, open the master switch and install the 
jumper wire(s) between the subbase wiring termi-
nals listed in the Test Jumpers column.

5.

Close the master switch before observing operation. 

6.

Read the voltage between the subbase wiring termi-
nals listed in the Voltmeter column.

7.

If there is no voltage or the operation is abnormal, 
check the circuits and external devices as described 
in the last column. 

8.

Check all wiring for correct connections, tight termi-
nal screws, correct wire, and proper wiring tech-
niques. Replace all damaged or incorrectly sized 
wires. 

9.

Replace faulty controllers, limits, interlocks, actua-
tors, valves, transformers, motors and other devices 
as required. 

10.

Ensure normal operation is obtained for each 
required test before continuing the checkout. 

11.

After completing each test, be sure to remove the 
test jumper(s). 

Jumper 

Number

Description

Intact

Clipped

JR1

Pilot Flame 
Establishing 
Period (PFEP)

10 seconds

4 seconds

JR3

Start-up 
Interlock Check

Disabled

Enabled

RUN/TEST SWITCH

SELECTABLE CONFIGURATION JUMPERS

M7397A

Summary of Contents for CB780

Page 1: ...B784 include automatic burner sequencing flame supervision system status indication system or self diagnostics and troubleshooting FEATURES Safety features Interlock check Closed loop logic test Dynam...

Page 2: ...t history of six most recent faults Cycles of operation at time of fault Expanded annunciator data at time of fault Fault message and code Hours of operation at time of fault Sequence status at time o...

Page 3: ...ing 40 F to 140 F 40 C to 40 C Storage 40 F to 150 F 40 C to 66 C Humidity 85 RH continuous noncondensing Vibration 0 5G environment Dimensions Refer to Fig 1 and 2 Weight CB780 CB784 1 pound 10 ounce...

Page 4: ...AF IRI acceptable Federal Communications Commission Part 15 Class B Emissions Mounting 833 2725 for panel mount Required Components CB780 120 Vac 50 60 Hz 833 2718 CB784 120 Vac 50 60 Hz 833 2720 Plu...

Page 5: ...AIN ALARM RESET 5 127 5 127 M23943C REMOVE ONLY FOR TERMINAL TEST ACCESS 1 1 5 1 4 133 BACK ENTER Edit 2 1 32 52 BURNER CONTROL 29 32 23 19 32 15 1 1 4 32 1 1 32 26 5 32 4 5 16 8 M23388C 1 2 13 7 16 1...

Page 6: ...s b Lockout Interlock opens c Ignition pilot valve intermittent pilot valve ter minal is not energized d Early Spark Termination terminal is energized after five seconds e No flame is present at end o...

Page 7: ...rwise purge timing starts when the High Fire Switch is closed This switch will also cause a hold four minutes fifteen seconds condition when the switch is open before purge or opens during purge The C...

Page 8: ...Interlock opens during the first ten seconds the purge timer will be reset This provides a continuous PURGE to occur without interruption before the Pilot Flame Establishing Period If a Lockout Inter...

Page 9: ...recommended Any other position decreases the maximum ambient temperature rating 2 The 833 2725 Wiring Subbase can be mounted directly in the control cabinet Be sure to allow ade quate clearance for se...

Page 10: ...Fig 6 Internal block diagram of the CB780 CB784 see Fig 7 8 9 or 10 for detailed wiring instructions CONFIGURATION JUMPERS MICROCOMPUTER RESET PUSHBUTTON RUN TEST SWITCH STATUS LEDs PLUG IN PURGE TIME...

Page 11: ...ignition transformer wires in the same conduit with the flame detection wiring 2 Do not route scanner wires in conduit with line voltage circuits 3 Enclose scanner wires without armor cable in metal...

Page 12: ...0 SEC INTERRUPTED PILOT IGNITION PREIGNITION INTERLOCK SERIES 90 FIRING RATE MOTOR SERIES 90 CONTROLLER 817 1742 INFRARED LEAD SULFIDE FLAME DETECTOR 817 1743 ULTRAVIOLET FLAME DETECTOR 817 1121 ULTRA...

Page 13: ...80 CB 784 RELAY MODULE 13 VDC POWER SUPPLY 833 2727 REMOTE KEYBOARD DISPLAY MODULE THREE WIRE SHIELDED CABLE MAY BE REQUIRED TWO 120 OHM TERMINATING RESISTORS ARE REQUIRED FOR CONNECTIONS OVER 100 FEE...

Page 14: ...ther than a hinge action 4 Mount the CB780 CB784 by aligning the four L shaped corner guides and knife blade terminals with the bifurcated contacts on the wiring subbase and tightening the two screws...

Page 15: ...e Keyboard Dis play Module with the two mating slots on the CB780 CB784 see Fig 13 2 Insert the two interlocking ears into the two mating slots and with a hinge action push on the lower cor ners of th...

Page 16: ...gnal Amplifier 1 Disconnect power supply before beginning installa tion to prevent electrical shock and equipment dam age More than one disconnect may be involved 2 Align the amplifier circuit board e...

Page 17: ...B780 CB784 provides a PREPURGE timing selectable from 30 seconds to 2 1 2 minutes with power applied and the CB780 CB784 operating control indicating a call for heat Running Interlocks Preignition Int...

Page 18: ...ergized for early spark termination 4 Main Flame Establishing Period MFEP a The CB780 CB784 has a selectable ten second or fifteen second MFEP After the Ignition Trials and with the presence of flame...

Page 19: ...it or a lockout message is available The CB780 CB784 LEDs provide positive visual indication of the program sequence POWER PILOT FLAME MAIN and ALARM Fig 18 Keyboard Display Module and sequence status...

Page 20: ...DELAY Low Fire Jumprd POWER PILOT FLAME MAIN AND ALARM PURGE HOLD F G Flame Detected POWER PILOT FLAME MAIN AND ALARM PURGE HOLD Low Fire Switch POWER PILOT FLAME MAIN AND ALARM PILOT IGN minutes sec...

Page 21: ...instantaneously switches the display from a second line selectable message to second line preempted message The sixty sec ond timeout function also can be used for this task The MODE pushbutton will...

Page 22: ...ion PILOT IGN 00 05 Fault History M7402C PILOT IGN 00 10 H1 Fault Cycle 174 SCROLL MODE SAVE SCROLL MODE SAVE BURNER CONTROL BURNER CONTROL LOCKOUT 17 MFEP Main Valve 0 M7403D LOCKOUT 17 MFEP Main Fla...

Page 23: ...t Hours nnnnn H2 Fault Code nnn H2 fault message H2 sequence message H2 second line msg H2 Fault Cycle nnnnn H3 Fault Hours nnnnn H3 Fault Code nnn H3 fault message H3 sequence message H3 second line...

Page 24: ...RM78nnx DI Device Suffix nnnn DI Run Test Sw RUN or TEST DI Operating Control OperControl 1 or 0 DI Interlock 1 or 0 DI Pilot Valve 1 or 0 DI Main Valve 1 or 0 DI Ignition 1 or 0 DI Low Fire Sw 1 or 0...

Page 25: ...nored during PFEP for the CB780 CB784 if terminals 8 and 9 or 9 and 21 are jumpered 5 During RUN the Run Test Switch when placed in the TEST position will drive the firing rate motor to the Low Fire p...

Page 26: ...ernal surge pro tectors will break down and conduct a current This could cause the CB780 CB784 to fail the dielectric test or possibly destroy the internal lightning and high current protection Equipm...

Page 27: ...nsformer is con nected to terminal 8 2 Automatic pilot valve opens if connected to terminal 8 NOTE Refer to wiring diagram of system being tested 1 Watch for spark or listen for buzz a Ignition electr...

Page 28: ...on and CB780 CB784 System Annunciation Diagnostics and Troubleshooting Bulletin Number CB 7803 2 Repeat ALL required Checkout tests after all adjustments are made ALL tests must be satisfied with the...

Page 29: ...1 Use one megohm volt meter with a 0 to 10 Vdc capability 2 Set the one megohm volt meter to the 0 to 10 Vdc range 3 Insert the positive red probe into the jack of the flame amplifier Insert the negat...

Page 30: ...nals 8 10 or 21 refer to the appropriate wiring diagram to determine the proper terminal Disconnect the leadwire to the pilot valve if it is connected to the same terminal c Close the master switch to...

Page 31: ...ten sec ond INITIATE sequence 5 Let the sequence advance through PREPURGE Ignition spark should occur after PREPURGE period Listen for the click of the first stage fuel solenoid valve s 6 Let the pro...

Page 32: ...e exact point the FLAME LED light goes out 9 Increase the pilot pressure immediately until the FLAME LED comes on and then turn it down slowly to obtain a pressure reading just above the dropout point...

Page 33: ...equipment Operating Manual Continue adjustments until hot refractory hold in is eliminated Ultraviolet Sensor Ignition Spark Response Test All Ultraviolet Detectors Test to make certain that the ignit...

Page 34: ...Fail fault will be displayed on the KDM Fault code 17 will be displayed to denote the fault g Safety shutdown will occur 7 Opening a Preignition Interlock after the first five seconds of POSTPURGE a...

Page 35: ...ERVICE NOTE If the Keyboard Display Module is scrambled remove and reinstall the Keyboard Display Module and reset the CB780 CB784 Relay Module SERVICE NOTE Use the access slots on the sides of the Wi...

Page 36: ...ing of device physically secure Physical protection of the device is applied via Run Test switch label seal It is intended to prevent and detect unauthorized access Modbus DDL Interface security Any c...

Reviews: