


33
Revision date: 05.13.10
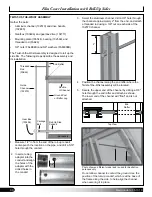
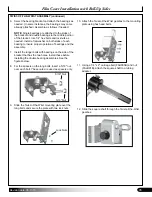
With the mounting plate installed, take the 103496
5.
gearbox, place it against the mounting plate at the
desired angle, and secure using the bolts included
with the gearbox.
NOTE:
The gearbox can be tilted to allow easier
access when using the crank handle.
Take two (2) pieces of 131S075 (75") pipe, slide the
6.
swaged end of one into the plain end of the other and
secure the joint using an FA4482B Tek screw.
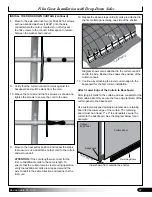
Using the diagram below, attach the 103496 gearbox
7.
and assemble the remaining components as shown.
NOTE:
Attach the plain end of the 131S075 pipe to
the 102717 drive hub. Use the pipe insert to mark the
hole location and drill the hole. Actual components
may differ slightly from those shown in the diagrams.
Have an assistant support the loose end of the axle to
prevent damage.
1/4" x 2" bolt (FAH005B)
and 1/4" nuts (FALB01B)
131S075
Pipe (plain
end)
102717 Drive
(3 pieces)
Mounting bolts
included with the
mounting plate.
5/16" x 5" carriage bolts
and 5/16" nuts to mount
plate to end rafter
Diagram shows the assembled components.
1/2"
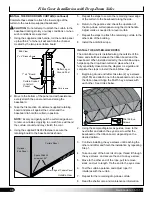
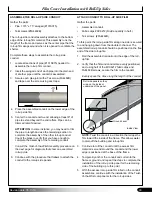
INSTALL THE DROP-DOWN CURTAIN (continued)
If an optional end panel has been installed, carefully
insert the alxe through the 2" axle conduit hole in the
optional end panel.
NOTE:
Diagrams shows gearbox mounted to the end
rafter on the outside of the optional end wall cover.
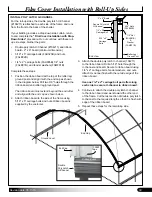
These instructions describe assembling the drop-
down axle in sections and working toward the other
end of the frame. If desired and assistants are
present, you can first fully assembly the axle and then
attach the axle to the rafters as a single unit.
This
procedure is not shown.
Axle
Conduit
Gearbox bolted
to end rafter.
Film Cover Installation with Drop-Down Sides
Optional
End Panel
Installed
2" Axle
Conduit
Hole


