


5
NOTE
:
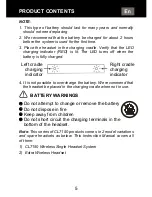
1. This type of battery should last for many years and normally
should not need replacing.
2. We recommend that the battery be charged for about 2 hours
before the system is used for the first time.
3. Place the headset in the charging cradle. Verify that the LED
charging indicator (RED) is lit. The LED turns off when the
battery is fully charged.
4. It is not possible to overcharge the battery. We recommend that
the headset be placed in the charging cradle when not in use.
BATTERY WARNINGS
Do not attempt to change or remove the battery
Do not dispose in fire
Keep away from children
Do not short circuit the charging terminals in the
bottom of the headset.
Note
: This series of CL7150
products comes in 2 model variations
and spare headsets as below. This Instruction Manual covers all
of them.
1) CL7150 Wireless Single Headset System
2) Extra Wireless Headset
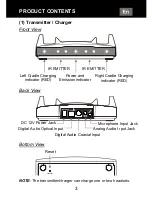
PRODUCT CONTENTS
Right cradle
charging
indicator
Left cradle
charging
indicator
Summary of Contents for CL7150
Page 3: ...2 PRODUCT CONTENTS PRODUCT CONTENTS...
Page 7: ...6 INSTALLATION INSTALLATION...
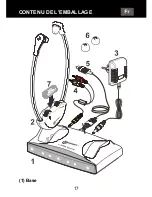
Page 17: ...16 CONTENU DE L EMBALLAGE CONTENU DE L EMBALLAG...
Page 18: ...17 1 Base CONTENU DE L EMBALLAGE...
Page 22: ...21 INSTALLATION...
Page 32: ...31 VERPACKUNGSINHALT VERPACKUNGSINHALT...
Page 33: ...32 1 Basis Aufladeger t VERPACKUNGSINHALT...
Page 37: ...36 1 Stromzufuhr wie in der Abbildung gezeigt verbinden INSTALLATION INSTALLATION...
Page 48: ...47 INHOUD VAN DE VERPAKKING INHOUD VAN DE VERPAKKING...
Page 52: ...51 INSTALLATIE INSTALLATIE...
Page 62: ...61 CONTENIDO DEL EMBALAJE CONTENIDO DEL EMBALAJE...
Page 66: ...65 INSTALACI N INSTALACI N...
Page 77: ...76 CONTENUTO DELLA CONFEZIONE CONTENUTO DELLA CONFEZIONE...
Page 78: ...77 1 Trasmettitore Caricabatteria CONTENUTO DELLA CONFEZIONE...
Page 82: ...81 1 Collegare l alimentatore come mostrato in figura INSTALLAZIONE INSTALLAZIONE...
Page 92: ...91...
Page 93: ...92 UGAmpliPOWER40 50_It_Ver 1 0 UGCL7150_EnFrGeNLSpIt_v1 0...