


Unpacking And Getting Started
The ProfCam has been designed to fold up compactly and easily for storage and transportation. Exercise
extreme care whenever unpacking or storing the camera to avoid damage to delicate electronics and other com-
ponents. For more information on packaging and storing the ProfCam, refer to section ‘Packing the Camera For
Storage and Transportation.’
Setup and Operation Of The ProfCam
Connecting The Main Cable
The main cable connects to the modular jack on the rear of the camera's base.
The cable will only connect one way and should snap in easily. If necessary,
turn the plug around and try inserting it again. Push the cable into the jack
until it snaps into place.
To remove the cable, press inward on the 'ears' of the connector, located on
each side of the plug and rock the connector gently from side-to-side while
pulling straight out from the camera base.
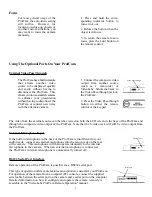
The other end of the main cable splits into four connectors:
In general, you will get a higher quality picture using the S-Video output.
However, many devices such as VCR's and TV's, are not capable of receiving
a S-Video signal. If your TV or VCR is not capable of receiving a S-video
signal, use the composite video jack on the camera's main cable.
Red RCA
Audio; will connect to the audio-in jack of a TV
Yellow RCA
Composite video; connects to the video-in jack of a TV
Black 4-pin
S-Video; will connect to the video-in jack of S-Video capable TV's
Black Barrel Plug
Power Connector; use with provided power supply to a wall outlet
T
HE AUDIO CONNECTION IS NOT REQUIRED TO VIEW A PICTURE FROM A
P
ROF
C
AM
N
OTE THAT THE
S-V
IDEO AND THE COMPOSITE VIDEO CONNECTORS ON THE
P
ROF
C
AM ARE BOTH
ALWAYS LIVE
. I
T IS POSSIBLE TO CONNECT THE CAMERA TO TWO SEPARATE VIEWING SOURCES
(
IE
.
A COMPUTER AND
TV,
OR TWO
TV’
S
)
AT THE SAME TIME
.
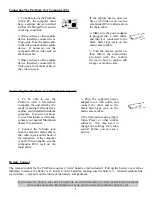
1. Set the camera unit on a flat,
solid surface.
2. Grasp the camera module,
and raise the neck to its upright
position. When it is completely
vertical, slide the locking coupler
until it meets the base, locking
the neck in position.
3. Turn the thumb screw
clockwise until tight. T h i s
will further help to keep the
camera head steady.
4. Remove the light base from
its protective cover and slide it
as shown into the front of the
camera base
5. Remove the lens cover from
the head of the camera.
6. Follow the instructions
below for information on how
to connect the camera to a TV
or other monitor to view the
picture.
thumb screw
S-video
power
audio
composite
2