background image

AccuMic Microphone 

— AccuMic PC

5

Technical Services Group ~ 1-800-283-5936 (USA) ~ 1-801-974-3760

To connect the AccuMic PC

1. Connect the 10-pin plug to the 10-pin connector on the AccuMic PC.

2. Connect the Speaker Ref In (green) to the Line Out connector on the PC soundcard.

3. Connect the Mic Out (red) to the Mic In on the PC soundcard.

4. Connect the Speaker Ref Out (green) to the Speaker jack cable from the speakers.

Note:

Your speakers connect directly to the AccuMic PC to allow the echo cancellation to

work properly.

5. Connect the power connector to the power supply and plug the power supply into an outlet.

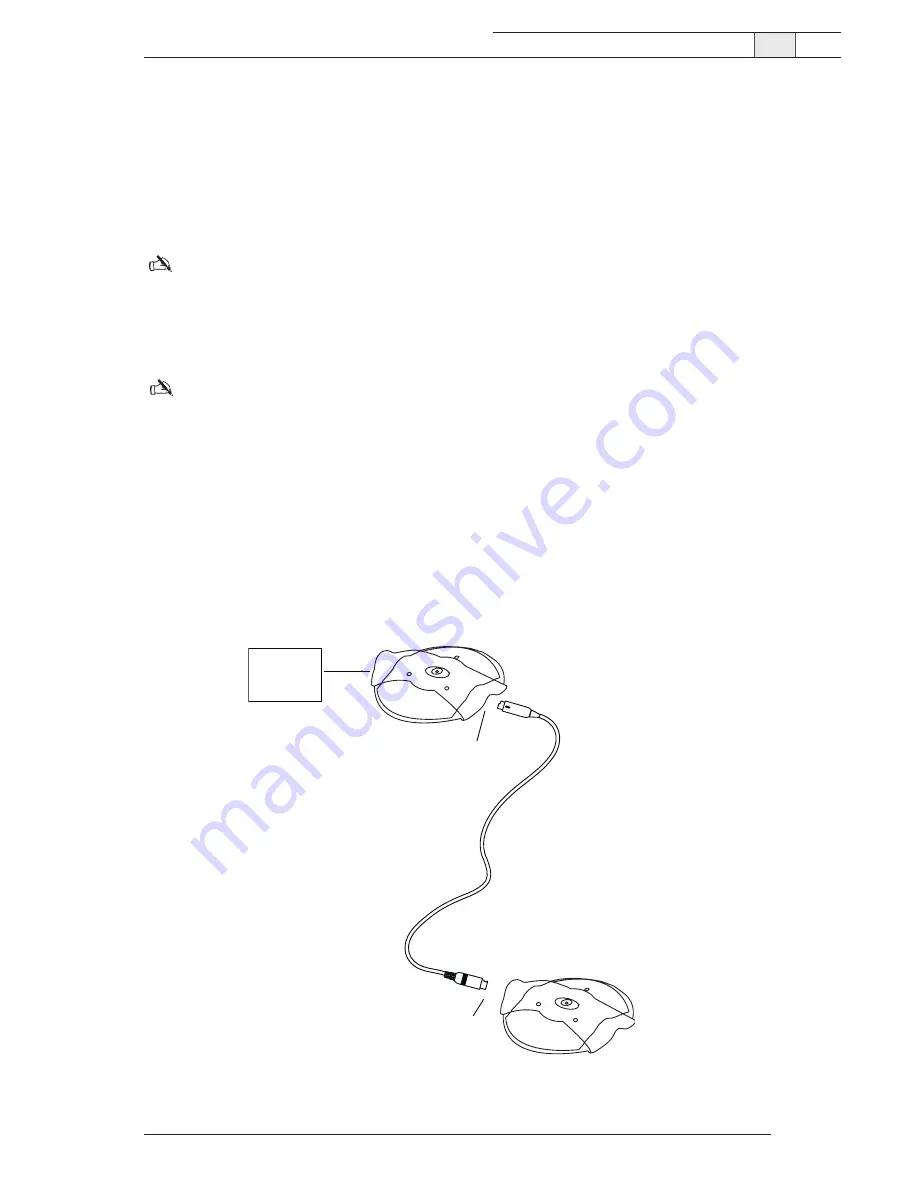
To connect an AccuMic PC Extension Mic

Note:

Do not connect an AccuMic PC Extension Mic to an AccuMic VC. The AccuMic PC is

not compatible with the AccuMic VC and will not work properly.

1. Disconnect the first AccuMic PC from the power source.

2. Connect one end of the 10' (3 meter) mini-DIN cable to the 8-pin connector on the first

AccuMic PC.

3. Connect the other end of the cable to the 8-pin connector on the extension AccuMic PC.

4. Reconnect the first AccuMic PC to the power source.

5. Place the mic pads a suitable distance apart on the conference table to accommodate

meeting participants.

8-Pin Connector

8-Pin Connector

10' (3-meter) Mini-DIN Cable

To

Computer

Extension AccuMic 

First AccuMic 

Figure 7. Connecting an AccuMic PC Extension Mic

Summary of Contents for AccuMic PC

Page 1: ...ClearOne Communications Inc 1825 Research Way Salt Lake City UT 84119 tel 1 800 945 7730 fax 1 800 933 5107 ...

Page 2: ...AccuMic User Manual ...

Page 3: ...oting 11 Appendix 12 Specifications 12 Video codec compatibility 13 Warranty 14 FCC Part 15 Compliance 16 2005 ClearOne Communications Inc All rights reserved No part of this document may be reproduced in any form or by any means without written permission from ClearOne Communications Printed in the United States of America ClearOne Communications reserves specific privileges Information in this d...

Page 4: ...ne coverage adaptive noise cancellation and proprietary Gentner Distributed Echo Cancellation provide clean clear audio Expansion capability extends audio pick up range to accommodate larger conferencing rooms Service and support If you need additional information on how to install set up or operate your AccuMic VC or AccuMic PC please contact us We welcome and encourage your comments so we can co...

Page 5: ... Manual 800 157 001 Figure 1 Unpacking the AccuMic VC Note ClearOne Communications is not responsible for product damage incurred during shipment You must make claims directly with the carrier Inspect your shipment carefully for obvious signs of damage If the shipment appears damaged retain the original boxes and packing material for inspection by the carrier Contact your carrier immediately AccuM...

Page 6: ...echo free B Speaker Reference Out This audio jack sends the far side audio to the computer loud speakers C Mic Out This audio jack sends local audio to the computer or codec for transmission to the far side participants D Power supply 12VDC E 10 Pin Connector This connector connects to the microphone pad Technical Services Group 1 800 283 5936 USA 1 801 974 3760 A B A B C D E Figure 3 Microphone p...

Page 7: ...the AccuMic PC flawlessly picks up audio within a full 360 degree coverage area You can connect an AccuMic PC Extension Mic part no 910 157 010 to expand the audio pick up capabilities of the conferencing system AccuMic PC Line In AccuMic PC PC Soundcard 10 Pin Connector PC or Laptop Line In Spkr In Line Out Spkr Out Mic In To Line Out To Mic In To Speaker Jack To Power Speaker Power Supply 20 Cab...

Page 8: ... the power supply into an outlet To connect an AccuMic PC Extension Mic Note Do not connect an AccuMic PC Extension Mic to an AccuMic VC The AccuMic PC is not compatible with the AccuMic VC and will not work properly 1 Disconnect the first AccuMic PC from the power source 2 Connect one end of the 10 3 meter mini DIN cable to the 8 pin connector on the first AccuMic PC 3 Connect the other end of th...

Page 9: ...nd adjust the far end microphone balance to ensure audio is being sent at a proper level and far end participants can hear you To open the volume control panel 1 From the Start Menu go to Settings then Control Panel 2 Double click the Sounds and Multimedia icon to open Sounds and Multimedia Properties 3 Select the Audio tab and click Volume in the Sound Playback section The Volume Control panel wi...

Page 10: ...your loudspeakers and causing feedback problems 1 Open Volume Control panel 2 On the Options menu click Properties 3 In the Properties window click Playback 4 Scroll down and select the Microphone check box 5 Click OK The volume control window now displays the settings for Microphone Balance 6 Select the Mute check box for Microphone Balance Figure 10 Options menu Figure 11 Playback Figure 12 Mute...

Page 11: ...panel 2 On the Options menu click Properties 3 In the Properties window click Recording 4 Select the Microphone check box 5 Click OK to open the Recording Control window 6 Click the Select check box for Microphone Balance 7 Use the volume slider to adjust the volume of the audio being sent to the far end Technical Services Group 1 800 283 5936 USA 1 801 974 3760 Figure 13 Recording Figure 14 Recor...

Page 12: ...nect the Speaker Ref In plug white to the video codec s Audio Out jack 3 Connect the Mic Out plug red to the video codec s Audio In jack 4 Using an RCA audio cable or an adapter not included connect the Speaker Ref Out white plug to the television s Audio In jack 5 Connect the power connector to the power supply and plug the power supply into an outlet AccuMic VC AccuMic VC To Power AUX2 AUX OUT V...

Page 13: ...e power source 2 Connect one end of the 10 3 meter mini DIN cable to the 8 pin connector on the first AccuMic VC 3 Connect the other end of the cable to the 8 pin connector on the extension AccuMic VC 4 Reconnect the first AccuMic VC to the power source 5 Place the mic pads a suitable distance apart on the conference table to accommodate meeting participants 8 Pin Connector 8 Pin Connector 10 3 me...

Page 14: ...pants need to be within 10 feet of the AccuMic If you have trouble with the audio quality ensure that The Playback microphone balance mute option is selected See page 7 The Recording microphone balance is selected See page 8 If problems persist please contact our Technical Services Group AccuMic Microphone Operation Using the AccuMic The AccuMic is a plug and play microphone the only function that...

Page 15: ... Reference Out AccuMic PC Cables 1 20 6 1 m four plug 3 5 mm plug 1 Power In 12VDC 2 5A 25W 1 Microphone Out 1 Speaker Reference In 1 Speaker Reference Out Microphones 3 elements each with 120 degree pickup range Visual Feedback Indication 3 LEDs that indicate direc tion of audio pickup Mute Button Mutes all mic elements A D Conversion 24 bit 16kHz Frequency Response 50Hz 7kHz AEC Tail Time 130ms ...

Page 16: ...13 Technical Services Group 1 800 283 5936 USA 1 801 974 3760 AccuMic Microphone Appendix Video codec compatibility AccuMic VC only Figure 17 Video codec compatibility with AccuMic VC ...

Page 17: ...arranty ClearOne Communications Inc Manufacturer warrants that this product is free of defects in both materials and workmanship For full warranty information and coverage refer to the ClearOne web site at www clearone com ClearOne Communications Inc 1825 Research Way Salt Lake City UT 84119 ...

Page 18: ...15 Technical Services Group 1 800 283 5936 USA 1 801 974 3760 AccuMic Microphone Appendix ...

Page 19: ...al area is likely to cause harmful interference in which case the user will be required to correct the interference at his her own expense Changes or modifications not expressly approved by ClearOne Communications Inc could void the user s authority to operate the equipment European Compliance This equipment has been approved in accordance with Council Directive 1999 5 EC Radio Equipment and Telec...

Page 20: ...mation technology equipment Immunity characteristics Limits and methods of measurement Salt Lake City Utah 84119 EN 61000 4 2 1995 A1 1998 Electrostatic Discharge EN 61000 4 3 1996 A1 1998 Radiated RF Immunity EN 61000 4 4 1995 Electrical Fast Transients EN 61000 4 5 1995 Lightning Surge EN 61000 4 6 1996 Conducted RF Immunity EN 61000 4 8 1993 Radiated Magnetic Field Immunity EN 61000 4 11 1994 V...

Reviews: