Eon e100
Quick Start Guide
ClearCube Technology
8834 Capital of Texas Hwy N Austin, Texas 78759
voice 512 652 3500 www.clearcube.com
QSG_E100_final.fm — Enter your TB topic here
CONNECTIONS
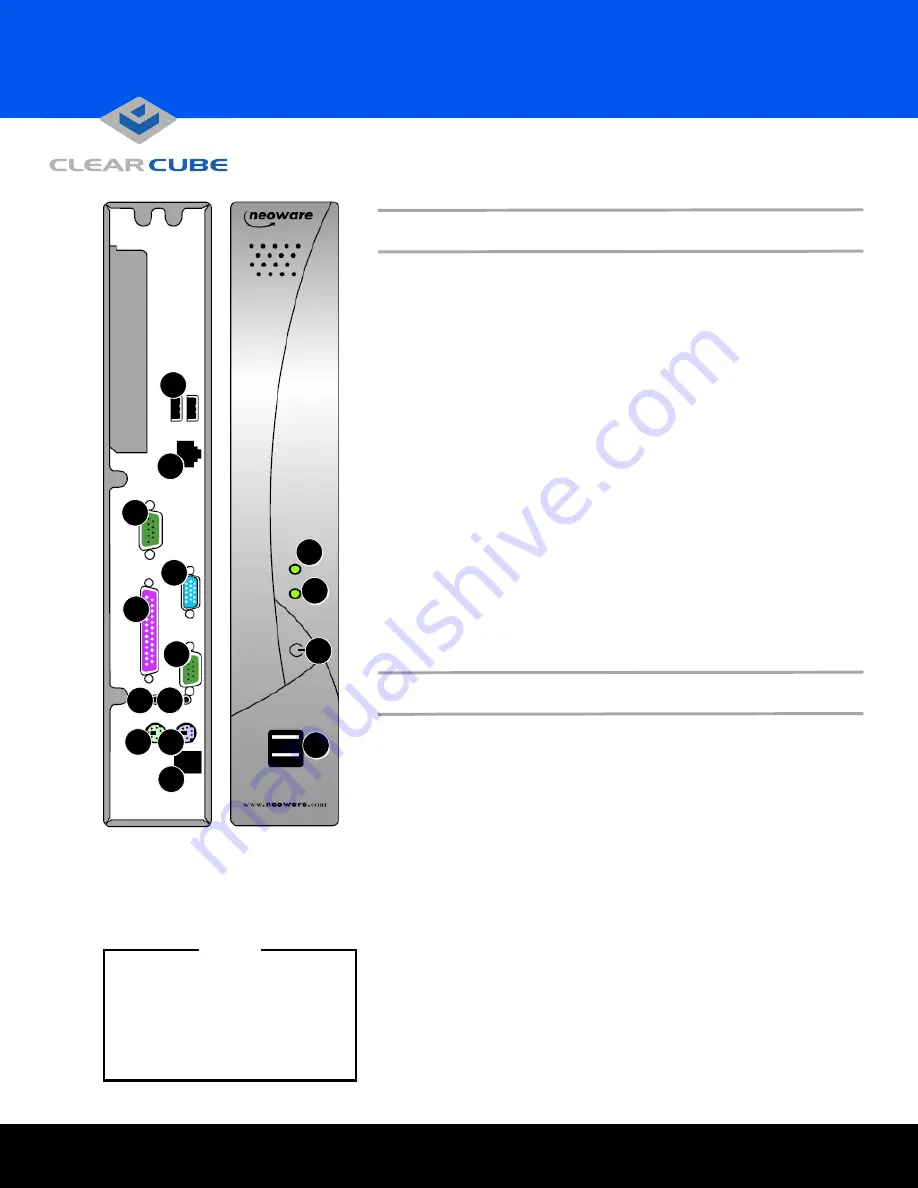
The Eon e100 is designed to operate in a vertical position. Install your
Eon e100 in its stand, then connect the power supply, keyboard, mouse,
Ethernet connection, and video to the ports as indicated. To lock the
power supply connector, twist the connector once it’s fully seated. Attach
other devices as desired.
To turn on your Eon e100 I/Port, push in the triangular on/off switch on its
front panel. To turn it off, push the on/off switch again. You may need to hold
the switch in for 5 seconds, depending upon how your I/Port is configured.
Verify connectivity to your network by watching for the flashing green network
activity LED. Enable any necessary ports on your switches and routers. Grid
Center uses port 6500 TCP. RDP uses port 3389 TCP and port 139 UDP.
Your individual network may use other ports besides these.
XPe OPERATING SYSTEM
After starting your XPe-based Eon e100, log in to the I/Port. The default
administrator ID and password is
administrator / clearcube
. The
default user ID and password is
user / clearcube
.
To log in directly to a Blade with the I/Port client, double-click the
IPort
Client Manager
icon on the desktop and enter login credentials for the
I/Port. Then log into the Blade using RDP, specifying the domain and
Blade name as follows:
domain.com\blade_name
If you are using your XPE-based Eon e100 as a client managed by Grid
Center, do the following from the Grid Center Console:
1.
Discover the I/Port.
2.
Configure the I/Port with the Primary and Secondary Consoles’ names
to establish them as trusted machines.
3.
Add the I/Port to the Grid Center authentication database.
4.
Allocate the I/Port to a Blade or a Blade group.
The Grid Center authentication database allows adding and configuring
multiple I/Ports simultaneously. See the
Grid Center Administrator’s
Guide
for more information.
1.
Power supply connector
8.
VGA video port
2.
PS/2 keyboard port
9.
10/100 BaseT Ethernet port
3.
PS/2 mouse port
10.
USB 2.0 ports (rear panel)
4.
Audio line out
11.
Network activity LED
5.
Audio line in
12.
Power LED
6.
Serial ports
13.
On/Off switch
7.
Parallel port
14.
USB 2.0 ports (front panel)
1
11
14
13
12
10
2
7
9
8
6
4
3
5
6
• The Ethernet connection on
the Neolinux I/Port must be
connected to an active network
before starting the I/Port in
order for the operating system
to turn on the network adapter.
Note


