L
N
• Projector mounting
Position the bracket (6) according to the desired angle and lock it with the knobs (7).
The bracket (6) can be height adjusted by using the two holes on the bracket; it can
moreover also be mounted towards the bottom of the fitting. To do this it is necessary
to fully extract the knobs (7), reposition the bracket (6) in the desired position, put the
knobs (7) back in and tighten them appropriately.
6
• Fitting the lamp
Refer to the instructions for opening the projector and changing the lamp in paragraph
5 MAINTENANCE.
6
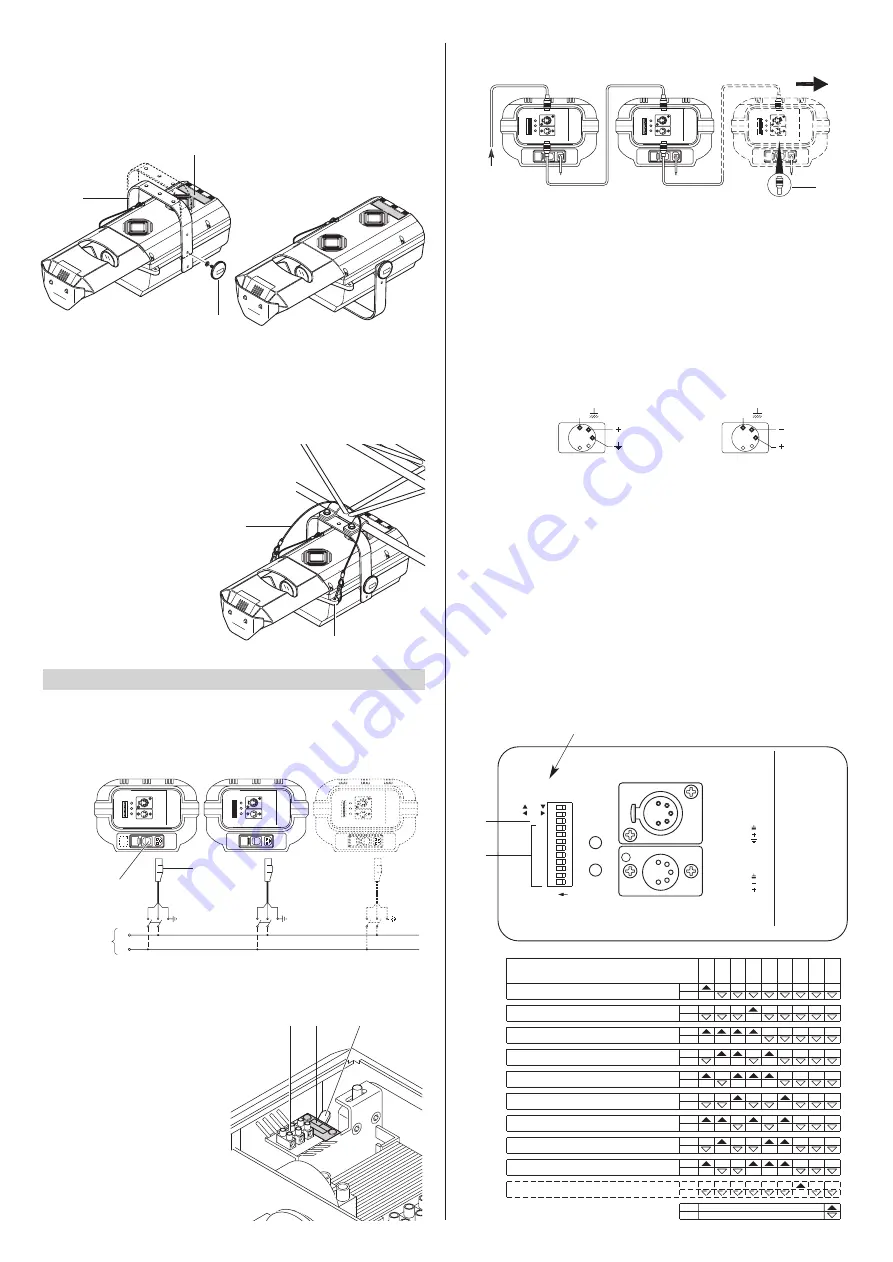
The connection between the projector and the control unit and between different pro-
jectors must be made with cable conforming to the EIA RS-485 specifications: braid-
ed, bipolar, shielded, 120
Ω
of characteristic impedance, 22-24 AWG, low capacity.
IMPORTANT: Do not use a microphone cable or any other cable with different char-
acteristics to the ones specified above.
The terminations need to be made with male/female connectors type XLR with 5 pins.
If you use the DMX signal, on the last fitting it is necessary to add a terminal plug (12)
with a resistance of 120
Ω
(minimum
1/
4
W) between the terminals 2 and 3.
If using the RS232/423(PMX) signal, the terminal is not required
• Switching on the projector
After carrying out all the above operations, press the switch (13) checking that the
lamp comes on and the automatic resetting sequence starts.
• Projector coding
Every MINISCAN HPE occupies 7 control channels. For these to be correctly
addressed to each projector it is necessary to code the projectors.
This has to be done on each single MINISCAN HPE, switching the microswitches (14)
according to the following table. The coding can also be done with the projector
switched off.
SUPPLY AND FINE-TUNING
3
• Mains power connection
The projector has to be hooked up to the electricity mains via the socket (2) supplied.
It is advisable for each projector to be connected with its own switch so as to be able
to switch it on and off individually from a distance.
Connecting the control signals RS 232/423(PMX) - DMX 512
7
5
1
8
Mains
2
• Selecting the frequency 50/60Hz
Some MINISCAN HPE made to spe-
cific requirements are equipped with
a device to quickly adapt the fitting to
the frequency of the electricity mains.
To select the right frequency, open
the top cover, referring to the instruc-
tions in paragraph 5 MAINTENANCE
and proceed as follows. Under the
square of the mount of the terminal
block (9), find the lever (10) of the fre-
quency selector. With the aid of any
tool that can be used on the lever
(10), position it on the desired fre-
quency, referring to the label (11).
9
11
10
SIGNAL
SCREEN
SIGNAL
5
4
3
2
1
DMX
512
SIGNAL
SCREEN
SIGNAL
RS232/423
(PMX)
1
2
3
4
5
DMX 512
RS 232/423
12
IMPORTANT: The wires must make no contact with each other or with the metal cas-
ing of the connectors. The casing needs to be connected to the braid of the shield and
to pin 1 of the connectors.
1 = ROTATING
COLOURS
2 = GOBO
ROTATION
3 = GOBO
CHANGE
4 = DIMMER/
STOPPER/
STROBE
5 = PAN
6 = TILT
7 = COLOR &
EFFECTS
THE DIGITAL START ADDRESS IS THE SUM OF THE
NUMBERS PRODUCED BY THE SELECTED SWITCHES
DIGITAL INPUT
TEST
256
128
64
32
16
8
4
2
1
ON
10
9
8
7
6
5
4
3
2
1
11
12
TILT
PAN
PIN
CONNECTIONS
PMX
RS232/423
1=SCREEN
2=SIGNAL
3=SIGNAL
DMX 512
1=SCREEN
2=SIGNAL
3=SIGNAL
CHANNEL
ASSIGNMENTS
OPTION SELECT
AND
START ADDRESS
STATUS
LEDS
PMX
DMX
DATA
ERROR
ON
Projector 1
- Channels 1-7
ON
OFF
ON
OFF
TEST
128
64
32
16
8
4
2
1
OFF
ON
OFF
ON
OFF
ON
OFF
ON
OFF
ON
OFF
ON
OFF
ON
OFF
ON
CODE
ON
OFF
Projector 2
- Channels 8-14
Projector 3
- Channels 15-21
Projector 4
- Channels 22-28
Projector 5
- Channels 29-35
Projector 6
- Channels 36-42
Projector 7
- Channels 43-49
Projector 8
- Channels 50-56
Projector 9
- Channels 57-63
Projector 10 - Channels 64-70
15
14
Spotlight selection
• Fixing the safety rope
It is compulsory to mount the safe-
ty rope (1). This has to be secured to
the projector framework and then
hooked onto the rings (8) on the base
of the projector.
• Installing the projector
The projector can be secured in any
position without affecting its operating
features.
Secure the projector in the desired
position with the holes on the bracket
(6) using two 10 mm screws ø with
nut and spring washer.
13


