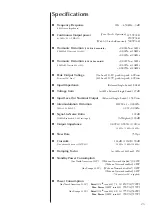
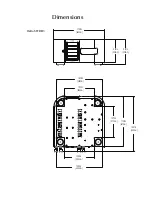
background image

11

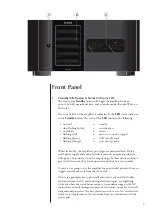
Classé CAN-Bus Control Ports

These 

RJ-45

 connectors are reserved for control and communication 

applications using a Classé implementation of the Controller Area 

Network (CAN) Bus specification. Refer to the 

CAN-Bus

 section located 

later in this manual for more information.

IR Input and Output

Your Classé amplifier includes two 

1

/

8th

-inch 

mini mono-jacks 

in order to 

support the IR remote controls that are ubiquitous today. IR commands 

exist for toggling the amplifier between 

operate

 and 

standby

, as well as 

discrete command codes for either 

operate

 or 

standby

. These codes may be 

used in “macros” for sophisticated remote control systems, facilitating the 

control of the amplifier in the larger context of a complete system.

Actually, this 

IR Input and Output

 description is a bit of a misnomer: the 

input supplied to these plugs is 

electrical

 in nature, not IR. It is obtained by 

using standard IR receivers, distribution amplifiers, and emitters (available 

from your dealer) to translate the remote’s flashes of infrared light into 

corresponding pulses of electricity. The big advantages here include being 

able to easily route the signals anywhere they might need to go, and the 

reliability of a solid electrical connection.

Since an IR distribution system such as your dealer may design for you 

usually must control many products, your amplifier includes both an IR 

input (for the control of this product) and an IR output (so as to pass 

along the same signal to the next product). This allows you to “daisy chain” 

your control wires from one product to the next.

The amplifier is designed to respond to IR commands of 5 Volts DC, with 

the tip of the mini-plugs defined to be “positive” relative to the shank of 

the plug.

DC Trigger Input and Output

Many audio/video preamplifiers can supply a DC control voltage to 

associated equipment in order to induce desired behavior. Your Classé 

amplifier can take advantage of these capabilities in order to be switched 

between 

operate

 and 

standby

 automatically, perhaps in concert with the  

preamp/processor itself.

Two 

1

/

8th

-inch 

mini mono-jacks

 provide this remote-controlled turn-on 

(that is, toggling between 

operate

 and 

standby

) of the amplifier. These jacks 

provide a simple pass-through of the control voltage from one to the other, 

allowing you to “daisy-chain” a series of amplifiers quite easily.

The remote trigger will be operated by the presence of 5–12  Volts DC, 

with tip polarity as shown below:

Summary of Contents for Delta STEREO

Page 1: ...Owner s Manual Delta STEREO Two Channel Amplifier...

Page 2: ...Welcome to the Class family 3 Unpacking and Placement 4 Special Design Features 6 Front Panel 7 Rear Panel 9 Installation 15 CAN Bus 17 Care and Maintenance 20 Troubleshooting 21 Specifications 23 Dim...

Page 3: ...and record your serial number for future reference a word about installation Every effort has been made to make the Class Delta STEREO simple and straightforward to install and use It may be placed on...

Page 4: ...the speaker s are acceptable alternatives In any case take care to position it well away from source components and preamp processors which may be sensitive to the amplifier s electromagnetic fields N...

Page 5: ...so powered from the same AC line their additional power consumption should be taken into account warm up break in period Your new Class power amplifier will deliver outstanding performance immediately...

Page 6: ...ghtly expect from Class extraordinary longevity The Class Design team has accumulated vast experience in what works well over the long term By using only the highest quality parts to begin with and th...

Page 7: ...y a small power supply and control circuit remain on consuming relatively little power Fortunately since the output stages by their nature conduct a great deal of current they warm up and sound their...

Page 8: ...oper operation of the cooling system be careful to keep the area around the air intake on the front panel free of obstructions 3 Output VU Meter The output meter shows output power in Watts into an 8...

Page 9: ...a high degree of symmetry between the inverting and non inverting signal paths balanced connections can offer the best performance For this reason we strongly recommend using the balanced analog inter...

Page 10: ...sts are provided for each channel of the amplifier These connectors are made of rhodium plated copper and designed with a feature called Torque Guard which ensures the optimum contact pressure to mate...

Page 11: ...ily route the signals anywhere they might need to go and the reliability of a solid electrical connection Since an IR distribution system such as your dealer may design for you usually must control ma...

Page 12: ...ts such as those sold in the European Union are shipped with Wake on Network mode disabled To identify whether the Wake on Network feature is enabled or disabled and to change its state use the follow...

Page 13: ...address automatically assigned If static IP addressing is required it can be accomplished by creating a reservation table see your router s settings page based on the amplifier s MAC address printed o...

Page 14: ...unnel Exhaust Port The Intelligent Cooling Tunnel removes heat from the amplifier via the exhaust port on the rear To ensure the proper operation of the cooling system be careful to keep the area arou...

Page 15: ...ords as most are not suitable for the current sometimes required by your amplifier 3 Make your preamp processor connections With the amplifier in standby or disconnected from the AC mains using high q...

Page 16: ...s worth the extra minute or two it might take just to ensure that all connections are correct and secure before plugging the power cables to the AC outlets 6 Turn on all the other components in your s...

Page 17: ...ct input when a Delta series source component starts playback Adjust the global system brightness Configure the entire system to go in and out of standby at the touch of a button and also bring indivi...

Page 18: ...art flashing unless you choose the unit that you are using to access CAN Bus Once you have chosen the target unit the touch screen will list the CAN Bus features available to it Some CAN Bus features...

Page 19: ...s this feature records protection circuit events and can only be accessed when the target amplifier is in standby Note For the amp to be put into standby while allowing the unit with the touchscreen t...

Page 20: ...ens cleaner such as you would use for cleaning a flat panel display Special care should be taken to gently clean the meter lens to avoid marking it in any way Caution DO NOT use paper towels as they m...

Page 21: ...cted and taken to your Class dealer for service If it powers up without any difficulty first power it back down and reconnect only the inputs then restart the amplifier If it again powers up normally...

Page 22: ...AC mains only and turn it on without reconnecting either the inputs or the speaker wires If the fuse blows again disconnect it from the AC mains and contact your Class dealer for assistance d If every...

Page 23: ...Level for Nominal Output Balanced Single Ended 1 58Vrms n Intermodulation Distortion SMPTE 4 1 0 0018 4 or 8 Bal SE CCIF 0 004 n Signal to Noise Ratio 118dB 22kHz Bandwidth 1 84Vrms input A Weighted...

Page 24: ...measurement bandwidth except when specified otherwise For purposes of improvement specifications and design are subject to change without notice For more information see your Class dealer or contact o...

Page 25: ...Dimensions Delta STEREO 17 50in 445mm 8 00in 203mm 8 78in 223mm 10 21in 259mm 16 00in 406mm 17 58in 447mm 10 76in 273mm 19 31in 490mm 10 20in 259mm 16 00in 406mm Delta STEREO...

Page 26: ...d LLC V1 5 251019 Class 380 rue McArthur Saint Laurent Qu bec H4T 1X8 CANADA Class offers International Service and Support for its Products Please visit our Website to find up to date Contact Informa...

Reviews: