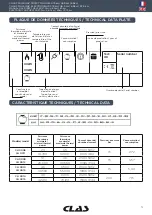


12
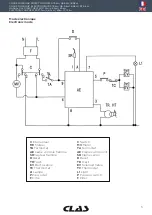
CH 0008
CH 0009
CH 0010
CH 0011
CH 0012
CH 0013
CH 0014
CH 0015
CONNECTION TO GAS CYLINDER
Connect to the gas cylinder in the following order: pressure reducer (already equipped with safety
valve) and gas hose. Consider that junctions are left threaded, so they need to be tightened by
turning counter clockwise.
Make sure that the rubber ring has been fi tted between the reducer and the cylinder (in case the
type of connection require one); connect the hose
to the gas inlet socket. Check joint seal by pouring over some soapy solution-bubbles are evidence
of a gas leak. More cylinders can be connected so to reach a greater autonomy.
The cylinder replacement must be carried out far from any fl ame. Be sure that the gas tube
position is perfectly streched.
Only the following accessories can be used to connect the cylinder:
• Flexible hose for liquid gas in accordance with DIN 4815 part 2, pressure class DK 6.
• Liquid gas pressure reducer in accordance with DIN 4811 part 1.
• Safety valve in accordance with DIN 30693, if the fl exible hose is longer than 0.4 m.
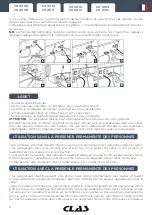
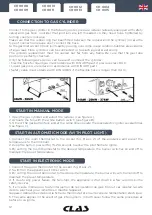
START IN MANUAL MODE
1. Open the gas cylinder and adjust the reducer (see fi gure A),
2. Activate the fan with the white button switch (see fi gure B),
3. 3. Press the gas button fully and at the same time operate the piezoelectric igniter several times
(see fi gure C).
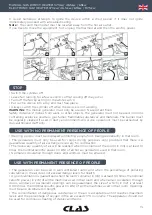
START IN AUTOMATIC MODE (WITH PILOT LIGHT)
1. Connect the room thermostat to the socket (fi g. B pos. 2) of the appliance and preset the
temperature to the minimum,
2. Keep the button pressed for 15-20 seconds to allow the pilot fl ame to ignite,
3. By setting the room thermostat to the desired temperature, the burner switches on and off to
maintain the preset temperature.
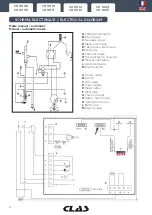
START IN ELECTRONIC MODE
1. Connect the room thermostat to the socket (fi g. B pos. 2),
2. Switch on the appliance with the switch,
3. By setting the room thermostat to the desired temperature, the burner will switch on and off to
maintain the preset temperature,
4. If, due to any power failure, the fan stops, the appliance is shut down in a few seconds by the
safety devices,
5. Il en va de même pour toute interruption de la circulation du gaz. En tout cas répetéz la suite
décrite plus haut pour remettre en marche l’appareil,
l’appareil, débranchez d’abord la fi che du thermostat et ensuite celle de l’alimentation électrique.
5. The same applies in the event of gas interruptions. In both cases follow the same procedure as
before to re-ignite,


