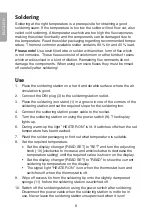
Clas Ohlson JLT-01 Instruction Manual Download Page 6

6

E

N

G

LI

S

H

Soldering

Soldering at the right temperature is a prerequisite for obtaining a good 
soldering seam. If the temperature is too low the solder will not flow out, also 
called cold soldering. At temperatures which are too high the flux vaporizes 
making the solder flow badly and the components can be damaged due to 
the temperature. Read the solder packaging regarding recommended tempe-
rature. The most common available solder contains 60 % tin and 40 % lead.

Please note! 

Use resin filled wire or solder with another form of flux which 

is not corrosive.  These fluxes consist of colofonium or other kinds of resins 
which are dissolved in a kind of dilution. Remaining flux remnants do not 
damage the components. When using corrosive fluxes they must be rinsed 
off carefully after soldering!
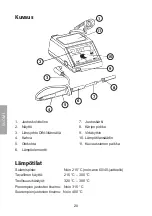
Use

1.  Place the soldering station on a hard and durable surface where the air 

circulation is good.

.  Connect the DIN plug () to the soldering station outlet.
.  Place the soldering iron stand (1) in a groove in one of the corners of the 

soldering station and set the required slope for the soldering iron.

4.  Connect the soldering station power cable to the socket.
5.  Turn the soldering station on using the power switch (9). The display 

lights up.

6.  During warm-up the light ”HEATER ON” is lit. It switches off when the set 

temperature has been reached.

7.  Read the solder packaging to find out what temperature is suitable.
8.  Set the required temperature. 

• 

Set the display changer [READ SET] to ”SET” and turn the adjusting 
knob (10) (clockwise to increase and anticlockwise to decrease the 
temperature setting) until the required value is shown on the display.

•  Set the display changer [READ SET] to ”READ” to show the current 

soldering tip temperature on the display.

•  The signal light ”HEATER ON” is on when the thermostat is on and 

switches off when the thermostat is off.

9.  Wipe off excess tin from the soldering tip onto the slightly dampened 

sponge (11) before the soldering station is switched off.

10. Switch off the soldering station using the power switch after soldering. 

Disconnect the power cable when the soldering station is not to be in 
use. Never leave the soldering station unsupervised when it is on!

Summary of Contents for JLT-01

Page 1: ...S U O M I N O R S K S V E N S K A EN GL I S H Soldering station L dstation Loddestasjon Juotosasema Article number Model 18 3015 JLT 01 UK 30 9267 JLT 01 www clasohlson com Ver 200802...

Page 2: ......

Page 3: ...al problems please contact our Customer Service Department see address on reverse Presentation Soldering station for advanced hobby activities with a temperature control 150 420 C 48 W provides a quic...

Page 4: ...ssional Safety Requirements for Soldering Iron m WARNING FIRE RISK The tool can become a fire hazard if used improperly Please take the following into consideration Be careful when using the tool in t...

Page 5: ...ower switch 10 Temperature control 11 Space for sponge Temperatures Melting point Approx 215 C Approx value for 60 40 solder Normal use 215 C 300 C Collecting surplus tin from minor soldering Approx 3...

Page 6: ...groove in one of the corners of the soldering station and set the required slope for the soldering iron 4 Connect the soldering station power cable to the socket 5 Turn the soldering station on using...

Page 7: ...oldering station Remove oxidation or other contamination from the soldering tip using a very fine abrasive paper after every 20 hours of use or when necessary Please note Do not let the soldering stat...

Page 8: ...er andra fr gor kontakta v r kundtj nst se adress uppgifter p baksidan Presentation L dstation f r avancerad hobby med elektronisk temperaturkontroll 150 420 C 48 W ger snabb uppv rmning Display f r t...

Page 9: ...kvalificerad yrkesman S kerhetsf reskrifter f r l dpenna m VARNING BRANDFARA Om verktyget anv nds p ett felaktigt s tt uppst r brandfara T nk d rf r p f ljande Var f rsiktig n r verktyget anv nds i n...

Page 10: ...h llare 9 Str mbrytare 10 Temperaturinst llning 11 Plats f r avtorkningssvamp Temperaturer Sm ltpunkt Ca 215 C ca v rde f r 60 40 lod Normal anv ndning 215 C 300 C Tennsugning fr n mindre l dning Ca 3...

Page 11: ...DIN kontakt 3 till l dstationens uttag 3 Placera l dkolvsst llet 1 i ett sp r p ett av l dstationens h rn 4 Anslut l dstationens n tkabel till ett eluttag 5 Sl p l dstationen med str mbrytaren 9 disp...

Page 12: ...ingen v tska kommer in i l dstationens ppningar Reng r l dspetsen fr n oxider eller andra f roreningar med mycket fint slippapper med ca 20 timmars mellanrum eller vid behov Obs L t inte l dstationen...

Page 13: ...ndesenter se opplysninger p baksiden Presentation Loddestasjon for avansert hobbyvirksomhet med elektronisk temperatur kontroll p 150 C 420 C 48 W Dette gir en hurtig oppvarming Display for overv king...

Page 14: ...av en fagperson Sikkerhetsadvarsel specielt for loddepenn m ADVARSEL BRANNFARE Hvis verkt yet brukes feil kan det v re fare for brann Husk derfor V r forsiktig n r varmepistolen brukes i n rheten av...

Page 15: ...despiss 8 Spisshette 9 Str mbryter 10 Temperaturinnstilling 11 Holder for svamp Temperaturer Smeltepunkt Ca 215 C ca verdi for 60 40 loddetinn Normal bruk 215 C 300 C Tinnsuging fra mindre loddearbeid...

Page 16: ...le kabelens DIN kontakt 3 til loddestasjonens uttak 3 Plasser loddestativet 1 i et spor p en av hj rnene p loddestasjonen og still inn nsket vinkel p loddepistolen 4 Plugg str mledningen til et str mu...

Page 17: ...mmer v ske inn i loddestasjonens pninger Rengj r loddespissen for oksider og annen forurensning med et fint slipepapir med ca 20 timers mellomrom eller ved behov Obs La ikke loddestasjonen st p med h...

Page 18: ...s laitteeseen tulee teknisi ongelmia ota yhteys myym l n tai asiakaspalveluun yhteystiedot k ytt ohjeen lopussa Esittely Juotosasema vaativalle harrastajalle Elektroninen l mp tilans t 150 420 C 48 W...

Page 19: ...toskyn koskevia turvallisuusohjeita m VAROITUS PALOVAARA Ty kalun ohjeiden vastainen k ytt voi aiheuttaa palovaaran Huomioi seuraavat seikat Noudata varovaisuutta kun k sittelet ty kalua helposti sytt...

Page 20: ...sk rki 8 K rjen pidike 9 Virtakytkin 10 L mp tilans din 11 Kuivaussienen paikka Kuvaus L mp tilat Sulamispiste Noin 215 C noin arvo 60 40 juotteelle Tavallinen k ytt 215 C 300 C Teollisuus k sity t 32...

Page 21: ...lle Varmista hyv ilmankierto 2 Liit liitosjohdon DIN liitin 3 juotosaseman liit nt n 3 Aseta juotoskolviteline 1 juotosaseman kulmassa olevaan uraan 4 Liit juotosaseman verkkojohto pistorasiaan 5 Kytk...

Page 22: ...liuottimia Varmista ett laitteeseen ei p se kosteutta Puhdista juotink rki oksideista ja muista ep puhtauksista hienolla hiomapaperilla noin 20 tunnin v lein tai tarvittaessa Huom l j t kuumaa juotosa...

Page 23: ...es that the machinery Soldering Iron 18 3015 JLT 01 UK 30 9267 JLT 01 Complies with the provisions of the following directives 2006 95 EC Low Voltage Equipment 89 336 EC EMC Insj n Sweden February 200...

Page 24: ...kundesenter clasohlson no INTERNETT www clasohlson no POST Clas Ohlson AS Postboks 485 Sentrum 0105 OSLO SUOMI ASIAKASPALVELU Puh 020 111 2222 Faksi 020 111 2221 S hk posti info clasohlson fi Interne...

Reviews: