background image

EN

G

LIS

H

Chopping

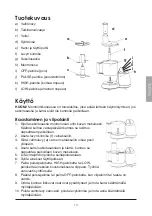
1.  Place the mixer bowl on the motor unit so that it engages 

in the grooves, see fig. 1. [infoga bild 2] Turn the bowl anti-
clockwise until you hear a click and the bowl locks in place.

2.  Place the blade (c) on the drive shaft.
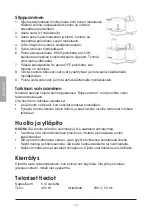
3.  Place the lid on the mixer bowl and turn it until you hear a 

click and the lid is securely attached, see fig. 2.

4.  Connect the power cable to the electrical outlet.
5.  Feed in food through the feed tube.
6.  Use the Pulse button, HIGH button or LOW button 

depending on the food to be processed. Feed in the food 
carefully with the pusher.

7.  Release the Pulse button or press the OFF button when 

you have finished chopping/shredding.

8.  Allow all movable parts to stop and then remove the lid by turning it clockwise.
9.  Carefully lift away the blade and remove the bowl from the food processor by 

turning it clockwise.

Using the dough blade

Attach the dough blade instead of the knife blade by following the instructions for 
“Chopping”. Remember the following when the dough blade is used:
•  Add the liquid slowly when mixing the dough.
•  Stop the food processor regularly and push down dough that is sticking to the 

sides of the mixer bowl.

Care and maintenance

Note! 

Do not try to sharpen the edges of the blade or the disc attachment, they 

might get damaged.
•  Ensure that the food processor is disconnected from the power supply before 

cleaning.

•  Wipe the unit clean with a damp cloth when necessary, and do no immerse the 

motor unit in water. Use a mild detergent – never use abrasive detergents or 
solvents.

•  All removable parts are dishwasher-safe. If using a dishwasher, place the parts 

in the upper rack of the dishwasher.

Disposal

Follow local ordinances when disposing of this product.  
If you are unsure about how to dispose of this product contact your municipality.

Specifications

Capacity  

500 ml liquid

Output   

450 W   

Power supply 

230 V, 50 Hz

Summary of Contents for 34-7339

Page 1: ...Food Processor Matberedare Blender Monitoimikone Ver 200801 English 3 Svenska 6 Norsk 9 Suomi 12 34 7339 211304 Art No Model No ...

Page 2: ......

Page 3: ...d processor unattended when it is in use Always use the supplied pusher to press food into the feed tube Do not use your fingers or any other implements Do not use the food processor to crush ice it can damage the mixer bowl Do not operate the food processor for more than 3 minutes at a time when grating slicing and not more than 30 seconds when chopping Always disconnect the unit from the electri...

Page 4: ...2 Place the accessory holder f on the drive shaft 3 Place the disc attachment a carefully on the drive shaft with the required side facing upwards 4 Place the lid on the mixer bowl and turn it until you hear a click and the lid is securely attached see fig 2 5 Connect the power cable to the electrical outlet 6 Fill the feed tube with foodstuff 7 Use the Pulse button HIGH button or LOW button depen...

Page 5: ...ning it clockwise Using the dough blade Attach the dough blade instead of the knife blade by following the instructions for Chopping Remember the following when the dough blade is used Add the liquid slowly when mixing the dough Stop the food processor regularly and push down dough that is sticking to the sides of the mixer bowl Care and maintenance Note Do not try to sharpen the edges of the blad...

Page 6: ... under uppsikt när den är igång Använd alltid den medföljande påmataren för att föra ner mat i påfyllningsröret Använd aldrig fingrarna eller något annat verktyg Matberedaren får ej användas till att hacka is eftersom detta kan medföra skador på blandarskålen Låt aldrig matberedaren vara igång i mer än 3 minuter i sträck vid rivning skivning eller 30 sek vid hackning Drag alltid stickkontakten ur ...

Page 7: ... fastlåst 2 Placera tillbehörshållaren f på drivaxeln 3 Tag sedan försiktigt insatsskivan a och placera den på drivaxeln med önskad sida uppåt 4 Placera locket på blandarskålen och vrid fast det ordentligt så att ett klickljud hörs och locket fixeras enligt bild 5 Anslut nätsladden till vägguttaget 6 Fyll påfyllningsröret med livsmedel 7 Använd pulsknappen HIGH knappen eller LOW knappen beroende p...

Page 8: ...ren Att använda degknådaren För att montera degknådaren följ instruktionerna för Att hacka men byt kniven mot degknådaren Tänk på följande när du använder degknådaren Tillsätt vätskan långsamt när du blandar degen Stoppa matberedaren ibland för att skrapa ned deg som har fastnat på blandarskålens sidor Skötsel och underhåll OBS Försök aldrig slipa eggarna på kniven eller insatsskivan eftersom de d...

Page 9: ...evidde Hold alltid blenderen under oppsikt når den er i gang Bruk alltid den medfølgende påmateren for å føre mat ned i påfyllingsrøret Bruk aldri fingrene eller noe annet verktøy Blenderen må ikke brukes til å hakke is da dette kan føre til skader på glasskolben La aldri blenderen være i gang i mer enn 3 minutter i strekk ved riving skiving eller 30 sekunder ved hakking Trekk alltid støpselet ut ...

Page 10: ...n blir fastlåst 2 Plasser tilbehørsholderen f på drivakselen 3 Ta deretter innleggsskiven a forsiktig og plasser den på drivakselen med ønsket side oppover 4 Plasser lokket på glasskolben og vri det ordentlig fast så en klikkelyd høres og lokket festes som vist på bilde 5 Koble strømkabelen til vegguttaket 6 Fyll påfyllingsrøret med mat 7 Bruk pulsknappen HIGH knappen eller LOW knappen avhengig av...

Page 11: ... blenderen Å bruke deigelteren For å montere deigelteren følg instruksjonene for Å hakke men bytt kniven med deigelteren Husk følgende når du bruker en deigelteren Tilsett væsken langsomt når du blander deigen Stopp blenderen av og til for å skrape ned deig som har festet seg på glasskolbens sider Vedlikehold OBS Forsøk aldri å slipe eggene på kniven eller innsatsskiven da disse kan bli skadet Før...

Page 12: ...a silmällä kun se on käytössä Käytä mukana tulevaa syöttöosaa kun laitat ruokaa täyttöputkeen Älä käytä syöttämiseen muita välineitä tai käsiäsi Monitoimikonetta ei saa käyttää jään murskaamiseen sillä jää saattaa vahingoittaa sekoitusastiaa Älä käytä monitoimikonetta raastamiseen tai viipalointiin pidempään kuin kolme minuuttia kerralla tai silppuamiseen pidempään kuin 30 sekuntia Irrota pistoke ...

Page 13: ...hoa vastapäivään kunnes se lukittuu napsahtaen paikoilleen 2 Aseta levyn kiinnike f vetoakseliin 3 Siirrä vaihtolevy a varoen vetoakseliin oikea puoli ylöspäin 4 Aseta kansi sekoitusastiaan ja kierrä kunnes se napsahtaa paikoilleen kuvan mukaisesti 5 Liitä virtajohdon pistoke seinäpistorasiaan 6 Syötä ainekset täyttöputkeen 7 Paina pulssipainiketta HIGH painiketta tai LOW painiketta aineksien koos...

Page 14: ...n Taikinan vaivaaminen Noudata samoja ohjeita kuin kappaleessa Silppuaminen mutta vaihda veitsi taikinanvaivaajaan Ota huomioon taikinaa vaivatessa Lisää neste varovasti kun sekoitat aineksia keskenään Pysäytä monitoimikone silloin tällöin ja kaavi astian sivuille tarttuneet roiskeet taikinaan Huolto ja ylläpito HUOM Älä teroita veistä tai vaihtolevyjä Ne saattavat vahingoittua Varmista että monit...

Page 15: ......

Page 16: ...t kundesenter clasohlson no INTERNETT www clasohlson no POST Clas Ohlson AS Postboks 485 Sentrum 0105 OSLO SUOMI ASIAKASPALVELU Puh 020 111 2222 Faksi 020 111 2221 Sähköposti info clasohlson fi Internet www clasohlson fi OSOITE Clas Ohlson Oy Yrjönkatu 23 A 00100 HELSINKI GREAT BRITAIN For consumer contact please visit www clasohlson co uk and click on customer service Internet www clasohlson co u...

Reviews: