10
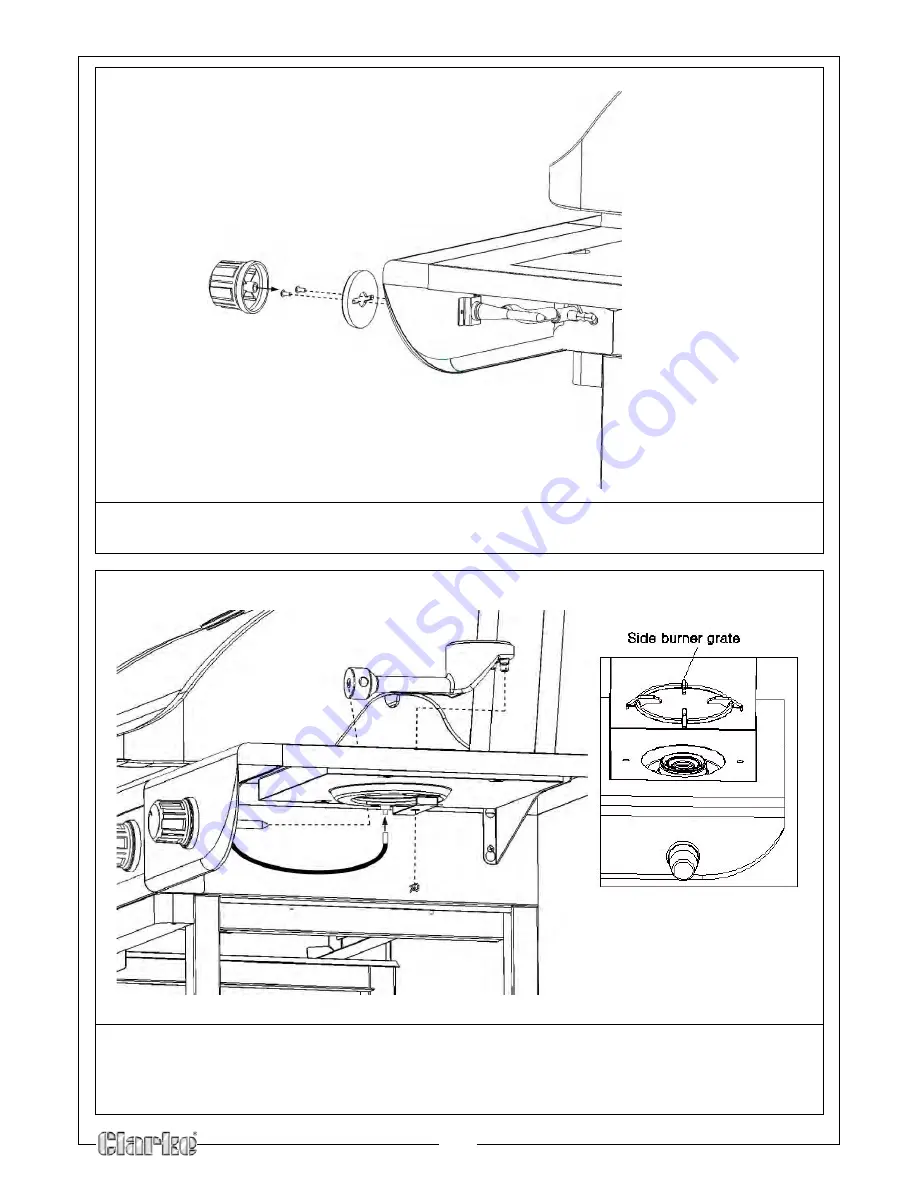
13. Fit the control knob to the side burner table as shown and secure using the two
screws supplied.
14. Connect the side burner valve and secure using 2 screws,
15. Fit the Spark Electrode.
16. Place the Side burner Grate (8) into position.
Page 1: ...2 11 USER GUIDE STAINLESS STEEL GAS BARBECUE MODEL NO SSBBQ4 PART NO 6925310...
Page 2: ...statutory rights SPECIFICATION STORAGE Your gas bottle must be stored outdoors in a well ventilated area and must be disconnected from your barbecue when not being used Ensure that you are outdoors an...
Page 3: ...ning the burner or valves 9 Do not use this barbecue in an enclosed area 10 We recommend keeping the barbecue at least 1 0 meter clear of any combustible materials 11 We would recommend that this barb...
Page 4: ...4 Drip Tray ELBBQ4SS04 15 Base ELBBQ4SS15 5 Warming Rack ELBBQ4SS05 16 Castors ELBBQ4SS16 6 Cooking Grills ELBBQ4SS06 17 Bottom Door Bracket ELBBQ4SS17 7 Heat Distribution Plates ELBBQ4SS07 18 Clip o...
Page 5: ...n adjustable wrench Assemble all nuts and bolts loosely at first Tighten all connections once fully assembled This increases the stability of your barbecue 1 Connect Left Side Panel 11 and Right Side...
Page 6: ...Bottom Door Bracket 17 into position and secure in place using 4 x M6 50 Bolts A and 4 Washers C 4 Fit the Upper Door Bracket 9 into position and secure using 4 x M6 50 Bolts A 4 x M6x12 Bolts B and 8...
Page 7: ...7 5 Push the Castors 16 into position 6 Get someone to help lift and position the Grill Body 2 as shown above and secure using 4 x M6x12 Bolts B and 4 x Washers C...
Page 8: ...into the left side of the Grill Body as shown Do not insert them fully 8 Slide the Left Side Table 1 over the bolts and push down to lock into place 9 Insert 2 x M6x12 Bolts B and 2 x washer C as sho...
Page 9: ...nto the right side of the Grill Body as shown Do not insert them fully 11 Slide the Side Burner Table 3 over the bolts and push down to lock into place 12 Insert 2 x M6x12 Bolts B and 2 x washer C as...
Page 10: ...trol knob to the side burner table as shown and secure using the two screws supplied 14 Connect the side burner valve and secure using 2 screws 15 Fit the Spark Electrode 16 Place the Side burner Grat...
Page 11: ...11 17 Slide the Drip Tray 4 into position as shown above 18 Fit the Doors 10 14 into position as shown...
Page 12: ...s 7 Cooking Grills 6 and Warming Rack 5 into position 20 Connect one end of the hose to the gas port on the BBQ and secure using one of the clips shown 21 Connect the regulator to the other end of the...
Page 13: ...part of the barbecue which may be hot 5 Check for leaks see below DISCONNECTING THE GAS BOTTLE 1 Turn the regulator switch clockwise to the off position 2 Press the button beneath the regulator switc...
Page 14: ...e gas supply hose away from any hot surfaces The gas bottle should only be changed by a competent person ENERGY SAVING TIPS Turn the gas off as soon as you have finished cooking Preheat the barbecue f...
Page 15: ...15 DECLARATION OF CONFORMITY...
Page 16: ......