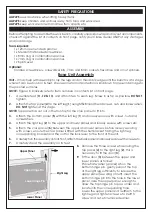
SAFETY PRECAUTIONS
ALWAYS
seek assistance when lifting heavy items.
ALWAYS
keep children and animals away from tools and work area.
ALWAYS
keep work area clean and free from oil spills etc.
ASSEMBLY
Before attempting to assemble the work bench, carefully unpack/unwrap and lay out all components,
check off against the list of contents on front page, notify your Clarke dealer ASAP of any shortages
and/or damage.
Tools required:
1 x 12mm open ended spanner.
1 x Medium flat bladed screwdriver.
1 x 8mm ring or combination spanner.
1 x 7mm ring or combination spanner.
1 x Spirit Level.
Optional:
Cordless screw screwdriver bits, 7mm and 8mm sockets, flexi drive and or nut spinners.
Base Unit Assembly
Hint -
It may help with assembly to lay the legs and on their back edge until the bench is at a stage
where it can be stood on its feet. Ensure some form of protection is laid down to prevent damage to
the painted surfaces.
NOTE :
Figures in brackets refer to item numbers in contents list on front page.
1.
Assemble feet (
11, 12 & 13
) and attach two to each leg. Screw in as far as possible.
DO NOT
tighten.
2.
Attach the top panel (
4
) to the left leg (
1
) using M5x8 round head screws, nuts and lockwashers,
DO NOT
tighten at this stage.
NOTE:
Top panel has cut out in the front lip for the cross panel to fit into.
3.
Attach the bottom panel (
5
) with the left leg (
1
) and loosely secure with screws, nuts and
lockwashers.
4.
Attach the right leg (
2
) to the upper and lower panels and loosely secure with screws etc.
5.
Attach the cross panel (
6
) between the upper and lower panels, before loosely securing
with screws, ensure the cross panel is fitted with the shelf bracket facing the right leg
corresponding bracket and the slot for the lock lever to the front of the unit.
6.
Carefully turn the assembly onto its front, attach the back panel and loosely secure with screws etc.
7.
Carefully stand the assembly on its feet.
8.
Remove the three screws etc securing the
top panel (
4
) to the right leg (
2
), this is
necessary to fit the door (
3
).
9.
Fit the door (
3
) between the upper and
lower panels as follows:
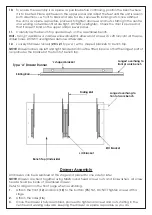
Place flat washer (spacer) A6 on the
bottom hinge pin, gently pull out the top
of the right leg sufficiently to release the
upper panel (see diag on left), insert the
bottom hinge pin into the hole in the lower
panel, raise the upper panel enough to
allow the top hinge pin to pass under and
locate into the corresponding hole.
Lower the upper panel and reattach to the
right leg and tighten screws etc. Refit 3
screw and nut etc removed earlier.
Lower Panel
Right Leg
Upper Panel
Lower Hinge Pin
Upper Hinge Pin


