

IMPORTANT:
T
he use of parts other than CLARKE replacement parts may result in safety hazards,
decreased tool performance and may invalidate your warranty.
Accessories
A wide range of airline accessories is available from your nearest CLARKE dealer, for further information, contact your nearest dealer, or telephone
CLARKE International Sales department on 01992 565300.
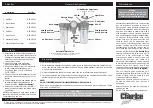
Parts List
General Arrangement
Description
Part No
1
Air Filter.
NSCMF201
2
Water Bowl.
NSCMF202
3
Drain Valve.
NSCMF203
4
Oil Bowl.
NSCMF204
5
Bowl Cover.
NSCMF205
6
Pressure Gauge.
NSCMF206
7
Clarke Airline Oil (1Litre).
3050825
Maintenance
Warning!
Disconnect from the air supply, and
relieve any pressure in the tool and
hose, before any disassembly.
Ensure the air is shut off before commencing
any maintenance activities to the unit.
Remove and clean air filter bowl regularly,
DO NOT use abrasive or chemical cleaners,
bowl can be washed in warm water with a
mild detergent, ensure the bowl is rinsed
and dried thoroughly before reassembling,
to carry out this procedure, push in red
button turn bowl in either direction and
remove, bowl can be withdrawn from
outer case by carefully pushing from the
bottom, taking care not to drop it. When
reassembling, ensure the lugs on top of
outer case line up with lugs on top of bowl.
Unscrew air filter by hand, (
Do Not Use
Tools
)
turning anticlockwise, take care not to
crush etc, note orientation of filter
components, (three pieces), clean and
inspect for damage etc. replace if
necessary. Filter assembly can be washed
in warm water soapy water as above, again
ensure parts are rinsed and dried
thoroughly. Reassemble unit noting correct
orientation of parts, (
Do Not Overtighten
).
Check oil level in oil bowl and top up if
necessary to 80% of bowl maximum, Clarke
airline oil. Bowl can be removed and
cleaned as filter bowl above.
Inspect the unit and air hoses for wear or
damage periodically, and replace if
necessary.
External unit can be wiped clean using a
soft damp cloth
DO NOT use damaged or leaking hoses.
Installation
1. Select location where filter/regulator is
to be fitted. care must be taken to avoid
exposure to frost/High temperatures etc,
ensure unit is not exposed to harmful
chemicals or fumes.
2. Mount unit firmly onto wall, using
appropriate fixings, (not supplied).
3. Connect air supply from compressor, to
(Air-IN) ensure pressure does not
excceeed 10bar, CMF2 ¼”BSP and
CMF3 ½” BSP.
4. Connect air out to appropriate point and
terminate with automatic connector or
similar.
5. Fit air pressure gauge, use plumbers tape
to ensure airtight seal with gauge in
vertical position, (
Do Not overtighten
).
6. Switch compressor ON and check for
leaks, any leaks must be rectified before
continuing.
NOTE: for maintenance purposes a suitable
shut off valve should be fitted between the
compressor and the unit.
Operation
1. Switch compressor ON.
2. Pull air pressure adjustment knob down, slowly turn to adjust air pressure to suit tool being
used, (see tool manufacturers specifications). Once desired pressure is reached, push knob
back up into lock position.
3. Adjust oil distribution to suit tool being used, (see tool manufacturers specifications).
4. For the automatic drain valve to operate, the air supply to the unit must be shut off, by either
switching the compressor off or closing the shut off valve.
NOTE :
DO NOT USE FILTER/REGULATOR/OILER WITH SPRAY OR BLOW GUNS.
If you have any problems, please contact your nearest Clarke dealer or telephone Clarke
Service on 020 8988 7400
Pressure Gauge
Air IN
Air OUT
Push IN And Turn
Bowl To Remove
Air Filter Bowl
Oil Filler
Automatic Drain Valve
A length of suitable flexible tubing can be fitted if required,
in order to drain water into a container etc.
Sight Glass
Oil Adjuster
Oil Distribution Adjustment
0 - minimum 9 - maximum
Push IN And Turn
Bowl To Remove
Oil Bowl
Lock
Unlock