background image

8

Parts & Service: 020 8988 7400 / E-mail: [email protected] or [email protected]

DISC SAFETY INSTRUCTIONS

1.

Disc speed.

 Check the speed of the disc before fitting to your angle 

grinder. Never use a disc with a rpm speed less than the rpm speed of your 
angle grinder. See specification on page 18.

2. The outside diameter and thickness of your accessories must be within the 

capacity rating of the power tool. The correct size accessories can be 
correctly guarded and controlled.

3.

Inspect the disc before fitting. 

Never use a disc that is chipped, cracked or 

damaged. Fragments from a broken or damaged disc can cause serious 
injury. Make sure that defective discs are destroyed and not used.

4.

Handling and mounting discs. 

Bonded abrasive products are breakable 

and shall therefore be handled with utmost care. The use of damaged or 
improperly mounted or used abrasive products is dangerous and can 
cause serious injuries.

5.

Disc usage. 

Always refer to the label for specified usage and observe the 

safety information. Do not use for purposes other than specified. Discs for 
wet cutting applications must not be used with this angle grinder.

6.

Use the correct disc. 

Always use the correct disc for it’s intended task. Using 

the incorrect disc can cause serious injury.

7.

Using the disc. 

Allow the disc and tool to do the work. Never force the disc 

onto the workpiece as this could cause kickback and/or shatter the disc 
causing serious injury. Kickback can occur in the event of a disc jam.

8.

Cutting discs. 

Do not use cutting discs for side grinding. Do not put 

sideways pressure on cutting discs.

9.

Do not use reducing bushes. 

Do not use separate reducing bushes or 

adapters to adapt large hole abrasive wheels. Do not force a disc onto a 
machine or alter the size of the arbor hole.

10. Never use a damaged disc. Inspect each disc before each use for chips, 

cracks, excess wear. If the tool or accessory is dropped, inspect for 
damage or install a new accessory. After fitting the accessory, position 
yourself away from the plane of the rotating accessory and run the tool at 
full speed. damages discs are likely to break apart during this test.

11.

Handling and storing discs.

Abrasive products shall be handled and 

transported with care. Abrasive products shall be stored in such a manner 
that they are not subjected to mechanical damage and harmful 
environmental influences.

12. Always use undamaged mounting flanges that are of the correct size and 

shape for your cutting or grinding disc. Proper flanges support the disc and 
reduce the possibility of breakage.

Summary of Contents for CAG800

Page 1: ...OPERATING MAINTENANCE INSTRUCTIONS GC0614 4 115mm ANGLE GRINDER MODEL NO CAG800 PART NO 6470143...

Page 2: ...ooklet carefully you encounter problems take the unit to your local CLARKE dealer CONTENTS GUARANTEE This product is guaranteed against faulty manufacture for a period of 12 months from the date of pu...

Page 3: ...nt recycling recovery and environmentally sound disposal of the WEEE In effect this means that this product must not be disposed of with general household waste It must be disposed of according to the...

Page 4: ...t use adapter plugs with earthed grounded power tools Unmodified plugs and matching outlets will reduce the risk of electric shock 2 Do not expose power tools to rain or wet conditions or use discs th...

Page 5: ...ry or long hair can be caught in moving parts Keep the work area clean and tidy 7 This tool vibrates with use Vibration may be harmful to your hands or arms Stop using the tool if discomfort a tinglin...

Page 6: ...for purposes not intended 4 Always position the power cable clear of the spinning disc If you loose control the cable may be cut or snagged and you hand drawn onto the spinning disc 5 Start up speed...

Page 7: ...before putting the angle grinder down 17 Use the disc guard Do not use the angle grinder without the disc guard Make sure that the guard is securely fitted and positioned for maximum safety before op...

Page 8: ...ays use the correct disc for it s intended task Using the incorrect disc can cause serious injury 7 Using the disc Allow the disc and tool to do the work Never force the disc onto the workpiece as thi...

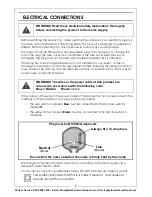
Page 9: ...n into a mains socket could cause an electrical hazard If the colours of the wires in the power cable of this product do not correspond with the markings on the terminals of your plug proceed as follo...

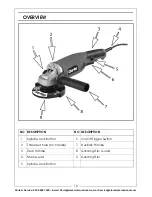
Page 10: ...nal com or Service clarkeinternational com OVERVIEW NO DESCRIPTION NO DESCRIPTION 1 Spindle Lock Button 6 On Off Trigger Switch 2 Threaded hole for handle 7 Auxiliary Handle 3 Rear Handle 8 Grinding D...

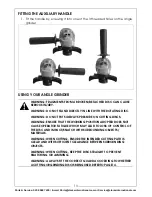
Page 11: ...e by tightening the screw 3 Ensure the disc guard is securely fitted before using the grinder WARNING MAKE SURE THAT THE ANGLE GRINDER IS SWITCHED OFF AND UNPLUGGED FROM THE MAINS SUPPLY BEFORE FITTIN...

Page 12: ...n the opposite side engages with the flat section on the spindle 5 Place the grinding disc over the spindle and on top of the inner flange Place the disc onto the spindle as shown Make sure that the d...

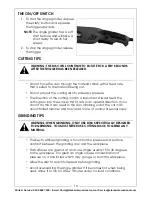
Page 13: ...THE ROTATING DISC WARNING DO NOT PUT SIDEWAYS PRESSURE ON CUTTING DISCS WARNING ENSURE THAT THE WORKING POSITION ADOPTED DOES NOT CAUSE OPERATOR FATIGUE WHICH MAY LEAD TO LOSS OF CONTROL OF THE DISC...

Page 14: ...not do this It can result in the disc climbing out of the cut in an uncontrolled manner and may lead to loss of control or serious injury GRINDING TIPS The key to efficient grinding is to control the...

Page 15: ...re semi flexible wheels The closed guard should be used with type 1 41 42 discs as follows Type 1 Straight grinding wheels Type 41 Flat cutting off wheels Type 42 Depressed centre cutting off wheels S...

Page 16: ...and screws are tight and secure Check the secondary handle and the guard for damage Always have any damaged or worn parts repaired or replaced Always have your angle grinder inspected and maintained...

Page 17: ...17 Parts Service 020 8988 7400 E mail Parts clarkeinternational com or Service clarkeinternational com PARTS LIST DIAGRAM...

Page 18: ...ess Head Screw M4x14 33 Housing 9 Front Cover 34 Carbon Brush 10 Bearing 6201 35 Carbon Brush Holder 11 Bearing Platen 36 X head ST Screw M3 5x5 12 Cross Recess Head Screw M4x10 37 X head ST Screw M3x...

Page 19: ...19 Parts Service 020 8988 7400 E mail Parts clarkeinternational com or Service clarkeinternational com DECLARATION OF CONFORMITY...

Page 20: ......

Reviews: