


10
Parts & Service: 020 8988 7400/E-mail:[email protected] or [email protected]
BEFORE USE
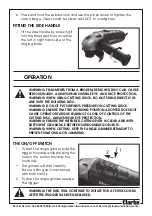
FITTING / ADJUSTING THE DISC GUARD
Slide the disc guard over the end of
the grinder.
Rotate the guard to the required
position and secure by tightening the
screw into the square nut until the
guard is clamped in place.
The guard should be fitted to give
maximum protection from the disc
when fitted in the working position.
FITTING/REMOVING THE DISC
Ensure the disc guard is correctly fitted before installing the disc.
WARNING: MAKE SURE THAT THE GRINDER IS SWITCHED OFF AND
UNPLUGGED FROM THE MAINS SUPPLY BEFORE FITTING OR REMOVING
THE DISC.
1. Press and hold the spindle lock
button.
•
You may need to turn the spindle
by hand to fully engage the
spindle lock.
2. Use the pin spanner supplied to
loosen & remove the outer flange.
3. Ensure that the inner flange is
fitted correctly with the raised flat
surfaces pointing inwards as
shown to engage with the flat
section on the spindle.
4. Place the grinding disc over the spindle to sit on the inner flange.
•
If the grinding wheel supplied is a ‘Depressed Centre’type, mount it as
shown, i.e. with the depressed centre towards the machine.
•
For standard discs ensure the raised section of the outer flange is pointing
towards the disc.
5. Screw on the outer flange with the centre boss facing inwards so as to sit
inside the apperture of the disc. Tighten securely with the pin spanner.
•
When using thin discs, the outer flange can be reversed so that the raised
section is pointing away from the disc.
Disc Outer flange
pin spanner
Raised surface
of inner flange


