background image

Basic Operations

25

VRX868RVD

English

Owner

’s ma

nua

l

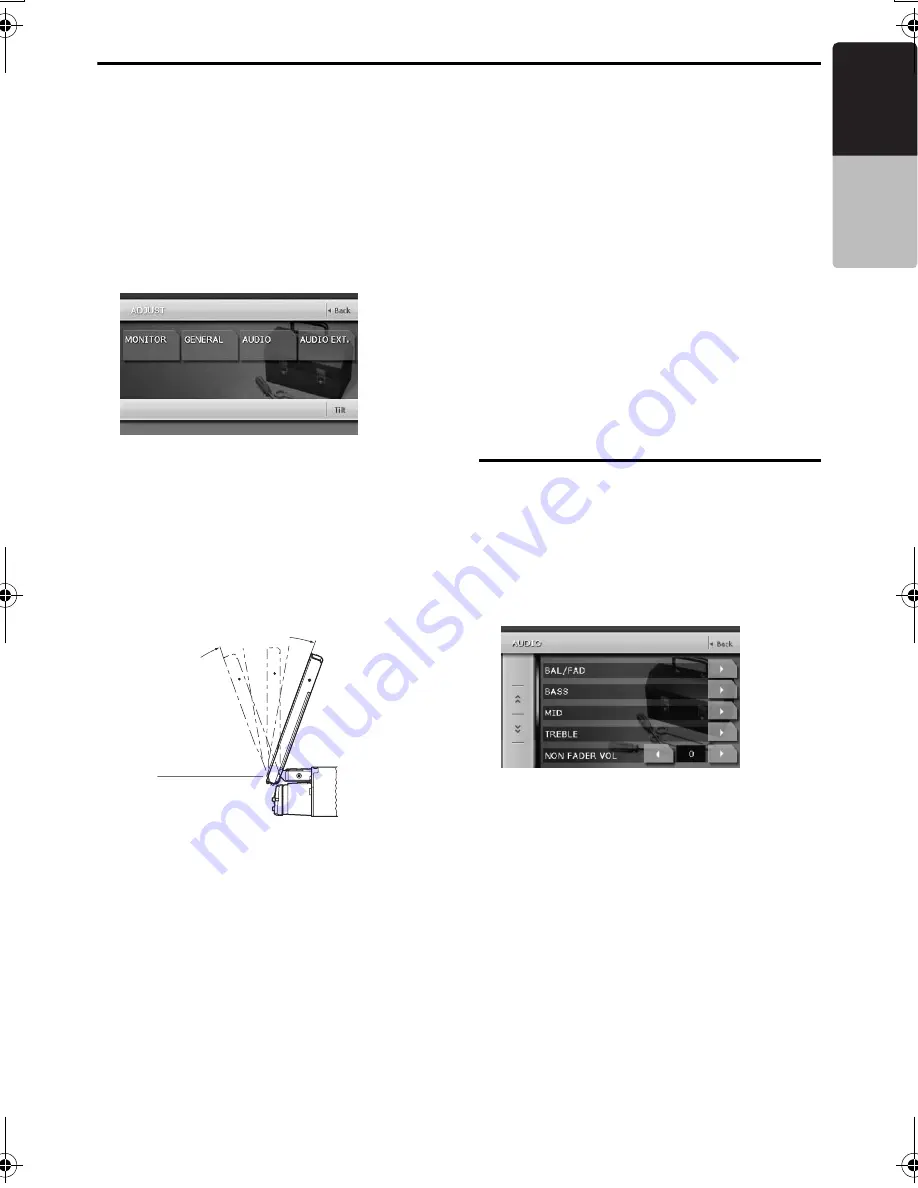
Adjusting the angle of the liquid 
crystal panel

The angle of the liquid crystal panel can be 
adjusted depending on the mounting angle of the 
unit or light coming into the car.
1. Turn the power on. When the liquid crystal 

panel is closed, press the [

P

] (OPEN) 

button.

2. Press the [

ADJ

] button to display the following 

screen:

3. Repeat touching the [

Tilt

] key to adjust the 

angle of the liquid crystal panel. Every 
touching the [

Tilt

] key tilts the liquid crystal 

panel forward or backward.
The adjusted angle is stored in memory.

*

Adjustment is possible within the range 70

°

 to 

110

°

.

*

There are 5 adjustable angle available.

Housing the liquid crystal panel

1. Press the [

P

] (OPEN) button.

The liquid crystal panel is housed 
automatically.

Note:

When leaving this unit unused for a long period of 
time or leaving your car, be sure to house the liquid 
crystal panel.

Turning the liquid crystal panel 
horizontal (Air conditioner operation 
mode)

When the way the liquid crystal panel is mounted 
hinders the operation of the air conditioner, the 
position of the panel can be turned horizontal 
temporarily.
1. Keep pressing the [

P

] (OPEN) button more 

than 2 seconds when the liquid crystal panel 
is open.
A beep sounds and the liquid crystal panel 
turns horizontal.

*

Press the [

P

] (OPEN) button again for the 

panel to return to the original position.

*

The unit can be set so that the panel returns to 
the original position after a set time in the 
horizontal position (See page 30).

Adjusting the AUDIO

Note:

When the optional 5.1 ch Surround Decoder 
(DVH943N) is used, the following tone 
adjustments cannot be made. To adjust the tone, 
refer to the section “

5.1 ch Surround Decoder 

Operations

”.

1. Press the [

ADJ

] button, then touch the 

[

AUDIO

] key.

2. Touch the item key to adjust.
3. Perform the adjustment.

See the following sections for detail.

4. Touch the [

Back

] key to return to the previous 

screen.

*

In the following sections, only the details 
regarding adjustments are described, 
procedures to select items are skipped.


MAX 110˚ 

70˚ 

VRX868RVD.book  Page 25  Thursday, April 27, 2006  3:41 AM

Summary of Contents for VRX868RVD

Page 1: ...DVD MULTIMEDIA CON PANEL DE CONTROLTÁCTIL DVD MULTIMEDIESTATION MED PEKSKÄRM ESTAÇÃO MULTIMÉDIA PARA DVD COM CONTROLO DE PAINEL DIGITAL Owner s manual Installation manual Mode d emploi et manuel d installation Benutzerhandbuch Installationshandbuch Manuale dell utente e manuale di installazione Gebruikershandleiding en installatiehandleiding Manual de instrucciones y de instalación Ägar installati...

Page 2: ...dvendigt på apparatet og indikerer at apparatet arbejder med laserstråler af klasse 1 hvilket betyder at der anvendes laserstråler af svageste klasse og at man ikke på apparatets yderside kan blive udsat for utilladelig kraftig stråling APPARATET BØR KUN ÅBNES AF FAGFOLK MED SÆRLIGT KENDSKAB TIL APPARATER MED LASERSTRÅLER Indvendigt i apparatet er anbragt den her gengivne advarselsmækning som adva...

Page 3: ...rations NAX963HD etc 64 5 1 ch Surround Decoder Operations 66 12 IN CASE OF DIFFICULTY 70 13 ERROR DISPLAYS 72 14 SPECIFICATIONS 73 INSTALLATION AND WIRE CONNECTION MANUAL 74 1 BEFORE STARTING 74 2 PACKAGE CONTENTS 74 3 GENERAL CAUTIONS 74 4 CAUTIONS ON INSTALLATION 75 5 INSTALLING THE MAIN UNIT 76 6 REMOVING THE MAIN UNIT 78 7 CAUTIONS ON WIRING 78 8 WIRE CONNECTION 79 9 SAMPLE SYSTEM 82 1 FEATUR...

Page 4: ...rystal panel is closed press this button to change to the next mode such as TUNER mode When the liquid crystal panel is open press this button to display the Source menu screen to switch the mode R F buttons Use these buttons to change to the previous next preset station in the TUNER TV DAB modes Use these buttons to select a track in the CD Video CD MP3 WMA iPod and CD changer modes Use these but...

Page 5: ...roadcast reception when the optional TV tuner is connected When receiving the TV broadcast the strength of the signals changes since the car is moving so in some cases it may not be possible to receive clear pictures TV signals are strongly linear so reception is affected by buildings mountains and other obstacles Such external factors such as electric train lines a high voltage lines and signal d...

Page 6: ...performed under the following conditions When power is first turned on after initial installation When an external device is connected or disconnected When Reset button is pressed In addition to the above conditions the system check function can be performed from the GENERAL menu in the ADJUST mode You can change the media sources Engine ON position When the liquid crystal panel is closed When the...

Page 7: ...t screen Option Menu PTY Preset List screen PTY Item List screen Note 1 These images indicate the buttons to press or keys to touch 2 External equipment not connected with CeNET is not displayed 3 When the TUNER mode is currently selected touch the Back key Selects desired station ...

Page 8: ...de operation 4 Source menu Screen during DVD mode when motorcar moving DVD PLAYER mode screen Option menu DVD SETUP menu Note 4 When displaying movies in DVD video mode touching the screen surface will cause the DVD PLAYER mode screen to be displayed ...

Page 9: ...11 VRX868RVD English Owner s manual Adjusting audio feature settings When no surround decoder is connected ADJUST mode menu AUDIO menu BAL FAD screen BAL FAD AUDIO EXT menu From any screen ...

Page 10: ...12 VRX868RVD English Owner s manual When the 5 1 ch Surround Decoder is connected ADJUST mode menu From any screen AUDIO menu STATUS screen SPEAKER SEL menu STATUS SPEAKER SEL AUDIO EXT menu ...

Page 11: ...her system settings From any screen ADJUST mode menu MONITOR menu Switched by touching this key repeatedly Hue is not displayed when displaying PAL images GENERAL menu WALL COLOR screen WALL COLOR Monitor Adjust screen Bright Color Hue Dimmer MONITOR ADJ ...

Page 12: ... batteries improperly can cause them to explode Take note of the following points When replacing batteries replace both batteries with new ones Do not short circuit disassemble or heat batteries Do not dispose of batteries into fire or flames Dispose of spent batteries properly MUTE VOLUME P TIME BAND SRC 0 9 DISC SEL SEARCH MODE MENU RTN SET UP TOP MENU 2 ZONE PBC RDM SLOW ANGLE SCN RPT AUDIO SUB...

Page 13: ...the TA Traffic Announcement standby mode Keep pressing more than 1 second in the DAB mode to turn on off the Information standby mode RPT button Press this button to turn on off the AF function in the RDS and DAB modes Keep pressing more than 1 second to turn on off the REG function in the RDS mode RDM button Press to switch between TV mode and VTR mode Press to turn on off the PTY standby mode in...

Page 14: ...pressing more than 1 second to play folders at random in MP3 WMA mode PBC button Press to turn on off the PBC function in the Video CD mode AUDIO button Press to switch the AUDIO function in the DVD video Video CD modes SUB TITLE button Press to display subtitles in the DVD video mode ANGLE button Press to switch the ANGLE function in the DVD video mode when the Angle mark is displayed This button...

Page 15: ... Disc List screen E e T t buttons Press to scroll the Disc Track List screen SCN button Press to perform track scan Keep pressing more than 1 second to perform disc scan RPT button Press to perform track repeat Keep pressing more than 1 second to perform disc repeat Other button operations in this mode are the same as those in DVD PLAYER mode When SUB zone is selected SUB zone operations are suppo...

Page 16: ...o OFF and you turn the power off be sure to close the liquid crystal panel for safe before removing the DCP Attaching the DCP 1 Hook the right side of the DCP to the right side of the main unit 2 Settle the left side of the DCP to the main unit CAUTION CAUTION This unit uses a magnet to fix the DCP For the items that can be affected by magnetism such as magnetic cards be sure to keep them away fro...

Page 17: ... remote control sensor is exposed to direct sunlight In extremely cold weather the display movement may slow down and the display may darken but this is not a malfunction The display will work normally when the temperature increases Small black and shiny spots inside the liquid crystal panel are normal for LCD products The liquid crystal panel may stop temporarily when it opens or closes when the ...

Page 18: ...eets or discs equipped with stabilizers etc These may damage the disc or cause breakdown of the internal mechanism Storage Do not expose discs to direct sunlight or any heat source Do not expose discs to excess humidity or dust Do not expose discs to direct heat from heaters Cleaning To remove fingermarks and dust use a soft cloth and wipe in a straight line from the centre of the disc to the circ...

Page 19: ... to select the angle of choice The number of recorded angles are indicated by the icon shown below Subpicture subtitles function A DVD video can record subtitles for up to 32 languages and you can select the language of the subtitles you wish to see The number of recorded subtitle languages are indicated by the icon shown below Multi story function When a DVD video contains more than one story for...

Page 20: ...nding on its recording conditions You cannot play Super Audio CDs Playback of the CD player is not supported even if it is a hybrid disc About MP3 WMA playback This unit can play back CD R CD RW DVD R RW and DVD R RW discs on which MP3 WMA music data have been recorded For a detailed information see the section entitled Listening to an MP3 WMA page 50 Note on region numbers The DVD video system as...

Page 21: ...s off Selecting a mode When the liquid crystal panel is open 1 Press the SRC button to display the Source menu External equipment not connected to this unit is not displayed 2 Touch the desired mode key When the liquid crystal panel is closed 1 Press the SRC button to change the operation mode Each time you press the SRC button the operation mode changes in the following order TUNER mode DAB mode ...

Page 22: ...The liquid crystal panel s maximum angle of inclination can be adjusted to match the installation configuration within the vehicle Perform this with the panel in its housed position 1 Keep pressing the P OPEN button more than 5 seconds The electronic beep will be heard After the beep sounds twice the panel will come out and stand up to the maximum angle After completion of the calibration the pane...

Page 23: ...id crystal panel horizontal Air conditioner operation mode When the way the liquid crystal panel is mounted hinders the operation of the air conditioner the position of the panel can be turned horizontal temporarily 1 Keep pressing the P OPEN button more than 2 seconds when the liquid crystal panel is open A beep sounds and the liquid crystal panel turns horizontal Press the P OPEN button again fo...

Page 24: ...ge left 13 to right 13 Emphasises the sound from the left speakers Emphasises the sound from the right speakers 2 1 Touch the key of the BASS item 3 1 When the AUDIO BASS screen is displayed touch the or key for the desirable type to adjust to a desirable level GAIN 6 to 8 The factory default setting is 0 FREQ 50Hz 80Hz 120Hz The factory default setting is 50Hz Q 1 1 25 1 5 2 The factory default s...

Page 25: ...o be displayed directly by pressing the MONI button 2 2 Touch the AUTO DAY or NIGHT key to set the colour mode The factory default setting is AUTO AUTO The colour is changed according to the status of the car light When the car light is off light grey colour When the car light is on dark grey colour DAY Set to the light grey colour NIGHT Set to the dark grey colour 2 1 Touch the key of the MONITOR...

Page 26: ...monitor screen is locked to show the visual input source 2 To cancel the monitor lock press the MAP button The screen returns to show the image of the selected mode Adjusting the GENERAL 1 Press the ADJ button then touch the GENERAL key 2 Touch the C key to display the next menu screen if desired 3 Perform the adjustment for the desired item See the following sections for detail 4 Touch the Back k...

Page 27: ... Select when the Clarion navigation system NAX943DV NAX9500E is connected COMPOSITE Select when a navigation system of the other manufacturer is connected OTHERS Select for external devices other than a navigation system NONE Select when no external device is connected The factory default setting is NONE 3 1 Touch the key of the CONNECT item to display the CONNECT screen 3 2 Touch the RGB COMPOSIT...

Page 28: ...tory default setting is 10 seconds 3 1 Touch the C key to display the next menu screen 3 2 Touch the key of the SYSTEM CHECK item The available operation mode is listed in white letters 3 3 Touch Check key at the top right of the screen to perform the system check manually The system will be restarted after performing the system check 3 1 Touch the C key to display the next menu screen 3 2 Touch t...

Page 29: ...f the MAIN zone is muted and the sound of the SUB zone is output normally When it arises during 2 ZONE OFF the audio signals to the 4ch speakers are attenuated and the voice from the navigation system is output from the front two speakers You cannot operate the 2 ZONE function during the voice interrupt of the navigation system If a mobile phone interrupt arises when an external equipment is speci...

Page 30: ...al panel Displays image of device connected to the Visual terminal 3 Displays image of device connected to the Visual terminal Displays image of mode selected from the Source menu Rear monitor optional Displays image of mode selected from the Source menu 2 Audio output Sound from mode selected from the Source menu is output from 4ch speaker NON FADER and AUDIO OUT Front monitor lock ON Front monit...

Page 31: ...ly seek a station When the x key is touched the station is sought in the direction of higher frequencies if the X key is touched the station is sought in the direction of lower frequencies When the DX Seek tuning starts DX SEEK appears on the screen LOCAL SEEK If you keep touching the X or x key more than 1 second the Local Seek tuning is carried out The broadcast stations with good reception sens...

Page 32: ...ired station with the seek tuning manual tuning or preset tuning 3 Touch the List key 4 Touch and hold one of the Preset key for more than 2 seconds to store the current station into the preset memory Auto store The Auto Store is a function for storing up to 6 stations that are automatically tuned in sequentially If 6 receivable stations cannot be received a previously stored station remains unove...

Page 33: ...eption The factory default setting is ON When the AF function is on AF blinks on the screen Switching ON OFF the AF function 1 Touch the ON or OFF key of the AF item to turn the function on or off If the reception of the current broadcast station deteriorates durably SEARCH is displayed on the screen and this unit searches for the same programme on another frequency AF function between RDS and DAB...

Page 34: ...goes into the TA standby mode Cancelling TA standby mode 1 When TP and TA are displayed on the screen press the TA button TA on the screen goes off and the TA standby mode is cancelled If TP is not displayed press the TA button to search for a TP station Searching for a TP station 1 When TP is not displayed press the TA button TA is displayed on the screen and this unit automatically searches for ...

Page 35: ... the unit returns to the previous mode PTY preset memory 1 Touch the Option key on the RDS mode screen 2 Touch the Item key of PTY SELECT item The PTY select mode is turned on 3 Touch your desired Programme Type key to select 4 Touch the Preset key to display the Preset screen Keep touching your desired Preset key on the Preset screen more than 2 seconds to store the selected programme type into t...

Page 36: ...touch the GENERAL key 2 Touch the C key to select PTY LANGUAGE item 3 Touch the key of the PTY LANGUAGE item and touch the desired language key to change the setting 4 Touch the Back key to return to the previous screen Volume setting of TA emergency broadcast ALARM and PTY The volume for TA ALARM and PTY interrupts can be set during TA ALARM or PTY interrupt The factory default setting is 15 1 Pr...

Page 37: ...e screen size Set up the screen size according to the rear view monitor which is connected to this unit When watching through a conventional type of the rear view monitor 4 3 N PS The leftmost and rightmost areas of the screen are cut off This function allows displaying the important part of image fully on the screen In some cases image is displayed while being panned scrolled N LB A black zone is...

Page 38: ...ouch the key of SUBTITLE LANGUAGE item The SUBTITLE LANGUAGE menu is displayed 4 2 Touch the key to select a desired language to set it The factory default setting is ENGLISH 4 1 Touch the key of PASSWORD item The PASSWORD screen is displayed 4 2 Touch the ten key 0 to 9 to input a 4 digit password Input the old password and touch the ENT key Input 4356 to return password to 0000 Input a new passw...

Page 39: ... 7767 NETHERLANDS 7876 NETHERLANDS ANTILLES 6578 NORWAY 7879 OMAN 7977 POLAND 8076 PORTUGAL 8084 QATAR 8165 ROMANIA 8279 SAN MARINO 8377 SAUDI ARABIA 8365 SLOVAKIA Slovak Republic 8375 SLOVENIA 8373 SOUTH AFRICA 9065 SPAIN 6983 SWAZILAND 8390 SWEDEN 8369 SWITZERLAND 6772 SYRIAN ARAB REPUBLIC 8389 TURKEY 8482 UNITED ARAB EMIRATES 6569 UNITED KINGDOM 7166 Vatican City State 8665 YEMEN 8969 YUGOSLAVI...

Page 40: ...tion which turns off the picture when the car is moving so only the audio can be heard The picture can only be watched when the car is stopped and the parking brake is applied Pausing play 1 Press the p button or touch the p key to pause play PAUSE appears in the display 2 To resume disc play press the p button again Ejecting a disc 1 Press the o EJECT button to eject disc EJECT appears in the dis...

Page 41: ...y during playback The DVD menu appears The displayed contents differ depending on the DVD software Example showing DVD menu display Operating the DVD menu You can select the button items displayed in the DVD menu by directly touching it If the button items are hard to select correctly you can also operate them by displaying Key Pad on the screen When the Key Pad is displayed direct operation of th...

Page 42: ...apter searching About chapter Chapter means a small segment to divide the data area of the disc 1 Press the R or F button during playback Chapters are skipped as many as the times the button is pressed and playback starts Pressing the F button starts playback from the beginning of the next chapter Pressing the R button starts playback from the beginning of the current chapter When this button is p...

Page 43: ... Chapter Scan key then touch the Back key The message C SCN will be displayed After scan playback of all chapters on the disc chapter scanning through the same disc is performed again Depending on the disc the menu may appear again after scan playback of all chapters within the title 3 Press the R button to turn off the scan playback Repeat playback This operation plays back chapters recorded on t...

Page 44: ...ending on the disc switching may be completely impossible or impossible on some scenes It may take time to switch among subtitles 3 Touch the Back key to return to the previous screen To turn off subtitles 1 Repeat touching the Sub Title key until Sub Title OFF is displayed on the screen Subtitles are turned off Switching angles On DVD discs in which video images have been recorded in two or more ...

Page 45: ...ess the p button Playback stops 2 To resume playback press the p button again Playback resumes from the scene where playback is paused Slow playback 1 Press the p button then press and hold the F button While pressing the button slow playback continues at the speed 1 3 times the normal playback Slow playback cannot be performed in the backward direction In addition audio cannot be reproduced durin...

Page 46: ...ayback status will be displayed on the playback screen On Off of Playback Control On Video CDs equipped with Play Back Control function you can turn it on off The factory default setting is ON 1 Touch the screen to display the VIDEO CD mode screen 2 Each time you touch the PBC key you can switch between on and off When the PBC is turned on or off the disc plays from the beginning Playback control ...

Page 47: ...uch the ENT key Playback starts from the track of the input track number If the input track number does not exist or searching with a track number is not allowed the screen image will not change 4 Touch the Back key Selecting a track on the Track List screen This function allows you to select tracks from a displayed list 1 Touch the List key The Track List screen is displayed 2 When the desired tr...

Page 48: ...g single byte letters If you add a file extension other than specified or forget to add these file extension the file cannot be played In addition if you use upper case and lower case letters capital and small letters mixedly for file extensions normal play may not be possible 2 Files other than MP3 WMA data cannot be played Playing files with a format not supported will be skipped and the scan ra...

Page 49: ...vels Folders containing no MP3 WMA files are not recognised Only folders containing tracks 1 to 4 in illustration are given numbers and displayed on the list Pausing playback 1 Press the p button or touch the p key during playback Playback pauses 2 To resume playback press the p button or touch the p key again Playback resumes Skipping a track searching 1 Press the R or F button during playback Tr...

Page 50: ...lder number 4 Touch the Back key Other various play functions 1 Touch the Option key 2 Touch the touch key of the function you want to play Track Scan track scan playback This operation scans and plays back all tracks recorded on the disc the first 10 seconds for each T SCN is displayed on the screen Folder Scan folder scan playback This operation plays back the first tracks of all folder on the M...

Page 51: ...conds to store the title into memory The display returns to the original mode screen Title list play You can display a list of titles then select the CD track disc or broadcast station to listen to from that list You cannot display a title list with the unit in Seek Preset Scan Auto store TV mode Cancel those operation modes before displaying a title list 1 Touch the screen TV mode only 2 Touch th...

Page 52: ...ode The image at both top and bottom in a display disappears NORMAL normal display There is a black area at both right and left ends of a display In case of normal TV broadcasting 4 3 the image can be shown without being cut or deformed Note When a 4 3 scale image non wide screen image is displayed part of the image may be out of view or the image may be distorted when in wide mode or full wide mo...

Page 53: ...nctions are available or not depends on the iPod version The iPod is used with the equalizer function turned OFF Do NOT connect an iPod to the unit with a headset connected to the iPod Precautions regarding battery consumption When the iPod s internal battery becomes depleted the recharge warning indicator will appear in the iPod s display In this condition the iPod cannot be played even if attach...

Page 54: ...n Playback resumes Skipping a track searching 1 Press the R or F button during playback Tracks are skipped as many as the times the button is pressed and playback starts Pressing the F button starts playback from the beginning of the next track Pressing the R button starts playback from the beginning of the current track When this button is pressed again within about 2 seconds playback starts from...

Page 55: ...optional connector cable for iPod with video you can enjoy the video data and slideshow data stored in the iPod showing them on the liquid crystal panel of this unit and the rear monitor if connected Note Do not connect the iPod to this unit when a Video Playlists item is selected on the iPod 1 Touch the VIDEO key on the iPod menu screen The screen will be changed to a black screen In this conditi...

Page 56: ...hile the player loads checks the magazine If NO DISC appears in the display eject the magazine and insert discs into each slot Then reinsert the magazine back into the CD changer Pausing play 1 Press the p button or touch the p key during playback Playback pauses and PAUSE appears in the screen 2 To resume playback press the p button or touch the p key Playback resumes Displaying the CD TEXT title...

Page 57: ...eginning of the previous track Fast forward and fast backward 1 Press and hold the R or F button during playback The playback speed becomes 5 time faster first and then 20 time faster 3 seconds later Releasing the button resumes the normal speed playback Other various play functions 1 Touch the Option key 2 Touch the touch key of the function you want to play Track Scan track scan playback This sc...

Page 58: ...turns off the picture when the car is moving so only the audio can be heard The picture can only be watched when the car is stopped and the parking brake is applied 1 Press the SRC button and touch the TELEVISION key 2 Press the BAND button or touch the Band key to select the desired TV band TV1 or TV2 Every pressing the button toggles the TV band between TV1 and TV2 3 Press the R or F button to t...

Page 59: ...Auto store Auto store selects 6 TV stations automatically and stores each one into a preset memory If 6 stations cannot be received with good reception previously stored station remain and only the strong stations are stored into memory 1 Touch the Band key to select the desired TV band TV1 or TV2 2 Touch the List key 3 Touch and hold the AS key for more than 2 seconds A beep sounds and the statio...

Page 60: ...time the button is pressed the reception band changes in the following order M1 M2 M3 M1 This unit has the separated preset memory function for DAB stations Up to 18 stations 6 for each M1 M2 and M3 can be preset in the Preset keys 3 Press the R or F button to recall the stored programme Seek tuning 1 Press the BAND button to select the desired band M1 M2 or M3 If MANU is displayed at the bottom o...

Page 61: ...uch the Option key and then touch the key of the INFO SELECT item The INFO SELECT screen is displayed 2 Touch the ON or OFF key of the desired Information item 3 Touch the Back key to return to the previous screen PTY This function enables you to listen to the selected programme type regardless of the function mode DAB and RDS have the same PTY You can select one PTY from DAB or RDS PTY broadcast ...

Page 62: ... NONE to set the function RGB Select when the Clarion NAVI NAX943DV NAX9500E is connected Control of it can be made only from the remote control unit and the NAVI voices are output from the special speakers for the NAVI COMPOSITE Select when a NAVI of the other manufacturer is connected Control of it can be made only from the remote control unit and the NAVI voices are output from the special spea...

Page 63: ... Be sure to perform this setting after connecting the RGB type or composite type image equipment to the RGB terminal 1 Press the ADJ button and touch the GENERAL key 2 Touch the key of the CONNECT item 3 Touch the OTHERS key to set the function Changing display It is possible to change between the AV display and the external equipment display using the MAP button 1 To switch from the AV screen to ...

Page 64: ...only the details regarding settings are described procedures to select setting items are skipped SPEAKER SEL speaker selection This function determines centre speaker surround speaker and sub woofer connection Dolby PLII CONTROL This function is available only when the MUSIC MODE is selected for Dolby PLII For setup details see Selecting the Dolby PLII Dolby Pro Logic II type 3 1 Touch the key of ...

Page 65: ...ault value CENTER HPF This function can be set to the following three settings 50 Hz 80 Hz and 120 Hz 120 Hz is the default value SURROUND HPF This function can be set to the following four settings 50 Hz 80 Hz 120 Hz or THRGH through THRGH is the default value SUB WOOFER LPF This function can be set to the following three settings 50 Hz 80 Hz and 120 Hz 120 Hz is the default value 3 1 Touch the k...

Page 66: ... is not reflected in the music source Setting and storing P EQ Properties 1 Press the ADJ button and touch the AUDIO key 2 Touch the key of the P EQ item to display the submenu 3 Touch the key for the desirable type to select The P EQ adjustment contents are as follows SIGNAL This function selects MUSIC or P NOISE The factory default setting is P NOISE SPEAKER SELECT This function selects FRONT CE...

Page 67: ... key of the DETAIL item to display the submenu 3 Perform the following adjustments Subwoofer volume adjustment Centre volume adjustment Balance Fader adjustment 3 1 Touch the or key of the SUBWOOFER VOL item to adjust to desirable level Setting range 6 to 3 The factory default setting is 0 3 1 Touch the or key of the CENTER VOL item to adjust to desirable level Setting range 6 to 0 The factory def...

Page 68: ...t receptive part of the remote control unit it may not work The batteries of the remote control unit are dead or there is no battery in the remote control unit Check the batteries of the remote control unit The Reset button Problem Cause Measure Disc cannot be loaded Another disc is already loaded Eject the disc before loading the new one There is a foreign matter already in place Eject the foreig...

Page 69: ...Improper NTSC PAL setting Set the NTSC PAL properly according to the VTR When the TV tuner is connected the image gets unclear Bad receiving condition A radio wave may not reach sufficiently due to obstruction of mountains or buildings Check it again at a place where a radio wave can be received properly The TV tuner has a double or triple image Bad receiving condition It may be under the influenc...

Page 70: ...yed due to scratches etc Replace with a non scratched non warped disc ERROR 6 A disc is loaded upside down inside the DVD deck and does not play Eject the disc then reload it properly PARENTAL VIOLATION Parental level error Set the correct Parental level WRONG REGION Region code error Eject the disc and replace correct region code disc DRM WMA files protected by DRM are played Perform the operatio...

Page 71: ... 60mVrms High 600 80mVrms Mid 840 100mVrms Low input impedance 10 kΩ or greater Video input 1 0 0 2 Vp p input impedance 75 Ω Video Output Video output 1 0 0 2 Vp p output impedance 75 Ω LCD Monitor Screen Size 7 inch wide type 152 mm Width 85 mm Height Display method Transmission type TN liquid crystal display Drive method TFT thin film transistor active matrix driving Pixels 336 960 1440 234 Gen...

Page 72: ...ories No 1 Flat head screw M5 8 4 Sems hexagonal bolt M5 8 5 Electro tap Machine screw M4 3 4 6 Bag for accessories No 2 Hook plate 2 Lead clamp 7 Bag for accessories NO 3 Rca cap 12 8 Universal mounting bracket 9 Remote control unit 0 Battery for remote control unit Outer Escutcheon DCP Case 3 GENERAL CAUTIONS 1 Do not open the case There are no user serviceable parts inside If you drop anything ...

Page 73: ...hamper operation of the shift lever or obstruct your view before selecting the installation location Figure 2 3 Install the unit within 30 of the horizontal plane Figure 3 4 If you have to do any modification on the car body such as drilling holes consult your car dealer beforehand 5 Use the included screws for installation Using other screws can cause damage Figure 4 6 The source unit has mountin...

Page 74: ...ks 4 Mount the outer escutcheon so that all the hooks are locked Note 1 Some car models require special mounting kits for proper installation Consult your Clarion dealer for details 2 Fasten the front stopper securely to prevent the main unit from coming loose Figure 6 Console opening dimensions Hole Main unit 182 mm 53 mm Screwdriver Stoppers Hole Rear fastening hole of vehicle Instrument panel R...

Page 75: ...om the both sides Figure 7 2 Secure the mounting brackets to the chassis as shown in Figure 8 Holes are pre tapped for TOYOTA and NISSAN vehicles modification such as drilling new holes of the mounting brackets may be required for other models 3 Wire as shown in Section 8 4 Secure the unit in the dashboard and then reassemble the dashboard and the centre panel 2 Screw 2 Spring 4 Hexagonal screw M5...

Page 76: ...IRING 1 Be sure to turn the power off before wiring 2 Be particularly careful where you route the wires Keep them well away from the engine and exhaust pipe etc Heat may damage the wires 3 If the fuse should blow check to see if the wiring is correct If a fuse is blown replace it with a new one of the same amperage rating as the original 15A FUSE 4 To replace the fuse remove the old fuse of the po...

Page 77: ...nal Right left Non fader output terminal Grey Black Purple Red White Yellow Yellow Yellow White Red Video output terminal TV tuner input terminal or DVD changer input terminal Video Audio left Audio right Visual input terminal Optical output connector Radio antenna jack Connector cable Wireless Headphone VTR etc 4 Channel Amplifier Right Left 2 ZONE output terminal Grey Rear monitor Black Red Gree...

Page 78: ...ad is not disconnected or front ends are not insulated 3 Connecting the PHONE MUTE Terminal The lead included with the unit must be connected to the specified position of the vehicle s connector in order to use the Mobile phone interrupt setting function See next page for how to connect the parking brake lead 4 2 3 3 B 1 B 6 B 5 B 7 B 8 B 4 B 3 B 2 A 4 A 6 A 8 A 7 1 A 5 1 2 1 5 No Description REAR...

Page 79: ...se use the CAA188 instead If the specified lead of the mobile phone is connected to the phone mute lead of the main unit the audio mute is available when the mobile phone is used TV Tuner When the TV tuner is to be connected connect the CeNET connector and RCA PIN yellow For detailed information refer to the instruction manual of the TV tuner DVD Changer To connect the TV tuner and the DVD changer...

Page 80: ... amplifier Black Digital optical fiber cable included the DVH943N RCA cable sold separately Digital optical fiber cable DCA 005 008 sold separately Set the SLAVE STAND ALONE switch to the SLAVE position Set the CeNET STAND ALONE switch to the CeNET position Grey Grey RCA video cable included the VCZ628 Ferrite clamp Included the DVD changer RCA cable included the DVH943N Red White Non fader output...

Page 81: ......

Page 82: ...yright 2006 Clarion Co Ltd Printed in Japan Imprimè au Japon Gedruckt in Japan Stampato in Giappone Gedrukt in Japan Impreso en Japón Tryckt i Japan Impresso no Japão 2006 5 Y YI QC 6823E 280 8407 00 Clarion Co Ltd VRX868RVD ...

Reviews: