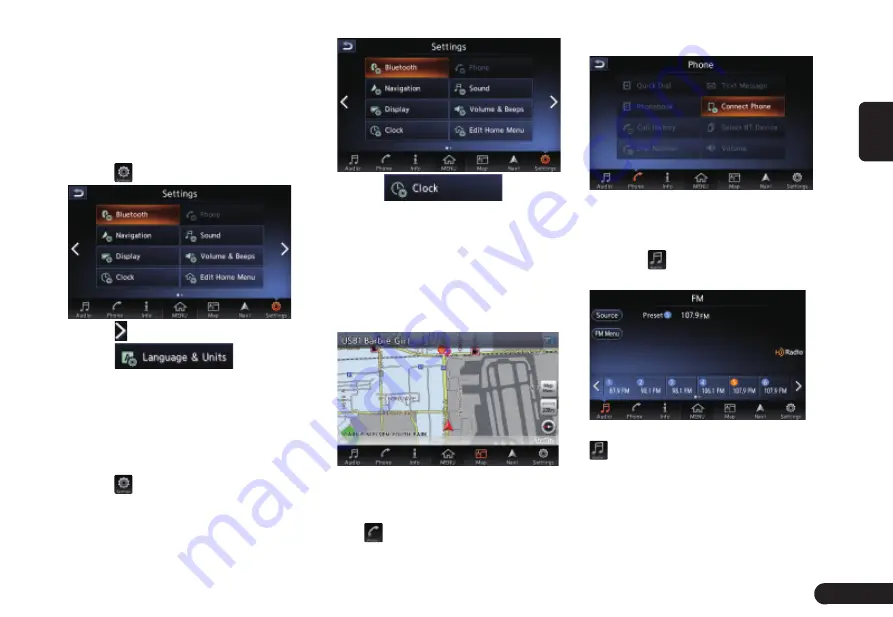
background image

7

English

Basic method of use

Switching the language

When the unit turns on, the default 
language is set to English. Switch to 
your language to use the unit.

Press [

MENU

] button on the panel.

Touch 

 to enter Settings Screen.

Touch   or slide the screen.

Touch 

.

Select the language and unit you 

use.

Setting the time

Press [

MENU

] button on the panel.

Touch 

 to enter Settings Screen.

Touch 

.

Set the clock you need.

Mode Switch

Switch to navigation mode

Press [

MAP

] button on the panel to 

switch to navigation mode for map 
display. 

Switch to Bluetooth mobile 

phone mode 

Touch 

 switch to Bluetooth 

mobile phone mode. 

Switch to source mode

Press [

AUDIO

] button on the panel  

or touch 

 to switch to source mode 

such as Radio mode. 

Press [

AUDIO

] button or touch 

 in Source mode to switch 

to source selection screen. 

Summary of Contents for QY-8600

Page 1: ...MODEL QY 8650 Navigation system manual Car Navigation ...

Page 2: ...5 Basic method of use 6 Basic Operations 7 Basic Settings 8 Source Media Mode 12 Bluetooth Operation 14 Navigation 15 Navigation System Settings 20 Outline of Destination 24 Entering Procedures 24 Entering the Destination 26 Route Guidance 29 About Information 32 ...

Page 3: ...lay or no voice play Or it may trigger accident fire or electric shock Contact NISSAN dealers Stop using it immediately when there is any foreign object water spill smoke or bad smell and contact designated NISSAN dealers Continuous use may trigger accident fire or electric shock Caution The volume during driving shall be adjusted so that the sound outside the vehicle can be heard Or it may cause ...

Page 4: ... outlet on a circuit differ ent from that to which the receiver is connected z z Consult the dealer or an experienced radio TV technician for help This device complies with Part 15 of the FCC Rules Op eration is subject to the following two conditions This device may not cause harmful interference and This device must accept any interference received including interference that may cause undesired...

Page 5: ...No disc in the shape of heart or octagon may be played In order to protect the internal structure of the player the player will stop playing automatically for protection when something abnormal occurs during the playing If the machine can t operate normally even if you oper ate as per the displayed instructions the machine may have malfunctions and you should contact NISSAN dealers Distortion may ...

Page 6: ...on the display If the machine is turned on when the temperature is below zero LCD will appear to be darker than usual until the temperature inside the machine rises Names of Various Parts Panel Buttons 2 4 1 3 5 6 7 8 9 0 1 LCD touch screen To display the working statuses of various modes 2 SD card slot Map SD card 3 CAMERA button To enter camera mode 4 D Next Track button In SB iPod Bluetooth Aud...

Page 7: ... knob Rotate to adjust volume short press to turn off on audio device 9 AUDIO button To enter audio selection screen or Audio Mode 0 Day night button Press to switch between day or night mode MAP button Press to enter the map screen MENU button Press to enter Menu Screen to select audio function or navigation function Caution It is prohibited to pull out the map SD card or the system will not work...

Page 8: ...Setting the time 1 Press MENU button on the panel 2 Touch to enter Settings Screen 3 Touch 4 Set the clock you need Mode Switch Switch to navigation mode Press MAP button on the panel to switch to navigation mode for map display Switch to Bluetooth mobile phone mode Touch switch to Bluetooth mobile phone mode Switch to source mode Press AUDIO button on the panel or touch to switch to source mode s...

Page 9: ... volume when speaking on the phone z z Map navigation Adjust Voice Guidance volume when voice guidance interrupt z z Parking guidance Adjust parking guid ance volume in parking guidance For example turn the volume knob in Source USB mode to adjust the volume as shown below z z Turn the knob clockwise volume up z z Turn the knob counter clock wise volume down Audio On Off When the radio or media pl...

Page 10: ...h to turn Bluetooth On or Off 3 Touch to Select the mobile phone or audio device to connect You can operate as per the information prompted 4 Touch to view and select BT Device 5 Touch to edit Bluetooth information Phone settings You can confirm and view various information concerning about the Bluetooth phone Note Before setting phone you need to pair the mobile phone with this unit 1 Touch to en...

Page 11: ...creen or map navigation screen Or you can press any button for the corresponding operation 3 Touch to enter brightness adjustment screen z Touch or to adjust the brightness of display 4 Touch to enter contrast adjustment screen z Touch or to adjust the contrast of display 5 Touch to enter back ground colour adjustment screen z Touch or to change the background colour Volume and Beeps Adjust the Au...

Page 12: ...e the device by pressing Yes on the pop up screen displayed upon connecting the media device Apple CarPlay settings The connected device supports Ap ple CarPlay Once Apple CarPlay is started some NissanConnect features will be replaced or disabled by CarPlay including NissanCon nect Apps iPod on USB Hands Free phone Bluetooth Audio and naviga tion guidance on the Vehicle Informa tion Display 1 Tou...

Page 13: ... 7 6 1 Channel category 2 Channel name 3 Artist name 4 Song title 5 Save the favorite channel by artist or song alert 6 Preset channel list Station list Up to 18 channels can be saved 7 Switch the play mode between replay and live 8 SiriusXM signal intensity 9 View track list by kinds of categories etc 0Back to source screen USB mode 1 Touch to enter USB audio screen when you connect a USB 1 2 3 4...

Page 14: ...oth Audio mode Before playing Bluetooth Audio you need to pair the audio device with this unit 1 Touch to enter Bluetooth Audio screen 1 2 3 4 5 6 7 1Back to source screen 2 View track list and select a track to play it enter the bluetooth settings screen 3Turn on or off repeat play 4Short touch switch to Previous Track Long touch Fast Backward 5Touch to Play Pause 6Short touch switch to next Trac...

Page 15: ...and operate as per the information prompted 5 After successful pairing it will automatically return to Bluetooth Setting screen Bluetooth Telephone 1 Touch to enter Phone screen 2 Touch to edit and delete Quick Dial number 3 Touch to view Phonebook 4 Touch to view Call History records 5 Touch to dial phone number by keypad 6 Touch to view text message 7 Touch to connect a phone with this unit 8 To...

Page 16: ...ur sor at the centre of the screen as the destination or store it to the Address Book 5 1 2 3 4 1 BACK key Returns to the scrolled Map screen before touching the key 2 New Destination key Sets the location under the cursor as the destination When a destination is already set the old destination is cancelled as soon as the new destination is set 3 Add to Route key When another location is already s...

Page 17: ...n the map of the current location 1 3 2 3 4 1 Audio mark Indicates the current source mode 2 Vehicle mark Indicates the current location and direction of your vehicle 3 Map Menu key Displays the Map menu 4 Map scale key Touch this key to decreases increases the map scale 5 Map bearing mark Indicates the map orientation You can switch the map orientation between Heading Up North Up and 3D map by to...

Page 18: ...to the touched position and keep touching the map to scroll the map towards the touched direction For the 3D map touch the upper part of the map to scroll the map toward the touched direction and touch the left or right part to rotate the map while touching Slow scroll mode operation Touch while scrolling the 2D map to display the following screen Keep touching the desired arrow key moves the map ...

Page 19: ... of the screen z z Turn List During the route guidance mode displays the list of the name dis tance and turning direction of the guid ance junctions at the left of the screen z z Drive Report During the route guid ance mode displays the Drive Report z z Full Map Changes to display one map using full screen Screen examples 2D Map 3D Map 2D 2D Map 2D 3D Map 4 Touch to enter Map Settings screen Map O...

Page 20: ...elected North Up when Zoomed Out key Turn on or off north up when zoomed Names Displayed on Map key Change the names of place facil ity and road displayed on map Left Split Map Settings key Change settings of Map Orienta tion Long Range and Map Scale of left split map Show all Freeway Exits on Route key Turn on to show all freeway exits on route Auto Show Turn List on Freeway key Turn on to show t...

Page 21: ...ocation 1 Touch 2 Touch 3 Search for the location you wish to register by a similar way as for entering destinations 4 Touch to register it 5 Touch to sort the loca tions by number name icon and group To edit a Stored Location 1 Touch 2 Touch the name of the Stored Location you wish to edit 3 Refer to To edit the Home Loca tion on Page 秋20秋to edit it Stored Routes Registers the current route You c...

Page 22: ...an delete various data stored in the navigation system 1 Touch 2 Touch the item key to delete Delete Home Location key De letes your home location Delete Address Book key z Delete All Deletes all the stored locations z Delete 1 Entry Deletes only the location that you specify on the Delete One screen Delete Stored Routes key z Delete All Deletes all the stored routes z Delete 1 Entry Deletes only ...

Page 23: ... 1 Touch to enter route Settings screen 2 Touch the desired item key Basic Route Type key You can change the conditions of route calculation z z Fastest Route Calculates the route of which the required time is shortest z z Minimise Motorways Calculates the route of which motorways are not used as much as possible z z Shortest Route Calculates the route of which the distance is shortest other Routi...

Page 24: ... can reset all the Navigation set tings to return to the factory settings Note G G Though all the settings are reset the stored data such as the Address Book Stored Routes and Avoid Area are not erased 1 Touch 2 Then touch from the displayed confirmation screen Outline of Destination Entering Procedures To start route guidance operate the navigation system with the following procedure Select the m...

Page 25: ...touching the characters on the screen Note G G During the character entry the system shows the city name list automatically when all the matching cities can be displayed on one page 5 Touch to enter the city name you wish to go to by touching characters on the screen Then the system returns to the Street Address screen Enter the street name by the same way 6 Touch to enter the street name you wish...

Page 26: ...Destination menu by using vari ous methods Use a suitable search ing method according to the place you wish to go to Destination menu screen For the operation procedure hereaf ter see the explanation of each sec tion By Street Address For the operation procedure refer to Setting destination by entering the address on page 第21页 By Nearby Points of Interest 1 Touch 2 Touch your desired category An e...

Page 27: ...ry For example When a additional category list is displayed touch a category again to select one 3 Set the narrow down conditions for the places By Name key Input the facility name to narrow down the target place Select a City key Input the city name to narrow down the target place Near Current Location key Shows a list of facilities around the current location Near Destination key When the destin...

Page 28: ...rea code and then touch 2 Touch the place you wish to go from the displayed place list 3 Touch By Freeway Entrance Exit The entrance or exit of a freeway can be set as the destination 1 Touch to enter the character input screen 2 Enter the name of the freeway then touch Freeway list dis played 3 Touch the place you wish to go from the displayed freeway list 4 Touch By City Center The centre of a c...

Page 29: ...ressing the MAP button to switch the screen between the following guidance screens and the full map screen Junction Map When you get near to approx 300 m or 300 yd 1 km or 1 mile for a mo torway from the next guidance point the screen will be divided into two displays and the Junction Map will be displayed on the left display You can set to display the Junction Map screen always in the route guid ...

Page 30: ...e turn ing direction or the distance to the guidance point will be given when you get near to the guidance point You can set whether to use the voice guidance or not and set the volume to be changed according to the vehi cle speed Changing Editing the Route Settings From the Route menu editing the current route confirming the route information setting the conditions of the route calculation etc ca...

Page 31: ... points can be set The specified waypoints are displayed by marks with the ordinal number for visiting Current destination waypoint name key You can touch the name of the current destination or waypoints you wish to edit Route calculation criteria key You can change the conditions of route calculation z z ECO Route z z Fastest Route z z Minimize Freeway z z Shortest Route 3 Change settings by touc...

Page 32: ...erted route where the section from the current location up to the specified distance is avoided 1 Touch to enter the Detour screen 2 Touch the distance you want to avoid The route where the section of se lected distance is avoided is auto matically calculated and the route guidance will be restarted About Information This screen sets or displays various information that is helpful for using the ve...

Page 33: ......

Page 34: ......

Reviews: