background image

NX503E/FX503E

3

English

names and functions of parts

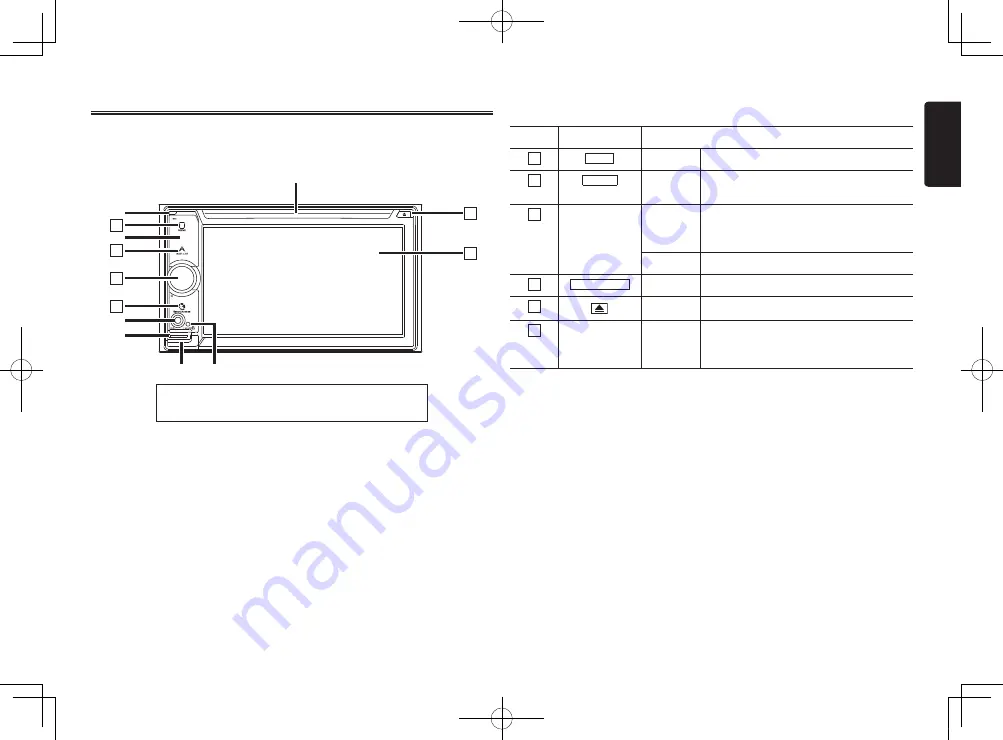
The following describes the button names on the operation panel of the unit and their 
functions.

nX503E

1

2

3

4

5

6

 4

 7

 3

 5

 6

 1

 2

Insert and remove the microSD card after turning off 
the unit, because the microSD card might get damage.


1   This is the built-in microphone. This is used as the microphone for the hands free function 

when the unit is connected to a Bluetooth compatible cellphone by a wireless connection.


2   This is the remote control sensor. This receives the signal from the remote control (sold 

separately).


3   This is the AUX terminal. Audio and video from external devices connected to this terminal can 

be played when the audio mode is switched to AUX.


4   This is the Antitheft Indicator. This light blinks when the Antitheft Activation setting is set to “ON” 

to indicate that the antitheft function is activated.


5   This is where the microSD card is inserted to enjoy data in microSD cards.


6   The map microSD is housed in here. To update the map, open this cover, and remove and 

insert the card.  
Do not open the cover for other operations.


7   This is where DVD video, CD, MP3, WMA, and DivX discs are inserted.

This document uses the following inline graphics and conventions to indicate operations 
using the buttons on the operation panel.

Number

Inline graphic

Description of operation

1

   MEnU  

Short press This displays the main menu screen.

2

   nAVI  AV   

Short press This switches between the current position map 

screen and currently selected audio screen.

3

Turn

This is the rotary volume key.
Use this to adjust the volume of audio-visual 
functions or the route audio guidance, etc.

Short press This turns off the screen.

4

   Smart  Access   

Short press This starts up Smart Access.

5

Short press This ejects the disc inserted in the unit.

6

Touch

This is the monitor and touch panel. This 
functions as a touch panel by touching the 
screen when it is displayed.

S-GPF_EUR_QSG.indb   3

2013/03/15   14:27:54

Summary of Contents for NX503E

Page 1: ... DÉMARRAGE RAPIDE et guide d installation KURZANLEITUNG und Montageanleitung GUIDA DI AVVIO RAPIDO e manuale di installazione BEKNOPTE HANDLEIDING installatiehandleiding GUÍA DE INICIO RÁPIDO y Manual de instalación SNABBGUIDE OCH BRUKSANVISNING PODRĘCZNIK WPROWADZAJĄCY i podręcznik użytkownika ΟΔΗΓΟΣ ΓΡΗΓΟΡΗΣ ΕΚΚΙΝΗΣΗΣ Εγχειρίδιο εγκατάστασης S GPF_EUR_QSG indb 1 2013 03 15 14 27 48 ...

Page 2: ...m actual screens Actual screens may be changed without notice for performance and function improvements CAUTIONS This appliance contains a laser system and is classified as a CLASS 1 LASER PRODUCT To use this model properly read this Owner s Manual carefully and keep this manual for your future reference In case of any trouble with this player please contact your nearest AUTHORIZED service station...

Page 3: ...e microSD card might get damage INFORMATION FOR USERS CHANGES OR MODIFICATIONS TO THIS PRODUCT NOT APPROVED BY THE MANUFACTURER WILL VOID THE WARRANTY Operation Panel Generalities For a longer service life be sure to read the following cautions Do not allow any liquids on the set from drinks umbrellas etc Doing so may damage the internal circuitry Do not disassemble or modify the set in any way Do...

Page 4: ...esponsible for the operation of this device or its compliance with safety and regulatory standards Please note that the use of this accessory with iPod or iPhone may affect wireless performance iPhone iPod iPod classic iPod nano iPod touch and iTunes are trademarks of Apple Inc registered in the U S and other countries DivX DivX Certified and associated logos are trademarks of Rovi Corporation or ...

Page 5: ...ated 5 This is where the microSD card is inserted to enjoy data in microSD cards 6 The map microSD is housed in here To update the map open this cover and remove and insert the card Do not open the cover for other operations 7 This is where DVD video CD MP3 WMA and DivX discs are inserted This document uses the following inline graphics and conventions to indicate operations using the buttons on t...

Page 6: ...from the remote control sold separately 5 This is the Antitheft Indicator This light blinks when the Antitheft Activation setting is set to ON to indicate that the antitheft function is activated This document uses the following inline graphics and conventions to indicate operations using the buttons on the operation panel Number Inline graphic Description of operation 1 MENU Short press This disp...

Page 7: ...e When the unit turns on the default language is set to English Switch to your language to use the unit 1 MENU 2 System Language 3 Select the language you use 4 OK When you switch the language the unit is automatically restarted and the language is switched to the selected language Setting the time FX503E only 1 MENU 2 Time 3 Set the hour the minute and AM PM 4 Set Selecting a Source Press MENU to...

Page 8: ...he cellphone must be registered paired with the unit Notice Pairing cannot be executed while you are driving Also pairing sometimes cannot be executed if the Bluetooth function is not enabled on the cellphone too For details refer to the User s Manual for the cellphone During hands free operations making outgoing calls taking incoming calls telephone calls connection telephone calls communications...

Page 9: ...is is called Smartphone linking The following lists the smartphones that can be linked to the unit Covered models iPhone 4 iPhone 4S Android smartphones iPhone and iPad other than the above are not supported Covered OS iOS 5 or later Android OS4 0 or later as of January 2013 Also with this function only applications compatible with Smartphone linking can be used This User s Manual refers to these ...

Page 10: ...lication starts up The application can be operated from screens on the unit as if you are operating the smartphone To end an application touch MENU Smart Access Connect a smartphone that supports the following Bluetooth profile via Bluetooth for use SPP Serial Port Profile HID Human Interface Device Profile 3 Start Smartphone linking on the unit Starting up applications Notice The unit sometimes d...

Page 11: ...19 21 20 13 14 17 18 12 To enlarge this small map and open the Map screen tap Show Map button 13 Zooming in and out 14 Tilting up and down 15 Rotating left and right 16 2D or 3D view 17 Compass in 2D map view mode 18 Compass in 3D map view mode 19 Location information 20 Return to normal navigation 21 Set the cursor position as the destination Quick menu 27 25 23 24 26 28 29 30 22 The Quick menu i...

Page 12: ... are hindered A location where passengers are at risk An unstable location or where the system may fall CAUTION Do not install the system in the locations described below This may cause a fire accident or electrical shock A location exposed to rain or dust An unstable location or where the system may fall Do not install this unit in a place exposed to direct sunlight heat or a place where the vent...

Page 13: ... when connecting or disconnecting cables to from the unit otherwise an electric shock injury or accident may occur 2 PACKAGE CONTENTS Main unit Quick Start Guide Installation Manual CD ROM Owner s manual Owner s manual Navigation NX503E only Power supply cable RCA pin cable 6ch RCA pin cable Rear AUX IN Rear Video Out Bag for accessories Flat head screw M5 8 mm 8 Hexagonal bolt M5 8 mm 8 Electro t...

Page 14: ...attached to the vehicle and follow the instructions in Figure 4 Wire as shown in Section 9 P 15 Reassemble and secure the unit in the dashboard and set the face panel and center panel Installing the Main Unit in a NISSAN Vehicle Figure 3 Mounting bracket 1 pair for the left and right sides 6 Spacer thickness 1 mm 6 Flat head screw M5 x 8 attached to the main unit Main Unit Mounting Screw Holes Sid...

Page 15: ...ter panel may require modification Trimming filing etc 6 REMOVING THE MAIN UNIT When the main unit is to be removed disassemble it in the reverse of the order in INSTALLTING THE MAIN UNIT P 12 7 CAUTIONS ON WIRING Be sure to turn the power off before wiring Be particularly careful where you route the wires Keep them well away from the engine and exhaust pipe etc Heat may damage the wires If the fu...

Page 16: ... GPS reception may be impaired To improve the GPS signal reception install the GPS antenna horizontally on a flat plane Do not wax or paint the cover of the GPS antenna This may reduce the performance of the GPS antenna Install the GPS antenna at least 10 cm away from the windshield Wipe off the dirt of the mounting surface before installing the GPS antenna Stick the double sided tape to the botto...

Page 17: ...akdown may occur if the cord is not disconnected or front ends are not insulated See next page for how to connect the parking brake lead 9 WIRE CONNECTION Radio antenna jack Microphone sold separately GPS antenna jack NX503E only Refer to the following page Right Left Black Black Yellow Red White Red White audio input terminal video output terminal Rear audio output terminal External Amplifier Rea...

Page 18: ...ction of the arrow 2 Pass the Parking brake signal lead through and fold it back in the direction of the arrow Parking brake signal lead Stopper Parking brake signal lead Parking brake lead Grass green Connecting the Accessories Connection to the Rear Vision Camera for vehicle The Rear Vision Camera for vehicle can be connected to optional Rear Vision Camera input cable CCA 644 with RCA pin cable ...

Page 19: ... bepalingen van Richtlijn 1999 5 EC Español Declaración de conformidad Clarion declara que este modelo NX503E FX503E cumple con los requisitos esenciales y otras disposiciones aplicables descritos en la Directiva 1999 5 CE Svenska Intyg om överensstämmelse Härmed intygar Clarion att denna modell NX503E FX503E uppfyller kraven i direktiv 1999 5 EG gällande väsentliga egenskaper och övriga relevanta...

Reviews: