background image

– 22 –

O N

1

2

3

4

n

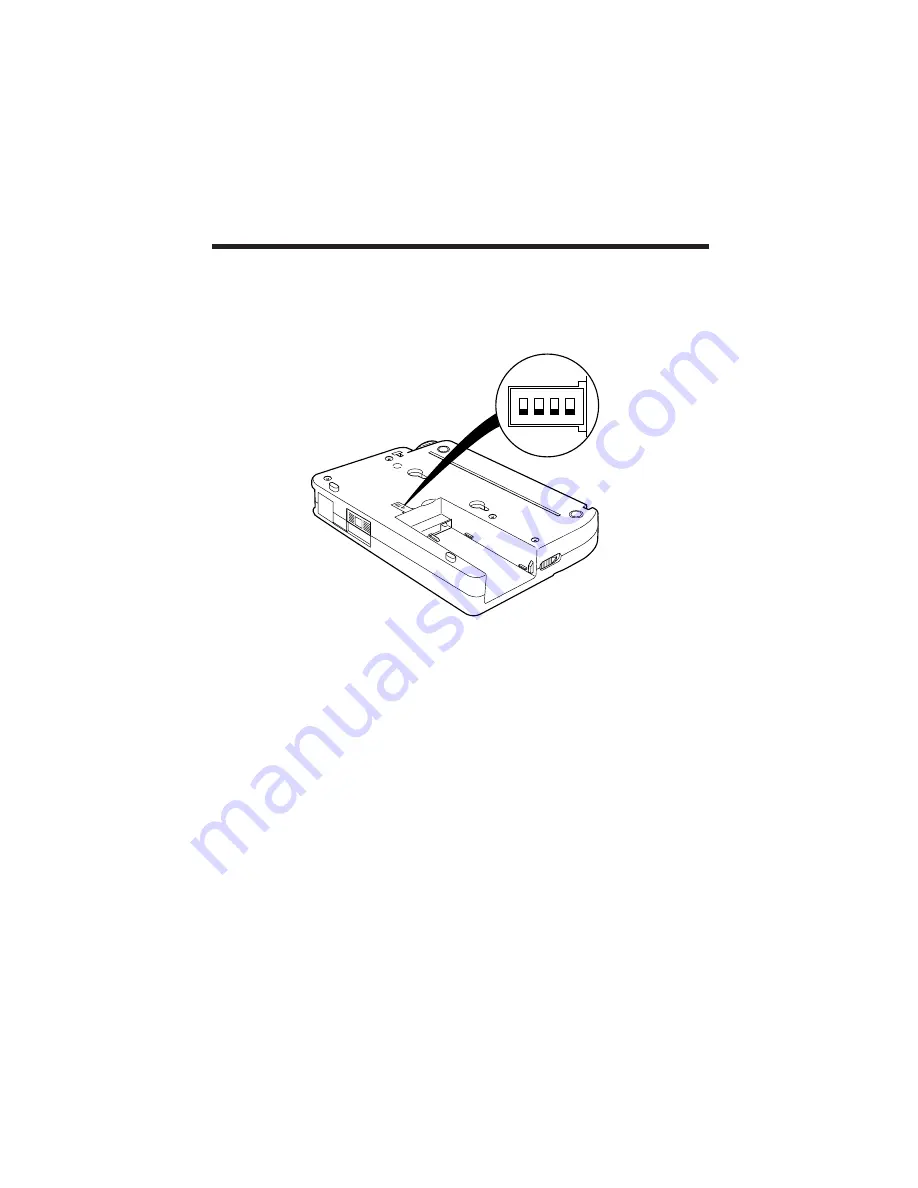
SW Assignments

The mode switch function is assigned to DIP switch SW1.

This switch functions to extend the possible settings to 6 as the remaining 3 Switches

operate under two modes, ON/OFF.

Each setting item is explained below.

SW1 :  Extension Switch

[Mode 1 = OFF side]

SW2 :  A4-->A6 Reduce print

[Enable/Disable = ON/OFF]

SW3 :  Manual Paper Feed

[Enable/Disable = ON/OFF]

SW4 :  Reverse Paper Feed Switch

[Enable/Disable = ON/OFF]

SW1 :  Extension Switch

[Mode 2 = ON side]

SW2 :  Not used

[Enable/Disable = ON/OFF]

SW3 :  HEX print mode

[Enable/Disable = ON/OFF]

SW4 :  VuePrint function set mode

[Enable/Disable = ON/OFF]

★ 

Set to "OFF" at the Factory before delivery.

Adjusting Printer Settings

Many preset functions can be accessed easily using the 4 bit DIP switches on the

bottom of the printer.

Please use these switches to meet your desired purpose.

When the unit powers up it reads the DIP setting one time only, and carries out the print

operations following those instructions.

Summary of Contents for PD-04

Page 1: ...Citizen Handy Printer PD 04 PD 04C User s Manual...

Page 2: ...into the extension cord do not exceed the extension cord ampere rating Also make sure that the total of all products plugged into the wall outlet does not exceed 15 amperes for 120V outlet and 7 5 am...

Page 3: ...ur in a particular installation If this equipment does cause interference to radio or television reception which can be determined by turning the equipment off and on the user is encouraged to try to...

Page 4: ...at the product Trade Name CITIZEN Product Name Printer Model Number AR10 M01 confirms to the following specifications Regulation FCC Part 15B Class B Test Method ANSI C63 4 1992 and therefore is in co...

Page 5: ...nit may result in fire Do not place the unit on an unsteady table or resting point Injury could result if the unit falls This symbol is used when the user MUST ACT WITH CARE About the Graphic Symbols...

Page 6: ...om the Bottom 16 Inserting Roll Paper 17 n Things to be Aware of when Inserting Paper 20 When the Paper runs out in the middle of a print job 20 Notes on the Usage of Thermal Paper 21 n Adjusting Prin...

Page 7: ...humidity or in a place that experiences severe changes of temperature or humidit In a place where the unit will be exposed to dust In a place where it is likely to come in contact with water or liquid...

Page 8: ...fore use If you do not do this the print head will be damaged 6 When pulling paper out of the printer always lift the paper depressor bar beforehand If you pull the paper out with the bar down the pri...

Page 9: ...ok computer with Windows 95 driver OPTIONS 1 Battery pack PD69910 This rechargeable battery is the power source of the Handy Printer 2 Recharger PD69923 for 120V PD69926 for 220 240V This device recha...

Page 10: ...6 Names of Parts and their Functions 9 8 Paper Holder Option 2 1 7 6 5 3 4 Battery Option...

Page 11: ...t head becomes too hot the printer reacts in the following way The error lamp and the power lamp flash simultaneously 3 Optical Receptor This section receives data sent by the optical communication sy...

Page 12: ...er automatically shuts down if there is no data transmission and no operation of the paper feed button FEED or paper depressor lever for a period of 10 minutes to prevent depletion of the rechargeable...

Page 13: ...o Recharge the Battery 1 Plug the recharger plug into an AC wall outlet 2 Put the battery pack in the recharger unit Make sure that the recharger and the battery pack recharge terminal directions matc...

Page 14: ...rinter 1 As shown in the illustration insert the battery pack and slide it in the direction of the arrow n Removal of Battery 1 Slide the battery pack release lever in the direction of the arrow 2 Rem...

Page 15: ...recharge the battery pack Be careful not to allow any water metal pieces or foreign objects to fall into the unit Do not try to alter the recharger or open its cabinet Do not damage the power cord or...

Page 16: ...charge up or when the printer starts to make errors this indicates that the battery pack has come to the end of its life At that time please purchase a new rechargeable battery pack The rechargeable b...

Page 17: ...If the paper depress lever is up please put it in the down position The error lamp will be blinking at this time 2 Place the edge of the paper straight forward into the insert slot As in the illustrat...

Page 18: ...so release the Paper Depress lever up position and slowly pull the paper out in a straight backward motion After removing the paper try once again to feed the paper in using the automatic insertion f...

Page 19: ...he insert path As seen in the illustration to the right holding both sides of the paper with your hands push the paper through the top insert path until it stops and the error lamp stops flashing Afte...

Page 20: ...ress Lever is up The error lamp will turn on 2 Place the end of the paper into the bottom insertion path As seen in the illustration to the right push the paper through the printer until it comes out...

Page 21: ...nserting Roll Paper 1 Fold over the end of the roll of paper To prevent bulging of the fold press down hard while folding 2 Connect the roll paper holder 3 If the Paper Depress Lever is up please lowe...

Page 22: ...straight Push the paper into the printer until it stops and the error lamp stops flashing and turns off After a few seconds the paper will automatically feed in and the printer will be ready to print...

Page 23: ...Lever on the left side of the roll paper holder in the direction of the arrow With the lever pushed remove the roll paper holder by moving it in the direction of the arrow When removing the roll paper...

Page 24: ...ll often result To avoid crooked paper entry make sure the front of the paper you are inserting is in good condition as shown in the illustrations below When the Paper runs out in the middle of a prin...

Page 25: ...thermal paper prints in contact with chlorinated plastic film for long periods Avoid ammonia Some duplicating machines use ammonia and the copies from that machine should not come into contact with t...

Page 26: ...4 Reverse Paper Feed Switch Enable Disable ON OFF SW1 Extension Switch Mode 2 ON side SW2 Not used Enable Disable ON OFF SW3 HEX print mode Enable Disable ON OFF SW4 VuePrint function set mode Enable...

Page 27: ...o this while the paper depressor lever is down Reverse Paper Feed Switch When the paper depression lever is released the paper feed button FEED is pressed it is possible to reverse feed the paper Eye...

Page 28: ...rint Menu Mode To select YES Turn the paper release lever up and down and then the press the paper feed switch To select NO Press the paper feed switch To exit Current Menu or VuePrint Menu Mode Press...

Page 29: ...hould select NO Press paper feed button The printer moves on to the next item 2 In the case that there is some change to be made select Yes After moving the paper depress lever up and down press the p...

Page 30: ...switch in VuePrint Mode turn the printer on Note In the case that the printer power is turned off in the middle of the set mode the new settings are lost and the printer returns its state before the...

Page 31: ...XON XOFF DTR DSR XON XOFF Auto Power Off Disable 3 5 10 minutes 10 minutes Font Type Face Roman Sans serif Courier Prestige Script Roman Print Pitch 10 12 15 Proportional 10 Character Code Set Italic...

Page 32: ...0 minutes 10 minutes Font Type Face Roman Sans serif Courier Prestige Script Courier Print Pitch 10 12 15 Proportional 10 Character Code Set Italic Graphic Graphic International Character Code USA Fra...

Page 33: ...mode To control functions in the VuePrint function set mode the item must be set to disable on the DIP switches Two of the DIP switch functions cannot be engaged simultaneously if they are not accessi...

Page 34: ...er up released press the paper feed button and hold it down while turning on the power The Self Test Print mode is engaged by putting down the paper depress lever the Program version the ASCII slide w...

Page 35: ...m there move the Paper Depress Lever up to the position shown on the illustration In doing so space will open up in between the platen roller and the print head You may need tweezers to remove the pap...

Page 36: ...the wrong side of the plug facing up When disconnecting the cable pull the connector out while pressing the buttons on both sides with your fingers Caution When Connecting the Printer Cable be Carefu...

Page 37: ...oth the PC and printer should be placed so that the receptors are directly facing each other The PC and printer should be placed within 20 to 80 centimeters of each other Make sure that there is nothi...

Page 38: ...estige Script 6 Character codes ASCII 96 Normal Characters International Characters 16 Languages 1 Legal Character set IBM Characters and Graphics Code Page USA MULTILINGUAL PORTUGAL FRENCH CANADA NOR...

Page 39: ...Speed 2400 4800 9600 19200bps Parity odd numbers even numbers none Data length 7 or 8 bit Stop bit 1bit or 2bit 14 IR Communication This rating applies when the host and the printer are positioned wi...

Page 40: ...mperature 25 C to 60 C Operating Humidity 30 to 90 RH with no condensation Storage Humidity 30 to 90 RH with no condensation 19 Noise Less than 52 dB meets JIS standards 20 Standards Certified North A...

Page 41: ...paper jammed in the print The distance between unit and host is too small or too great The Optical Receptors are not facing each other Solution Recharge battery Turn the power switch to ON Connect un...

Page 42: ...27 U S A Citizen Systems Europe GmbH http www citizen europe com Park House Mettinger Strasse 11 643 651 Staines Road Feltham D 73728 Esslingen Middlesex TW14 8PA Germany United Kingdom Japan CBM Corp...

Reviews: