Cisco WUSB54GSC Quick Installation Manual Download Page 9

 Setup for Windows XP or 2000

WUSB54GSC

9

Compact Wireless-G USB Network Adapter with SpeedBooster

If wireless security is enabled on this network, you will see a wireless 

A. 

security screen. If your network utilizes WEP (Wired Equivalent Privacy) 

encryption, the 

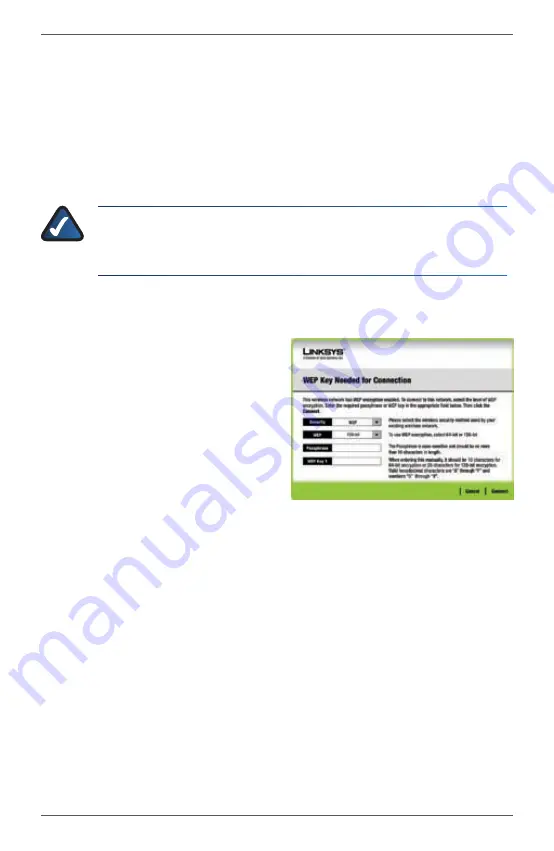
WEP Key Needed for Connection

 screen will appear. If 

your network utilizes WPA Personal (Wi-Fi Protected Access), the 

WPA 

Personal Needed for Connection

 screen will appear.If your network 

utilizes PSK2 (Pre-Shared Key 2) encryption, the 

PSK2 Key Needed for 

Connection

 screen will appear.

NOTE:

 For your network to operate correctly, your WEP key 

(WEP) or Passphrase (WPA, WPA2) must match the WEP key or 

Passphrase of your other wireless network devices.

WEP Needed for Connection

1. 

Select the level of encryption, 

and then enter the Passphrase 

or WEP Key.

WEP 

Select the level of 

encryption, 

64-bit

 or 

128-bit

.

WEP Key 

If you have your 

wireless network ‘s case 

sensitive Passphrase, you can 

enter it. The Passphrase will 

automatically generate the 

WEP key.   
If you don’t have the 

Passphrase, you can enter 

the WEP Key manually. For 

64-bit encryption, enter 

10 hexadecimal characters 

(“0” to “9” and “A” to “F”). For 

128-bit encryption, enter 26 

hexadecimal characters.

Click

2. 

 Connect

 and go to Step B.

WEP Key Needed

Summary of Contents for WUSB54GSC

Page 1: ...Compact Wireless G USB Network Adapter with SpeedBooster Model WUSB54GSC Package Contents Compact Wireless G USB Network Adapter with SpeedBooster USB Extension Cable Setup Wizard CD ROM User Guide on CD ROM Quick Installation ...

Page 2: ......

Page 3: ...ly A Insert the Setup Wizard CD into your CD ROM drive NOTE Windows or other personal firewalls may ask for permission to run the software or program You will need to allow the software to run in order to continue B The Welcome screen appears Click the Click Here to Start button Read the License Agreement C and click Next to continue the installation Windows will begin copying the D files onto you...

Page 4: ...with SpeedBooster F Locate an available USB slot on your computer Insert the Adapter into the slot until it locks into place Click Next For Windows Vista instructions refer to Section 2 For Windows XP or 2000 setup instructions refer to Section 3 Insert the Adapter ...

Page 5: ...ct your network and then click Connect B If your network has no wireless security this screen appears If your network has wireless security go to step C To connect to your unsecured network click Connect Anyway and go to step E C Enter the security key or passphrase also known as pre shared key or WEP key depending on your type of security Click Connect Select Network Unsecured Network Secured Net...

Page 6: ...nd the installation E This screen appears when you are connected to your network Select Save this network if you want to save your settings Click Close F The Set Network Location screen may appear to help apply the correct settings for your type of location If it doesn t appear go to step H Select Home Work or Public location Connecting to Network Connected to Network Select Network Location ...

Page 7: ...icon appears on your desktop s system tray You can use this utility to configure or change your wireless settings NOTE For help with the Windows Vista Wireless Network Configuration utility refer to Windows Vista Help and Support by clicking Vista s Start button Help and Support Congratulations Setup is complete Network Settings Saved Windows Vista Wireless Network Configuration Utility Icon Wirel...

Page 8: ... on the Available Wireless Networks screen click Advanced Setup and follow the on screen prompts Setting Up the Adapter with Available Networks The Available Wireless Network screen lists available networks in the center table by SSID wireless network name Select the wireless network you wish to connect to and click Connect If you do not see your network listed click Refresh If the network utilize...

Page 9: ...n screen will appear NOTE For your network to operate correctly your WEP key WEP or Passphrase WPA WPA2 must match the WEP key or Passphrase of your other wireless network devices WEP Needed for Connection 1 Select the level of encryption and then enter the Passphrase or WEP Key WEP Select the level of encryption 64 bit or 128 bit WEP Key If you have your wireless network s case sensitive Passphra...

Page 10: ...the Passphrase field Click 2 Connect and go to Step B After the Adapter is configured for the network the B Congratulations screen will appear Click Connect to Network to connect to your network NOTE After the Adapter is installed the Wireless Network Monitor screen opens and its icon appears in your computer s system tray You can double click the icon to open the Monitor if you want to find avail...

Page 11: ......

Page 12: ...nty Website http www linksys com FTP Site ftp ftp linksys com Support http www linksys com support Sales Information 800 546 5797 800 LINKSYS Linksys Cisco and the Cisco Logo are registered trademarks or trademarks of Cisco Systems Inc and or its affiliates in the U S and certain other countries Copyright 2008 Cisco Systems Inc All rights reserved Other brands and product names are trademarks or r...

Reviews: