background image

Start the System

1. Push the power button to start up the DX80. The power button’s LED lights up when 

the device starts up. 

2. Follow the on-screen instructions to set up the system. 

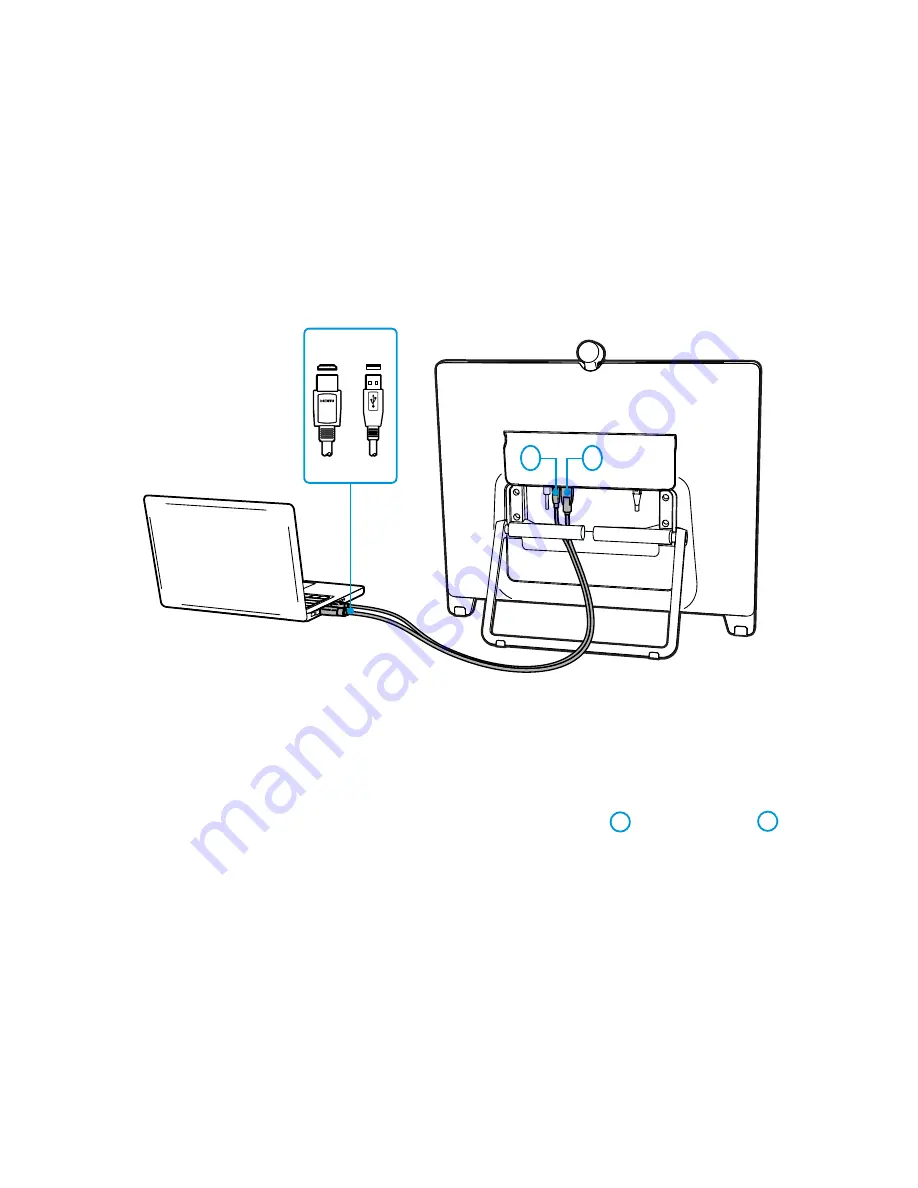
Connect to Computer

Connect your computer to the DX80 to use it as an external monitor, and to enable 

content sharing. 

1. Connect the HDMI-USB bundle (

C

) to the USB Type B 

3

 and the HDMI 

4


connectors on the DX80. 

2. Connect the USB and HDMI connectors on the other end to the computer. You may 

need an adapter (not provided) for the HDMI cable, depending on the connectors 

available on your computer.

3

4

Summary of Contents for Webex DX80

Page 1: ...Cisco Webex DX80 INSTALLATION GUIDE ...

Page 2: ...he device is registered to another service Room Setup https www cisco com go projectworkplace Explore the Cisco Project Workplace to find inspiration and guidelines when preparing your office or meeting room for video conferencing Accessories A Ethernet cable 2 9m 9 5ft C HDMI USB cable 2m 6 56ft B Power adapter and regional power cable D Cleaning cloth Always use the provided Lite On PA 1600 2A L...

Page 3: ... wall socket 4 Connect the provided power adapter and cable B between the DX80 2 and a power socket 5 Pull the foot stand set the DX80 in an upright position and adjust the angle The foot stand is stiff to open at first To use the same network wall socket for both your computer and DX80 connect your computer to the computer network port on the DX80 and the DX80 to the network wall socket see step ...

Page 4: ...t to Computer Connect your computer to the DX80 to use it as an external monitor and to enable content sharing 1 Connect the HDMI USB bundle C to the USB Type B 3 and the HDMI 4 connectors on the DX80 2 Connect the USB and HDMI connectors on the other end to the computer You may need an adapter not provided for the HDMI cable depending on the connectors available on your computer 3 4 ...

Page 5: ... to adjust the camera angle and to activate the document camera feature Adjust the foot stand to take advantage of the touch screen s extended tilt Adjust Camera and Stand Speaker Microphone Privacy shutter Turn the shutter to switch the camera on and off Mute Volume USB ...

Page 6: ...34 USA Cisco and the Cisco logo are trademarks or registered trademarks of Cisco and or its affiliates in the U S and other countries To view a list of Cisco trademarks go to this URL www cisco com go trademarks Third party trademarks mentioned are the property of their respective owners The use of the word partner does not imply a partnership relationship between Cisco and any other company 1110R...

Reviews: