background image

Description

vEdge5000
Router

vEdge
2000
Router

vEdge
1000
Router

Viptela Part
Number

Manufacturer & Part
Number

• SFP+ transceiver

• LC-type connector

• Long-reach 1310-nm optics for

single-mode fiber up to 10 km for
10-Gbps applications

X

X

SFP+-10GE-LR

Finisar
FTLX1471D3BCL

Ports and Connectors

The vEdge 1000 router supports three types of ports: network ports (also called SFP ports), management port,
and console port.

Network Ports (SFP Ports)

The built-in Gigabit Ethernet network ports on the vEdge 1000 router support 1-Gbps SFP transceiver modules.

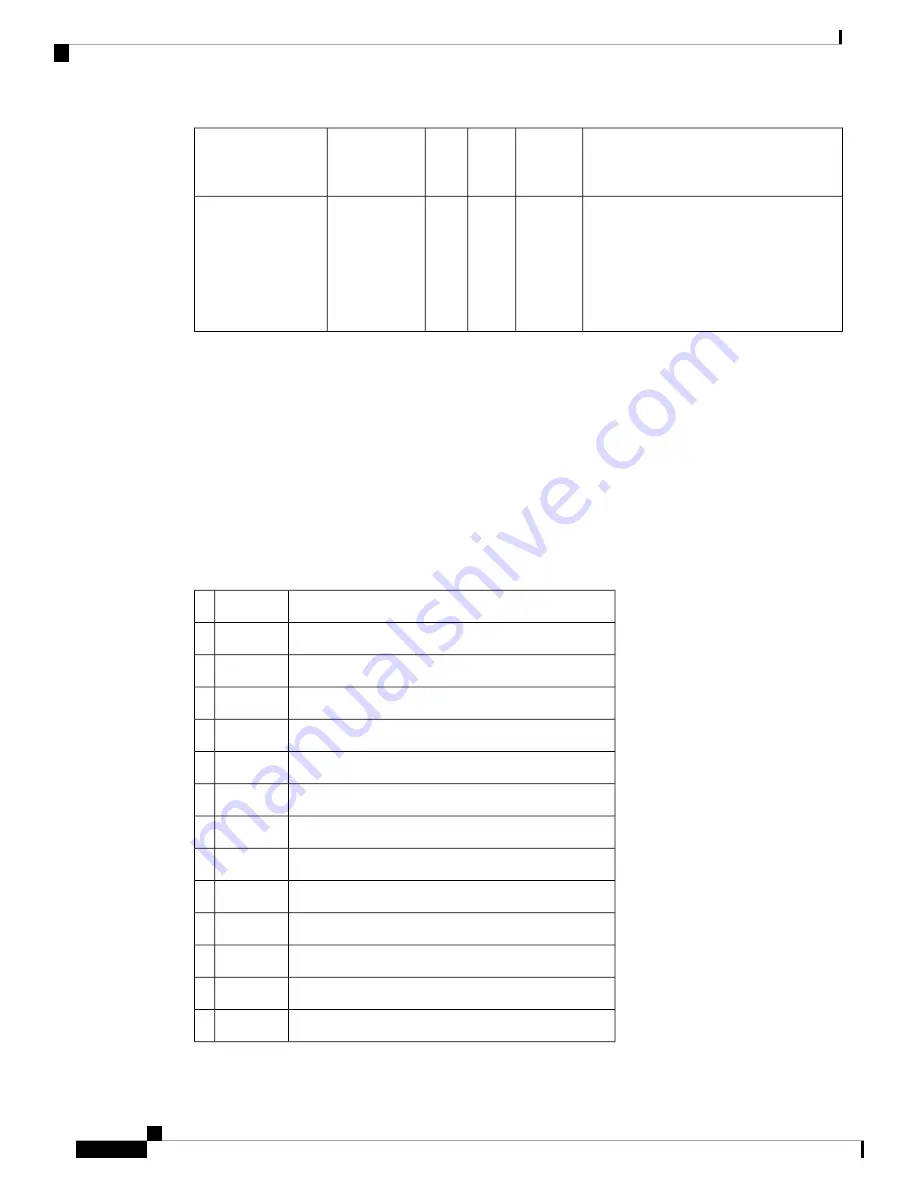
Table 1 provides the pinout information for the built-in SFP port connector. The SFP ports comply with the
SFP MSA standards.

Table 37:

Description

Signal

Pin

Module transmitter ground

VeeT

1

Module transmitter fault

TX_Fault

2

Transmitter disable

TX_Disable

3

Two-wire serial interface data line

SDA

4

Two-wire serial interface clock

SCL

5

Module absent

MOD_ABS

6

Rate select 0; optionally controls SFP module receiver

RS0

7

Receiver loss of signal indication

RX_LOS

8

Rate select 1; optionally controls SFP transmitter

RS1

9

Module receiver ground

VeeR

10

Module receiver ground

VeeR

11

Receiver inverted data output

RD-

12

Receiver non-inverted data output

RD+

13

Hardware Installation Guide for vEdge Routers

120

vEdge 1000 Router

Ports and Connectors

Summary of Contents for vEdge 100

Page 1: ...lation Guide for vEdge Routers First Published 2018 03 27 Americas Headquarters Cisco Systems Inc 170 West Tasman Drive San Jose CA 95134 1706 USA http www cisco com Tel 408 526 4000 800 553 NETS 6387 Fax 408 527 0883 ...

Page 2: ... Cisco Systems Inc All rights reserved ...

Page 3: ...16 vEdge 100 Router Default Configuration 19 Maintenance and Troubleshooting 20 Restore a vEdge Router 22 Return Hardware 23 vEdge 100b Router 27 C H A P T E R 2 Declaration of Conformity 28 Components and Specifications 29 Front and Rear Panel Components 31 Ports and Connectors 33 Power Supply 33 Planning and Installation 34 Prepare for Router Installation 35 Install the vEdge 100b Router 36 Conn...

Page 4: ...tall the vEdge 100m Router 63 Connect the vEdge 100m Router 69 vEdge 100m Router Default Configuration 72 Maintenance and Troubleshooting 77 Maintenance and Troubleshooting 77 Restore a vEdge Router 78 Return Hardware 79 vEdge 100wm Router 83 C H A P T E R 4 Declaration of Conformity 84 Components and Specifications 85 Front and Rear Panel Components 89 Ports and Connectors 92 Power Supply and Coo...

Page 5: ...Router 132 Connect the vEdge 1000 Router 144 vEdge 1000 Router Default Configuration 149 Maintenance and Troubleshooting 150 Install a Transceiver 152 Remove a Transceiver 153 Restore a vEdge Router 154 Return Hardware 155 vEdge 2000 Router 159 C H A P T E R 6 Declaration of Conformity 160 Components and Specifications 161 Front Panel Components 163 PIM and Transceiver Modules 165 Supported Transc...

Page 6: ... Rear Panel Components 217 NIM and Transceiver Modules 220 Supported Transceivers 225 Ports and Connectors 227 Field Replaceable Units 234 Power Supply and Cooling in Cisco vEdge 5000 Routers 234 Planning and Installation 237 Prepare for Router Installation 238 Connect the vEdge 5000 Router 239 vEdge 5000 Router Default Configuration 241 Maintenance and Troubleshooting 243 Remove vEdge 5000 Router...

Page 7: ...ive of encryption Secure identification chip for anti counterfeit and secure authentication Integrated power supply Kensington security lock slot to physically lock down the router GPS input for geographical location Desktop mount wall mount or rack mountable in a 19 inch rack Chassis Views Figure 1 and Figure 2 show the front and back panels of the vEdge 100 router indicating the location of the ...

Page 8: ...ties or end users in the following countries Cuba Iran North Korea Sudan and Syria Controlled Technologies Viptela manages technology subject to the U S Export Administration Regulations EAR These controlled technologies may include items under U S ECCN 5E002 encryption technology The Viptela encryption technology is for the development production and use of Viptela products that implement or use ...

Page 9: ...ly Power Specifications 90 264 Vrms AC input voltage 47 63 Hz AC input line frequency 15 Watts Typical power consumption with PoE disabled on ge0 0 32 Watts maximum Typical power consumption with PoE enabled on ge0 0 Physical Specifications 1 5 in 3 8 cm Chassis height 9 in 22 9 cm Chassis width 5 5 in 14 cm Chassis depth Can be accommodated in 1 RU Rack height 3 1 lb 1 4 kg Chassis weight Provide...

Page 10: ...CSA 60950 1 CB IEC60950 1 CE Marking EN 60950 1 UL60950 1 Safety AS NZS CISPR22 Class A EN 300 386 EN 55022 Class A FCC Class A ICES Class A VCCI Class A EMC ROHS 6 6 Environmental Front and Rear Panel Components This article describes the components on the front and rear panels of the vEdge 100 router See At a Glance for the exact location of these components on the router Front Panel LEDs The vE...

Page 11: ...tected Blinking Green 1000 Mbps link detected and link activity Solid yellow 10 100 Mbps link detected Blinking Yellow 10 100 Mbps link detected and link activity Green Yellow Ethernet Port LED 0 4 Rear Panel The rear panel of the vEdge 100 router has a Reset button a Kensington security lock slot and a GPS antenna input See Chassis Views for the location of these components Reset Button The Reset...

Page 12: ...can automatically identify the router s geographical location Ports and Connectors The vEdge 100 router supports three types of ports RJ 45 Ethernet ports USB port and USB serial console port RJ 45 Ethernet Ports There are five built in RJ 45 Ethernet ports on the vEdge 100 router These ports support 10 100 1000 Mbps and are numbered 0 through 4 Port 0 supports PoE capability Figure 1 provides the...

Page 13: ...he unit Table 1 describes the AC power supply specifications for the vEdge 100 router Table 4 Specification Item 90 264 Vrms AC input voltage 47 63 Hz AC input line frequency 15 Watts Typical power consumption with PoE disabled on transport interface 32 Watts maximum Typical power consumption with PoE enabled on transport interface AC Power Cord Specifications The vEdge 100 router ships with a det...

Page 14: ...ountries International Electromechanical Commission IEC 60364 Part 1 through Part 7 Evaluated to the TN power system Canada Canadian Electrical Code Part 1 CSA C22 1 Permit only trained and qualified personnel to install or replace switch components Locate the emergency power off switch in the room in which you are working In case of an electrical accident quickly turn off the power Disconnect pow...

Page 15: ...dge router models that support the rack mount option you can mount the routers in a two post or a four post rack Table 1 provides the rack requirements for the routers Table 5 Guidelines Rack Requirement Use a two post or a four post rack that meets the size requirements for the router provides bracket holes or hole patterns spaced at 1 U 1 75 in or 4 45 cm increments and is strong enough to suppo...

Page 16: ...0 Router A vEdge 100 router is shipped in a cardboard carton and secured firmly in place with foam packing material The carton contains a packing list and Quick Start instructions It is recommended that you do not unpack the router till you are ready to install it To unpack the router 1 Open the top flaps of the carton 2 Gradually remove the packing foam holding the router and the accessories in p...

Page 17: ...art number name and quantity of each item in the carton If any part on the packing list is missing contact your customer service representative or contact Viptela customer support from within the U S or Canada by telephone at 800 525 5033 or by email to support viptela com Table 1 lists the parts shipped with the vEdge 100 router and their quantities Table 6 Quantity Component 1 Router chassis 1 A...

Page 18: ...e measure or level Mount the vEdge 100 Router in a Rack You can mount the vEdge 100 router on two front posts in a 19 inch rack using simple rack mount ear accessories To do so 1 Place the router chassis on the floor or on a sturdy table near the rack 2 Verify the internal dimensions of the rack with a tape measure The rack mount tray is 440 mm wide and must fit within the mounting posts 3 Secure ...

Page 19: ...ure the mounting ears to the two front posts of the rack using the four rack mount screws two on each side in the packet marked B Tighten the screws Figure 4 Attaching the Mounting Ears to the Rack 1 Use a tape measure or level to verify that the tray is installed straight and the holes at either ends of the rack align properly Hardware Installation Guide for vEdge Routers 13 vEdge 100 Router Inst...

Page 20: ...ket marked D into the pre drilled holes on the underside of the router chassis as shown in Figure 6 Tighten the screws until wrist tight Note that the screw heads will not be flush with the chassis bottom Figure 6 Attach Screws to the Underside of the vEdge 100 Router Chassis 1 Secure the mounting plate to the wall using four screws appropriate for your wall type screws not included Ensure that th...

Page 21: ... 100 Router on the Mounting Plate 1 Secure the router by aligning the round hole on the L shaped bracket of the mounting plate with the screw hole in the rear of the router chassis Then attach the L shaped bracket to the router using a mounting ear screw from packet A Figure 9 Securing the vEdge 100 Router to the Mounting Plate Hardware Installation Guide for vEdge Routers 15 vEdge 100 Router Inst...

Page 22: ... Figure 10 Securing the Router with a Kensington Security Lock Connect the vEdge 100 Router This article describes how to connect the vEdge 100 router to an AC power source and to a management console Hardware Installation Guide for vEdge Routers 16 vEdge 100 Router Connect the vEdge 100 Router ...

Page 23: ...tion If you are connecting AC power to the router it is recommended that the building have an external surge protective device installed Connect the Router to LAN and WAN Interfaces To connect the vEdge 100 router to the LAN plug the appropriate cable into any port except port 4 on the front of the router To connect the vEdge 100 router to a WAN plug the appropriate cable into port 4 on the front ...

Page 24: ...he other end of the console cable into the console server or to a management console To use the USB console from a Windows device 1 Go to the Device Manager to determine which COM port is being used for the USB serial port 2 In the PuTTY SSH Telnet client in Connection Type select Serial Then specify the COM port and a speed of 115200 Hardware Installation Guide for vEdge Routers 18 vEdge 100 Rout...

Page 25: ... port with this command screen dev tty usbserial 115200 cs8 vEdge 100 Router Default Configuration The default configuration file looks like this vEdge100 show running config system vbond ztp viptela com aaa auth order local radius tacacs usergroup basic task system read write task interface read write Hardware Installation Guide for vEdge Routers 19 vEdge 100 Router vEdge 100 Router Default Confi...

Page 26: ...p client tunnel interface encapsulation ipsec allow service dhcp allow service dns allow service icmp no allow service sshd no allow service ntp no allow service stun no shutdown vpn 512 Maintenance and Troubleshooting Now that you have installed and connected the vEdge 100 router you can monitor and troubleshoot the various LEDs and system alarms on the router Alarm Severity Levels The system ala...

Page 27: ...hreshold level the system triggers an alarm Fan alarm The router has a fixed built in fan for system cooling which runs at a fixed speed If the fan stops running the system triggers an alarm Also if the fan starts to run below a predefined RPM threshold the system triggers an alarm Table 1 lists the yellow and red alarm threshold for the temperature sensing points in the system one board sensor on...

Page 28: ...vEdge Router Factory Default Configuration After you set up and start the virtual machines VMs for the vEdge Cloud routers and set up and start the hardware vEdge routers in your overlay network they come up with a factory default configuration When you make and commit changes to the default configuration a new configuration file is created This new configuration file then becomes the active confi...

Page 29: ...bel on the right side of the router the model number is printed on a label on the back of the router Figure 1 Sample Serial Number Label for a vEdge Router Obtain an RMA Number If you are returning a vEdge router or a hardware component to Viptela for repair or replacement contact the Viptela Customer Support team to open a support case and obtain a Return Materials Authorization RMA number Before...

Page 30: ...ardboard carton and original packing in which you received the router To repack the router in its original packing 1 If you do not have a vEdge 1000 router skip this step Otherwise 1 If the router is installed in a rack using the rack mount kit from Viptela remove the front stopper screwed along the front side of the rack mount tray 2 Then remove the rack mount tray from the rack by having one per...

Page 31: ...onent in its antistatic bag 3 Pack each component in its original packing material If you do not have the original packing material ensure that the component is packed adequately with packing material to prevent any damage in transit 4 Place the component in the original cardboard box or another cardboard box if the original is not available 5 Secure the box with tape 6 Write the RMA number on top...

Page 32: ...Hardware Installation Guide for vEdge Routers 26 vEdge 100 Router Return Hardware ...

Page 33: ...clusive of encryption Secure identification chip for anti counterfeit and secure authentication External power supply Kensington security lock slot to physically lock down the router Desktop mount wall mount or rack mountable in a 19 inch rack Fanless design Chassis Views Figure 1 and Figure 2 show the front and back panels of the vEdge 100b router indicating the location of the power interfaces s...

Page 34: ...ce Control List CCL of the U S Export Administration Regulations EAR as networking equipment within the following U S Export Control Classification Numbers ECCN 5A002 5D002 and 5E002 The vEdge hardware and software products and the Viptela encryption technology can be delivered to most end users and destinations worldwide without a licensing requirement The Viptela solution and products Hardware I...

Page 35: ...re obliged to maintain adequate controls to prevent nationals from outside the U S and Canada from accessing Viptela information subject to ECCN5E002 without first obtaining authorization from the U S government For additional information on controlled technologies please contact Viptela support at support viptela com Components and Specifications This article provides the chassis specifications o...

Page 36: ...2 to 104 F at sea level temperature de rating of 1 5 deg C per 1000 feet of altitude applicable up to max of 10000 feet or 3000 m Temperature Max 3000 m 10000 ft Altitude 10 to 85 RH Humidity Transportation Storage Condition 40 to 70 C 40 to 158 F Temperature 5 to 95 RH Humidity 4570 m 15000 ft Altitude Reliability Approximately 592 000 hours about 67 years MTBF Regulatory Compliance AS NZS 60950 ...

Page 37: ... front panel of the vEdge 100b router has a DC power input socket for plugging in the external 12 Volt AC DC power adapter that is shipped with the router Chassis Status LEDs The vEdge 100b router has a power LED a status LED and Ethernet port LEDs located in the front panel Each RJ 45 port has two built in LEDs See Figure 1 Figure 1 Chassis Status LEDs in a vEdge 100b Router Table 1 describes the...

Page 38: ...responding green LED is off Solid Yellow 10 100 Mbps link detected Blinking Yellow 10 100 Mbps link detected and link activity Yellow RJ 45 Ethernet Port LEDs 0 4 Reset Button The Reset button on the front panel is recessed to avoid accidentally pressing it while the router is operational To press the Reset button use a sharp narrow tool Table 2 describes the effects of pressing the Reset button T...

Page 39: ...a a USB Mini B connector See Figure 2 Figure 2 USB Mini B Connector A USB Type A to Mini B connector cable is shipped with the vEdge 100b router as standard accessory for console port connection Power Supply The vEdge 100b router has an external power supply and ships with a 12 Volt AC DC power adapter AC DC Power Adapter The vEdge 100b router accepts a DC power input of 12 Volts You can power the...

Page 40: ... States National Fire Protection Association NFPA 70 United States National Electrical Code Other countries International Electromechanical Commission IEC 60364 Part 1 through Part 7 Evaluated to the TN power system Canada Canadian Electrical Code Part 1 CSA C22 1 Locate the emergency power off switch in the room in which you are working In case of an electrical accident quickly turn off the power...

Page 41: ...clean temperature controlled and well ventilated environment Maintain ambient airflow for the router to operate normally The ambient intake air temperature should be in the range 0 C to 40 C 32 F to 104 F If the airflow is blocked or if the air intake is too warm the router can get overheated Avoid temperature extremes Ensure that the router is operating at an ambient temperature not more that 40 ...

Page 42: ...ed to building structure Install the vEdge 100b Router Once you have prepared your site for router installation unpack the vEdge 100b router and mount it either on the wall or in a 19 inch rack Unpack the vEdge 100b Router A vEdge 100b router is shipped in a cardboard carton and secured firmly in place with foam packing material The carton contains a packing list and Quick Start instructions It is...

Page 43: ...router against the items on the packing list The packing list specifies the part number name and quantity of each item in the carton If any part on the packing list is missing contact your customer service representative or contact Viptela customer support from within the U S or Canada by telephone at 800 525 5033 or by email to support viptela com Table 1 lists the parts shipped with the vEdge 10...

Page 44: ...two front posts in a 19 inch rack using simple rack mount ear accessories To do so 1 Place the router chassis on the floor or on a sturdy table near the rack 2 Verify the internal dimensions of the rack with a tape measure The rack mount tray is 440 mm wide and must fit within the mounting posts 3 Secure the left and right mounting ears to either side of the router chassis using the six screws two...

Page 45: ... screws two on each side in the packet marked B Tighten the screws Figure 4 Attaching the Mounting Ears to the Rack 1 Use a tape measure or level to verify that the tray is installed straight and the holes at either ends of the rack align properly Hardware Installation Guide for vEdge Routers 39 vEdge 100b Router Install the vEdge 100b Router ...

Page 46: ...o wall mount screws in the wall where you are mounting the router screws not provided The screws must align with the wall mount holes on the router s underside 2 Align the wall mount holes on the router s underside to the screws in the wall and gently slide the chassis from side to side or up and down onto the wall mount screws Figure 6 Sliding the Router Chassis onto the Wall Mount Screws Connect...

Page 47: ...lied with the vEdge 100b router Caution If you are connecting AC power to the router it is recommended that the building have an external surge protective device installed Connect the Router to LAN and WAN Interfaces To connect the vEdge 100b router to the LAN plug the appropriate cable into any port except port 4 on the front of the router To connect the vEdge 100b router to a WAN plug the approp...

Page 48: ...e cable into the console server or to a management console Figure 2 Connecting a vEdge 100b Router to a Management Console To use the USB console from a Windows device 1 Go to the Device Manager to determine which COM port is being used for the USB serial port 2 In the PuTTY SSH Telnet client in Connection Type select Serial Then specify the COM port and a speed of 115200 Hardware Installation Gui...

Page 49: ...is command screen dev tty usbserial 115200 cs8 vEdge 100b Router Default Configuration Default Configuration for Software Releases 16 1 and Later For Releases 16 1 and later the default configuration file looks like this vEdge100b show running config system vbond ztp viptela com aaa auth order local radius tacacs Hardware Installation Guide for vEdge Routers 43 vEdge 100b Router vEdge 100b Router ...

Page 50: ... authentication type ah sha1 hmac sha1 hmac vpn 0 interface ge0 4 ip dhcp client tunnel interface encapsulation ipsec no allow service bgp allow service dhcp allow service dns allow service icmp no allow service sshd no allow service netconf no allow service ntp no allow service ospf no allow service stun no shutdown vpn 512 interface ge0 0 ip address 192 168 1 1 24 no shutdown Default Configurati...

Page 51: ...Me1sF fI58nYYB03prGJJs59xSPKLov logging disk enable omp no shutdown graceful restart advertise connected advertise static security ipsec authentication type ah sha1 hmac sha1 hmac vpn 0 interface ge0 4 ip dhcp client tunnel interface encapsulation ipsec no allow service all no allow service bgp allow service dhcp allow service dns allow service icmp no allow service sshd no allow service netconf n...

Page 52: ...00b router are predefined and are triggered by a physical condition on the router such as a power supply failure excessive component temperature or fan failure The vEdge 100b router triggers the following types of hardware alarms Main board temperature alarm The main board of the router has one temperature sensing point board sensor 0 If the temperature of the sensor location crosses the predefine...

Page 53: ... show hardware environment show notification stream show hardware temperature thresholds Front and Rear Panel Components Check Alarms and Events Restore a vEdge Router This article explains how to revert the configuration for a vEdge router to the factory default values It also explains how to do a soft and hard reset of the router Reverting to the vEdge Router Factory Default Configuration After ...

Page 54: ...r of a vEdge router in one of the following ways In vManage NMS select the Configuration Devices screen The device table lists the serial and model numbers of the routers in the network Enter the show hardware inventory command at the CLI prompt The serial number sample shown in Figure 1 is printed on a label on the right side of the router the model number is printed on a label on the back of the...

Page 55: ...repack the router follow these steps 1 Shut down the vEdge router by issuing the poweroff command at the CLI prompt 2 Disconnect power to the router 3 Remove the cables and transceivers You will need the following tools to repack the router Phillips Number 2 screwdriver Cardboard carton and original packing in which you received the router To repack the router in its original packing 1 If you do n...

Page 56: ...omponents follow these steps 1 Ensure that you have the antistatic bag for each component and an ESD grounding strap 2 Place each component in its antistatic bag 3 Pack each component in its original packing material If you do not have the original packing material ensure that the component is packed adequately with packing material to prevent any damage in transit 4 Place the component in the ori...

Page 57: ...er Ethernet PoE source support on one Ethernet port Encryption and QoS support 100 Mbps forwarding throughput inclusive of encryption Secure identification chip for anticounterfeit and secure authentication Integrated power supply Kensington security lock slot to physically lock down the router GPS input for geographical location Desktop mount or wall mount Chassis Views Figure 1 and Figure 2 show...

Page 58: ...rmity The Viptela products are controlled under the Commerce Control List CCL of the U S Export Administration Regulations EAR as networking equipment within the following U S Export Control Classification Numbers ECCN 5A002 5D002 and 5E002 The vEdge hardware and software products and the Viptela encryption technology can be delivered to most end users and destinations worldwide without a licensin...

Page 59: ...obliged to maintain adequate controls to prevent nationals from outside the U S and Canada from accessing Viptela information subject to ECCN5E002 without first obtaining authorization from the U S government For additional information on controlled technologies please contact Viptela support at support viptela com Components and Specifications Components and Specifications This article provides s...

Page 60: ...ht Provided with the unit Wall mount plate accessory Packaging Specifications 5 375 in 13 6 cm Package height 11 94 in 30 3 cm Package width 9 19 in 23 3 cm Package depth Operating Condition 0 to 40 C 32 to 104 F at sea level temperature derating of 1 5 C per 1000 feet of altitude up to a maximum of 10 000 ft or 3000 m Temperature Maximum 3000 m 10 000 ft Altitude 10 to 85 RH Humidity Transportati...

Page 61: ...vEdge 100m AT 100m AT SKU AT T Carrier Sierra Wireless MC7354 Modem Band 2 1900 MHz Band 4 AWS 1700 2100 MHz Band 5 850 MHz Band 17 700 MHz 4G LTE Bands United States Region vEdge 100m GB 100m GB SKU GCF Certification Sierra Wireless MC7304 Modem Band 1 2100 MHz Band 3 1800 MHz Band 7 2600 MHz Band 8 900MHz Band 20 800 MHz 4G LTE Bands Australia Europe Middle East Latin America Asia Pacific Japan ...

Page 62: ...0m VZ 100m VZ SKU Verizon Carrier Sierra Wireless MC7354 Modem Band 4 AWS 1700 2100 MHz Band 13 700 MHz 4G LTE Bands United States Region Multiband Antenna Specifications The vEdge 100m router ships with two multiband swivel mount dipole antennas The articulating joint of the antenna provides 0 to 90 degrees pivot and 180 degree swivel movement allowing vertical and horizontal orientation of the a...

Page 63: ...ar Panel Components This article describes the components on the front and rear panels of the vEdge 100m router See At a Glance for the exact location of these components on the router Front Panel LEDs The vEdge 100m router has five chassis status LEDs located on the front panel Table 1 describes the LEDs their color and states and the status they indicate Table 18 Status Color LED Off System is n...

Page 64: ...f LTE interface disabled off Solid Green LTE enabled excellent signal strength dormant mode Blinking Green LTE enabled excellent signal strength active mode Solid yellow LTE enabled good signal strength dormant mode Blinking Yellow LTE enabled good signal strength active mode Solid Orange LTE enabled poor signal strength dormant mode Blinking Orange LTE enabled poor signal strength active mode Sol...

Page 65: ... that has an SMA connector If you connect a GPS antenna to the router it can automatically identify the router s geographical location Kensington Security Lock Slot The rear panel of the vEdge 100m router has a small metal enforced hole for attaching a Kensington lock to secure the router Reset Button The Reset button on the rear panel of the vEdge 100m router is recessed to avoid accidentally pre...

Page 66: ...ts The RJ 45 ports comply with the 801 standards Figure 1 RJ 45 Ports Pinout Information USB Port The vEdge 100m router has one USB port with a type A connector The USB port complies with USB 3 0 specification Console Port The vEdge 100m console port is a serial port and is accessible via a USB Mini B connector See Figure 2 Figure 2 USB Mini B Connector A USB Type A to Mini B connector cable ships...

Page 67: ...dge 100m router ships with a detachable AC power cord The power cord has a C5 female connector at one end and the other end is specific to the country locality to which the product is shipped Cooling System in a vEdge 100m Router The cooling system in a vEdge 100m router consists of internal heat sinks and an internal fan with adjustable speed The fan speed is algorithmically controlled based on r...

Page 68: ...uch as moist floors worn out power cords ungrounded power extension cords and missing safety grounds Operate the device within marked electrical ratings and product usage instructions To ensure that the router and the FRUs function safely and correctly use the specified cables and connectors and make certain they are in good condition Prepare for Router Installation This article provide guidelines...

Page 69: ...rts 10 to 85 humidity levels noncondensing Install the vEdge 100m Router Once you have prepared your site for router installation unpack the vEdge 100m router and install the SIM card and the antennas before you mount the router on the wall Unpack the vEdge 100m Router A vEdge 100m router is shipped in a cardboard carton and is secured firmly in place with foam packing material The carton contains...

Page 70: ...ou receive with your router against the items on the packing list The packing list specifies the part number name and quantity of each item in the carton If any part on the packing list is missing contact your customer service representative or contact Viptela customer support from within the U S or Canada by telephone at 800 525 5033 or by email to support viptela com Table 1 lists the parts ship...

Page 71: ...ge 100m Router Before you connect power to the vEdge 100m router you must install the SIM card that you received from your carrier The SIM card socket is located on the bottom of the vEdge 100m chassis See Figure 2 Figure 2 SIM Card Holder To install the SIM card into the socket 1 Unscrew the socket cover and open it Figure 3 Opening the Socket Cover Hardware Installation Guide for vEdge Routers 6...

Page 72: ... the SIM Card Holder Cover 1 Insert the SIM card firmly into the socket Figure 5 Sliding the SIM Card into the Socket 1 Close the SIM card holder cover Then close the socket cover and screw it shut Hardware Installation Guide for vEdge Routers 66 vEdge 100m Router Install the vEdge 100m Router ...

Page 73: ...uter has two antenna terminals To attach the multiband antennas to the router 1 Screw one antenna into the terminal marked MAIN and screw the other antenna into the terminal marked DIV Figure 7 Attaching the Antennas to the Rear of the Router 1 Turn each antenna so that it is vertical See Figure 8 Figure 8 Turning the Antenna to a Vertical Position Hardware Installation Guide for vEdge Routers 67 ...

Page 74: ...four screws appropriate for your wall type screws not included Figure 9 Securing the Mounting Plate to the Wall 1 Mount the router on the mounting plate by aligning the two slots on the underside of the router chassis to the notches in the mounting plate Then gently slide the router chassis down onto the notches Figure 10 Mounting the vEdge 100m Router on the Mounting Plate Hardware Installation G...

Page 75: ...igure 11 Securing the Router with a Kensington Security Lock Connect the vEdge 100m Router This article describes how to connect the vEdge 100m router to an AC power source and to a management console Hardware Installation Guide for vEdge Routers 69 vEdge 100m Router Connect the vEdge 100m Router ...

Page 76: ...ion If you are connecting AC power to the router it is recommended that the building have an external surge protective device installed Connect the Router to LAN and WAN Interfaces To connect the vEdge 100m router to the LAN plug the appropriate cable into any port except Port 4 on the front of the router To connect the vEdge 100m router to a WAN plug the appropriate cable into Port 4 on the front...

Page 77: ...NSOLE on the vEdge router 2 Connect the other end of the console cable into a management console Figure 3 Connecting a vEdge 100m Router to a Management Console To use the USB console from a Windows device 1 Go to the Device Manager to determine which COM port is being used for the USB serial port Hardware Installation Guide for vEdge Routers 71 vEdge 100m Router Connect the vEdge 100m Router ...

Page 78: ... 2 Launch the Terminal utility 3 From a terminal shell access the console port with this command screen dev tty usbserial 115200 cs8 vEdge 100m Router Default Configuration Default Configuration for Software Releases 16 3 and Later For Releases 16 3 and later the default configuration file looks like this vEdge100m show running config system Hardware Installation Guide for vEdge Routers 72 vEdge 1...

Page 79: ...tdown graceful restart advertise connected advertise static security ipsec authentication type ah sha1 hmac sha1 hmac vpn 0 interface cellular0 ip dhcp client tunnel interface encapsulation ipsec color lte no allow service bgp allow service dhcp allow service dns allow service icmp no allow service sshd no allow service netconf no allow service ntp no allow service ospf no allow service stun mtu 1...

Page 80: ...how running config system host name vedge vbond ztp viptela com aaa auth order local radius tacacs usergroup basic task system read write task interface read write usergroup netadmin usergroup operator task system read task interface read task policy read task routing read task security read user admin password 6 fTBoB4hFbObL96Rh wbr Tx3voGhKPNeTSjRsQ4AVd3dvS3R wbr A0DsOcBaNjZgXJiiUU6OldFVpqKKBP w...

Page 81: ...ue the request software reset command the default configuration file looks like this vEdge100m show running config system host name vedge vbond ztp viptela com aaa auth order local radius tacacs usergroup basic task system read write task interface read write usergroup netadmin usergroup operator task system read task interface read task policy read task routing read task security read user admin ...

Page 82: ... no allow service ospf no allow service stun mtu 1428 profile 0 technology auto no shutdown interface ge0 4 ip dhcp client ipv6 dhcp client tunnel interface encapsulation ipsec no allow service bgp allow service dhcp allow service dns allow service icmp no allow service sshd no allow service netconf no allow service ntp no allow service ospf no allow service stun no shutdown vpn 512 interface ge0 ...

Page 83: ... triggers the following types of hardware alarms Main board temperature alarm The main board of the router has one temperature sensing point board sensor 0 If the temperature of the sensor location crosses the predefined threshold level the system triggers an alarm CPU temperature alarm If the temperature of the system CPU crosses the predefined threshold level the system triggers an alarm Fan ala...

Page 84: ...ons about events that have occurred on the Viptela device LEDs The chassis LEDs located on the front panel of the vEdge 100m router indicate the status of the router If one or more major alarms are active in the router the Status LED is lit red If one or more minor alarms are active in the router the Status LED is lit solid yellow See Front and Rear Panel Components for details of the LEDs and the...

Page 85: ...prompt To perform a short press reset press the Reset button for two seconds The short press reset takes effect almost instantaneously and reboots the router Return Hardware This article describes how to return a vEdge router or a hardware component to Viptela for repair or replacement Locate Serial and Model Number To return a vEdge router or a hardware component to Viptela you need the serial an...

Page 86: ...com support Send email to support viptela com Call toll free 800 525 5033 1 A Viptela Customer Support representative validates your request and issues an RMA number for returning the router or a hardware component Note Do not return the router or any component to Viptela before first obtaining an RMA number Viptela reserves the right to refuse to take any shipment that does not have an RMA number...

Page 87: ...eal it with packing tape 7 Write the RMA number on top of the box for purposes of tracking If you are returning any field replaceable units with the router repack them as described in Repack Router Components below Repack Router Components If you need to return any router components follow these steps 1 Ensure that you have the antistatic bag for each component and an ESD grounding strap 2 Place e...

Page 88: ...Hardware Installation Guide for vEdge Routers 82 vEdge 100m Router Return Hardware ...

Page 89: ...0 100 1000 Mbps Ethernet ports Power over Ethernet PoE source support on one Ethernet port Encryption and QoS support 100 Mbps forwarding throughput inclusive of encryption Secure identification chip for anticounterfeit and secure authentication Integrated power supply Kensington security lock slot to physically lock down the router GPS input for geographical location Desktop mount or wall mount C...

Page 90: ...ement The Viptela solution and products have undergone a one time review by the Government of the United States of America and qualify for License Exception ENC As such they are eligible for export according to Section 740 17 of the EAR The Viptela solutions and products can be delivered to most end users worldwide except to entities or end users in the following countries Cuba Iran North Korea Su...

Page 91: ...pecifications Table 1 lists the specifications for the vEdge 100wm router chassis Table 23 Specification Item Services and Slot Density 5 ports one of which has 802 3af PoE source capability RJ45 Ports 10 100 1000 Mbps Yes Embedded hardware based cryptographic acceleration IPSec 2 GB Memory DDR3 ECC DRAM 4 GB NAND storage internal 1 USB host port 1 Mini USB connector console port default baud rate...

Page 92: ...t or 3000 m Temperature Maximum 3000 m 10 000 ft Altitude 10 to 85 RH Humidity Transportation Storage Condition 40 to 70 C 40 to 158 F Temperature 5 to 95 RH Humidity 4570 m 15 000 ft Altitude Reliability 104 000 hours MTBF Regulatory Compliance AS NZS 60950 1 CAN CSA 60950 1 CB IEC60950 1 CE Marking EN 60950 1 UL60950 1 Safety AS NZS CISPR22 Class B EN 300 386 EN 55022 Class B FCC Class B ICES Cl...

Page 93: ...Hz 4G LTE Bands Australia Europe Middle East Latin America Asia Pacific Regions vEdge 100wm NA 100wm NA SKU PTCRB Certification Sierra Wireless MC7354 Modem Band 2 1900 MHz Band 4 AWS 1700 2100 MHz Band 5 850 MHz Band 13 700 MHz Band 17 700 MHz Band 25 1900 MHz 4G LTE Bands North America Region vEdge 100wm NT 100wm NT SKU NTT Docomo Carrier Sierra Wireless MC7330 Modem Band 1 2100 MHz Band 19 850 ...

Page 94: ...he antenna provides 0 to 90 degrees pivot and 180 degree swivel movement allowing vertical and horizontal orientation of the antenna Table 3 lists the electrical mechanical and frequency specifications for the antennas Table 3 vEdge 100wm Multiband Cellular Antenna Specifications Table 25 Specification Item MIMO dipole swivel Antenna type 10 Watts Input power SMA male Connector 50 Ohms Nominal imp...

Page 95: ... three spatial streams Supports up to four different SSIDs Supports up to 50 concurrent clients Supports wireless security and authentication Personal and enterprise WPA WPA2 AES CCMP encryption TKIP encryption Internal embedded antennas Front and Rear Panel Components This article describes the components on the front and rear panels of the vEdge 100wm router For the exact location of these compo...

Page 96: ...terface disabled off Solid Yellow WiFi enabled Blinking Green WiFi client connected and link activity Green WiFi Status Off LTE interface disabled off Solid Green LTE enabled excellent signal strength dormant mode Blinking Green LTE enabled excellent signal strength active mode Solid yellow LTE enabled good signal strength dormant mode Blinking Yellow LTE enabled good signal strength active mode S...

Page 97: ...nna that has an SMA connector If you connect a GPS antenna to the router it can automatically identify the router s geographical location Kensington Security Lock Slot The rear panel of the vEdge 100wm router has a small metal enforced hole for attaching a Kensington lock to secure the router Reset Button The Reset button on the rear panel of the vEdge 100wm router is recessed to avoid accidentall...

Page 98: ...ports The RJ 45 ports comply with the 801 standards Figure 1 RJ 45 Ports Pinout Information USB Port The vEdge 100wm router has one USB host port with a type A connector The USB port supports USB 3 0 speeds Console Port The vEdge 100wm console port is a serial port and is accessible via a USB Mini B connector See Figure 2 Figure 2 USB Mini B Connector A USB Type A to Mini B connector cable ships w...

Page 99: ... power cord has a C5 female connector at one end and the other end is specific to the country locality to which the product is shipped Cooling System in a vEdge 100wm Router The cooling system in a vEdge 100wm router consists of internal heat sinks and an internal fan with adjustable speed The fan speed is algorithmically controlled based on readings obtained from internal temperature sensors The ...

Page 100: ...ensure that the router and the FRUs function safely and correctly use the specified cables and connectors and make certain they are in good condition Prepare for Router Installation This article provide guidelines and requirements for preparing your site to install the vEdge 100wm router Site Preparation Guidelines Efficient operation of your vEdge 100wm router requires proper site planning and pr...

Page 101: ...allation unpack the vEdge 100wm router and install the SIM card and the antennas before you mount the router on the wall Unpack the vEdge 100wm Router A vEdge 100wm router is shipped in a cardboard carton and is secured firmly in place with foam packing material The carton contains a packing list and Quick Start instructions It is recommended that you not unpack the router until you are ready to i...

Page 102: ...u receive with your router against the items on the packing list The packing list specifies the part number name and quantity of each item in the carton If any part on the packing list is missing contact your customer service representative or contact Viptela customer support from within the U S or Canada by telephone at 800 525 5033 or by email to support viptela com Table 1 lists the parts shipp...

Page 103: ...Before you connect power to the vEdge 100wm router you must install the SIM card that you received from your carrier The SIM card socket is located on the bottom of the vEdge 100wm chassis See Figure 2 Figure 2 SIM Card Socket To install the SIM card into the SIM card holder 1 Unscrew the SIM card socket cover and open it Figure 3 Opening the SIM Card Socket Cover Hardware Installation Guide for v...

Page 104: ...towards the socket cover hinge Figure 4 Sliding the SIM Card Holder 1 Open the SIM card holder Figure 5 Opening the SIM Card Holder Hardware Installation Guide for vEdge Routers 98 vEdge 100wm Router Install the vEdge 100wm Router ...

Page 105: ...IM Card into the SIM Card Holder 1 Close and lock the SIM card holder Then close the socket cover and screw it shut Figure 7 Locking the SIM Card Holder and Closing the Socket Cover Hardware Installation Guide for vEdge Routers 99 vEdge 100wm Router Install the vEdge 100wm Router ...

Page 106: ...enna terminals To attach the multiband antennas to the router 1 Screw one antenna into the terminal marked MAIN and screw the other antenna into the terminal marked DIV Figure 8 Attaching the Antennas to the Rear of the Router 1 Turn each antenna so that it is vertical Figure 9 Turning the Antenna to a Vertical Position Hardware Installation Guide for vEdge Routers 100 vEdge 100wm Router Install t...

Page 107: ...unting plate to the wall using four screws appropriate for your wall type screws not included Figure 10 Securing the Mounting Plate to the Wall 1 Mount the router on the mounting plate by aligning the two slots on the underside of the router chassis to the notches in the mounting plate Then gently slide the router chassis down onto the notches Hardware Installation Guide for vEdge Routers 101 vEdg...

Page 108: ...100wm Router This article describes how to connect the vEdge 100wm router to an AC power source and to a management console Connect AC Power to the Router To connect the vEdge 100wm router to an AC power source plug one end of the AC power cord into the back of the router and plug the other end into an AC power outlet as shown in Figure 1 Hardware Installation Guide for vEdge Routers 102 vEdge 100...

Page 109: ...otective device installed Connect the Router to LAN and WAN Interfaces To connect the vEdge 100wm router to the LAN plug the appropriate cable into any port except Port 4 on the front of the router To connect the vEdge 100wm router to a WAN plug the appropriate cable into Port 4 on the front of the router Figure 2 Connecting a vEdge 100wm Router to LAN and WAN Interfaces Hardware Installation Guid...

Page 110: ...onsole cable into a management console Figure 3 Connecting a vEdge 100wm Router to a Management Console To use the USB console from a Windows device 1 Go to the Device Manager to determine which COM port is being used for the USB serial port 2 In the PuTTY SSH Telnet client in Connection Type select Serial Then specify the COM port and a speed of 115200 Hardware Installation Guide for vEdge Router...

Page 111: ...console port with this command screen dev tty usbserial 115200 cs8 Maintenance and Troubleshooting You can monitor and troubleshoot the vEdge 100wm router using the various LEDs and system alarms on the router Alarm Severity Levels The system alarms on the vEdge 100wm router have two severity levels Hardware Installation Guide for vEdge Routers 105 vEdge 100wm Router Maintenance and Troubleshootin...

Page 112: ...e predefined threshold level the system triggers an alarm Fan alarm The router has a fixed built in fan for system cooling which runs at a variable speed The Viptela software maintains the fan at an optimal fan speed raising the speed as the ambient temperature increases and decreasing the speed as the temperature decreases to keep the router operating at the lowest possible temperature in the gre...

Page 113: ...ual machines VMs for the vEdge Cloud routers and set up and start the hardware vEdge routers in your overlay network they come up with a factory default configuration When you make and commit changes to the default configuration a new configuration file is created This new configuration file then becomes the active configuration If desired you can revert to the default factory configuration vEdge ...

Page 114: ...mber Label for a vEdge Router Obtain an RMA Number If you are returning a vEdge router or a hardware component to Viptela for repair or replacement contact the Viptela Customer Support team to open a support case and obtain a Return Materials Authorization RMA number Before you open a case and request an RMA number keep the following information ready Your existing service contract number if you h...

Page 115: ...ng 1 If you do not have a vEdge 1000 router skip this step Otherwise 1 If the router is installed in a rack using the rack mount kit from Viptela remove the front stopper screwed along the front side of the rack mount tray 2 Then remove the rack mount tray from the rack by having one person support the weight of the rack mount tray while a second person unscrews the rack mount screws 3 Place the r...

Page 116: ...al packing material If you do not have the original packing material ensure that the component is packed adequately with packing material to prevent any damage in transit 4 Place the component in the original cardboard box or another cardboard box if the original is not available 5 Secure the box with tape 6 Write the RMA number on top of the box for purposes of tracking Hardware Installation Guid...

Page 117: ...Encryption and QoS support 1 Gbps forwarding throughput inclusive of encryption Secure identification chip for anti counterfeit and secure authentication Dual power supplies with two external AC power adapters Hardware capable of supporting 3G 4G interfaces via USB ports Front to back cooling Chassis Views Figure 1 and Figure 2 show the front and back panels of the vEdge 1000 router indicating the...

Page 118: ...roubleshooting on page 150 Declaration of Conformity The Viptela products are controlled under the Commerce Control List CCL of the U S Export Administration Regulations EAR as networking equipment within the following U S Export Control Classification Numbers ECCN 5A002 5D002 and 5E002 Hardware Installation Guide for vEdge Routers 112 vEdge 1000 Router Declaration of Conformity ...

Page 119: ...sers to download the Viptela encryption software Recipients of controlled technology are obliged to maintain adequate controls to prevent nationals from outside the U S and Canada from accessing Viptela information subject to ECCN5E002 without first obtaining authorization from the U S government For additional information on controlled technologies please contact Viptela support at support viptel...

Page 120: ...d separately Rack mount accessory kit 19 in 48 3 cm EIA Packaging Specifications 8 5 in 21 6 cm Package height 11 75 in 29 84 cm Package width 16 5 in 41 9 cm Package depth Operating Condition 0 to 40 C 32 to 104 F at sea level temperature de rating of 1 5 deg C per 1000 feet of altitude applicable up to max of 10000 feet or 3000 m Temperature Max 3000 m 10000 ft Altitude 10 to 85 RH Humidity Tran...

Page 121: ...em 18 9 in 48 cm Height 1 75 in 4 45 cm Width 22 36 in 56 8 cm including the cable management ears Depth Router Components For a description of the vEdge 1000 router components read these articles Front Panel Components Transceiver Modules Ports and Connectors Power Supply and Cooling System Field Replaceable Units Front Panel Components This article describes the LEDs reset button and the SD card...

Page 122: ...ns has failed Green Red SYS Off OMP is down Green OMP with vSmart is up Green STATUS Off Power adapter input 0 is unpowered Green 12 Volt output is OK on power input 0 Red Fault on power input 0 Green Red PWR 0 Off Power adapter input 1 is unpowered Green 12 Volt output is OK on power input 1 Red Fault on power input 1 Green Red PWR 1 Hardware Installation Guide for vEdge Routers 116 vEdge 1000 Ro...

Page 123: ...pported card types SD SDHC Supported Transceivers This article provides a list of copper and fiber transceivers that have been tested and qualified for use in vEdge 1000 and vEdge 2000 routers You can order the transceivers that have a Viptela part number in the tables below directly from Viptela Table 35 Description vEdge 5000 Router vEdge 2000 Router vEdge 1000 Router Viptela Part Number Manufac...

Page 124: ...2000 Router vEdge 1000 Router Viptela Part Number Manufacturer Part Number Small form factor pluggable SFP transceiver LC type connector Short reach 850 nm optics over multimode fiber for 1 Gbps applications X X X Avago AFBR 5710PZ SFP transceiver LC type connector Long reach 1310 nm optics for single mode fiber up to 10 km for 1 Gbps applications X X X Avago AFCT 5710PZ SFP transceiver LC type co...

Page 125: ... for 10 Gbps applications X X SFP 10GE SR Finisar FTLX8574D3BCL SFP transceiver LC type transceiver Short reach 850 nm optics for multi mode fiber for dual rate 1 Gbps 10 Gbps applications Note The SFP ports of the 10 Gigabit Ethernet PIM support a rate of 10 Gbps only 1 Gbps is not supported X X Finisar FTLX8571D3BCV SFP transceiver LC type connector Long reach 1310 nm optics for single mode fibe...

Page 126: ...1 provides the pinout information for the built in SFP port connector The SFP ports comply with the SFP MSA standards Table 37 Description Signal P i n Module transmitter ground VeeT 1 Module transmitter fault TX_Fault 2 Transmitter disable TX_Disable 3 Two wire serial interface data line SDA 4 Two wire serial interface clock SCL 5 Module absent MOD_ABS 6 Rate select 0 optionally controls SFP modu...

Page 127: ...etwork port on the vEdge 1000 router has two LEDs the link activity status LED and the LAN WAN LED See Figure 1 Figure 1 LEDs on the SFP Network Ports on a vEdge 1000 Router Table 2 describes the Link Activity Status LED on the network ports Table 38 State Description Color Blinking The port and the link are active and there is link activity On steadily The port and the link are active but there i...

Page 128: ...hernet port on a vEdge 1000 router uses an RJ 45 connector to connect to a management device for out of band management The management port uses an autosensing RJ 45 connector to support a 10 100 1000Base T connection The two LEDs on the port indicate link activity on the port as well as the link speed status of the port See Management Port LEDs below Table 4 provides the pinout information for th...

Page 129: ...igure 2 LEDs on the Management Port on a vEdge 1000 Router Table 5 describes the LEDs on the management port Table 41 State Description Color LED Blinking Link is up and there is link activity Steady On Link is up but there is no link activity Off Link is not up Green Link Activity Indicates the speed of the link Green 1000 Mbps Yellow 100 Mbps Off 10 Mbps Green Yellow Off Status Hardware Installa...

Page 130: ...f the external interfaces The default baud rate for the console port is 115 200 baud Table 6 provides the pinout information for the RJ 45 console port connector A USB Type A to Type B cable is shipped with the vEdge 1000 router as standard accessory for console port connection Table 42 Description Signal P i n Request to send RTS Output 1 No connect NC 2 Transmit data TxD Output 3 Signal ground S...

Page 131: ... RJ 45 to DB 9 serial port adapter cable Figure 4 vEdge 1000 Router Connected to a Laptop via RJ 45 to DB 9 Cable Table 7 provides the wiring and pinout information for the RJ 45 to DB 9 serial port adapter cable Table 43 Signal DB9 Pin Signal RJ 45 Pin CTS 8 RTS 1 RXD 2 TXD 3 GND 5 GND 4 TXD 3 RXD 6 RTS 7 CTS 8 You can also connect the vEdge 1000 router to a management device such as a PC or a la...

Page 132: ...two AC power supply adapters to the vEdge 1000 router for redundancy purposes Table 1 provides the power requirements for the external AC power supply adapter for the vEdge 1000 router Table 44 Specification Item 90 264 Vrms AC input voltage 47 63 Hz AC input line frequency 28 Watts Typical power consumption Note It is strongly recommended that you use the power supply adapters provided by Viptela...

Page 133: ... via the vents provided near the fans See Figure 1 and Figure 2 below Figure 1 vEdge 1000 Router Airflow Figure 2 Vents Near the Fan Area of a vEdge 1000 Router Temperature sensors in the chassis monitor the internal chassis temperature When a single fan fails at room temperature the system can still provide sufficient cooling If a fan fails or if the ambient temperature inside the chassis rises a...

Page 134: ... the following LTE USB dongles Feeney Wireless Novatel Skyus 4G LTE with MC7354 modem Connected IO LT1000 with MC7350 modem Plug the USB Dongle into the vEdge Router Before you connect the USB dongle to the vEdge router and establish a cellular connection plug the SIM card and the antennas into the dongle as described in the documentation for the dongle To plug the USB dongle into the vEdge router...

Page 135: ...ller parameter click On to enable the USB controller which drives the external USB ports 9 Click Save to save the feature template 10 From the Templates title bar select Device 11 Click Create Template and from the drop down list select From Feature Templates 12 Complete the device template and attach it to the vEdge router as described in Create Configuration Templates for a vEdge Router After th...

Page 136: ...in the Hardware Type column and Wireless WAN module in the Description column Planning and Installation This article provides general safety standards to adhere to when installing or connecting a vEdge 1000 router or its components General Safety Standards Install your vEdge router in compliance with the following local national and international electrical codes United States National Fire Protec...

Page 137: ... provide guidelines and requirements for preparing your site to install the vEdge 1000 router Site Preparation Guidelines Efficient operation of your vEdge 1000 router requires proper site planning and proper layout of your equipment rack or wiring closet Ensure that the area around the router is kept free of dust and conductive material Follow appropriate airflow guidelines so that the cooling sy...

Page 138: ...ize For maximum stability secure the rack to ceiling brackets and to floor brackets Rack secured to building structure Airflow Requirements When planning your site for installing the vEdge 1000 router allow enough clearance around the installed router Since the router works with a front to back airflow there are no clearance requirements for the sides but it is recommended that you provide at leas...

Page 139: ... shipping carton and packing material when you unpack the router Flatten and store the box in case you need to move or return the router in the future See Return Hardware Packing List for a vEdge 1000 Router The cardboard carton in which the router is packed includes a packing list Check the parts you receive with your router against the items on the packing list The packing list specifies the par...

Page 140: ... a vEdge 1000 Router Using Mounting Ears The most common way to mount a vEdge 1000 router is on two front posts in a 19 inch rack using the mounting ears shipped with the router In addition to the items in the accessory box you need the following tools to mount a vEdge 1000 router in a 19 inch rack Number 2 Phillips screwdriver Tape measure To mount the vEdge 1000 router on two front posts in a 19...

Page 141: ...u retain the dust covers on any unused ports Mount a vEdge 1000 Router Using a Rack Mount Tray You can use a rack mount tray to install the vEdge 1000 router if you want to install two vEdge routers in the same slot in a 19 inch rack or if you want to mount the router on all four posts of the rack See Rack Mount Tray Specifications You need to order the rack mount kit from Viptela separately Unpac...

Page 142: ...t Check the parts you receive with your rack mount kit against the items on the packing list The packing list specifies the part number name and quantity of each item in the carton If any part on the packing list is missing contact your customer service representative or contact Viptela customer support from within the U S or Canada by telephone at 800 525 5033 or by email to support viptela com T...

Page 143: ...key to use with the 8 32 shoulder screws socket head A Figure 5 Screws and Nuts Included in the Rack Mount Kit Mount a vEdge 1000 Router Using a Rack Mount Tray In addition to the rack mount accessory kit you need the following tools to mount a vEdge 1000 router in a 19 inch rack using a rack mount tray Number 2 Phillips screwdriver Tape measure Mounting a vEdge 1000 router in a 19 inch rack is a ...

Page 144: ...apters on the tray 2 Place the adapter housing bracket over the AC power adapter and secure it in place by screwing down the two thumbscrews attached to the housing bracket See Figure 4 Figure 6 Screwing the AC Adapter Housing Bracket to the Rack Mount Tray 1 Using the Allen key provided in the rack mount kit screw the four 8 32 shoulder screws to either side of the router two on each side as show...

Page 145: ...he rack mount tray and then screwing the four thumbscrews attached to the stopper To do this first align one of the center thumbscrews to its corresponding hole on the rack mount tray and screw it in a bit then align and screw the second center screw and then tighten both screws After that secure the lone thumbscrews one on the left and the other on the right end of the rack mount tray Figure 9 At...

Page 146: ...e cable with it Figure 10 Securing the Cable on the DC End with Cable Ties Note There are two types of housing bracket sets provided in the rack mount kit Use the housing bracket set that fits the AC power adapter you received with the vEdge 1000 router Install the Rack Mount Tray on Two Front Posts To install the rack mount tray on two front posts in a 19 inch rack Hardware Installation Guide for...

Page 147: ...er s and position it in the rack Figure 11 Holding the Rack Mount Tray with the vEdge Router s in Place 1 Have a second person secure the rack mount tray to the two front posts of the rack using four rack mount screws provided in the rack mount kit See Figure 12 Figure 12 Screwing the Rack Mount Tray to the Two Front Posts of the Rack Hardware Installation Guide for vEdge Routers 141 vEdge 1000 Ro...

Page 148: ...The rack mount tray is 440 mm wide and must fit within the mounting posts 2 Have one person grasp both sides of the rack mount tray on which you secured the vEdge router s and position it in the rack Figure 13 Holding the Rack Mount Tray with the vEdge 1000 Router in Place 1 Have a second person secure the rack mount tray to the two front posts of the rack using four rack mount screws provided in ...

Page 149: ... Figure 15 Screwing the Extended Ear Bracket to the Four Post Rack 1 Screw the extended ear brackets to either sides of the rack mount tray using the 8 32 x 1 2 flat screws and the 8 32 Kep nuts provided in the accessory kit Figure 16 Attaching the Extended Ear Bracket to the Rack Mount Tray Hardware Installation Guide for vEdge Routers 143 vEdge 1000 Router Install the vEdge 1000 Router ...

Page 150: ...and electromagnetic interference EMI requirements and to ensure proper operation of your vEdge 1000 router connect the router to earth ground before you power it on To do so you need a number 2 Phillips screwdriver To connect system ground to the vEdge 1000 router see Figure 1 1 Connect one end of the grounding cable to a proper earth ground such as the rack in which the router is mounted 2 Secure...

Page 151: ...wer adapter is for redundancy If you are using only one power adapter you can plug it into PWR 0 or PWR 1 3 Secure the power adapter cords in place by loosening the cable clamp screw tucking the cords under the clamp and then tightening the screw as shown in Figure 2 4 Plug one end of each power cord into an AC power adapter and plug the other end into an AC power outlet Secure the AC power cord t...

Page 152: ...management console To connect the router to a management console use the console port which accepts a cable with an RJ 45 connector See Console Port To connect the vEdge 1000 router to a management console 1 Connect one end of the console cable into the console port labeled CONSOLE on the vEdge router see Figure 3 2 Connect the other end of the console cable into the console server or to a managem...

Page 153: ... determine which COM port is being used for the USB serial port 2 In the PuTTY SSH Telnet client in Connection Type select Serial Then specify the COM port and a speed of 115200 Hardware Installation Guide for vEdge Routers 147 vEdge 1000 Router Connect the vEdge 1000 Router ...

Page 154: ... to the console port Note The management console is also accessible via a USB Type B interface on the front panel of the vEdge 1000 router The USB Type B interface can be connected to a computer using a USB Type A or Type B cable that is shipped with the router Step 4 Connect the Router to a Network for Out of Band Management You can monitor and manage the vEdge 1000 router using a dedicated manag...

Page 155: ...ault configuration file looks like this vEdge1000 show running config system vbond ztp viptela com aaa auth order local radius tacacs usergroup basic task system read write task interface read write usergroup netadmin usergroup operator task system read task interface read task policy read task routing read task security read user admin password 6 t vzhbSwOUaaCnRu wbr AiJYG3VFR1NurXPY7YXSputMMv4hg...

Page 156: ... on the router Alarm Severity Levels The system alarms on the vEdge 1000 router have two types of severity levels Major red Indicates a critical situation on the router resulting from one of two conditions One or more hardware components on the router has failed One or more hardware components on the router has exceeded the temperature threshold A major alarm condition requires immediate attention...

Page 157: ...on a power adapter input the system triggers an alarm Table 1 lists the yellow and red alarm threshold for the six temperature sensing points in the system four board sensors spread across the board 1 CPU junction temperature sensor and 1 DRAM temperature sensor The lower threshold value Bad Fan applies if a fan failure condition is also detected otherwise the higher threshold value applies normal...

Page 158: ...e 1000 router are hot removable and hot insertable field replaceable units FRUs You can remove and replace them without powering off the router or disrupting router functions Caution Before you install a transceiver or any component in the router chassis make sure that you understand how to prevent electrostatic discharge ESD damage See General Safety Standards Note It is recommended that you purc...

Page 159: ... optical connectors for the vEdge router from Viptela Remove a Transceiver To remove any type of transceiver from a vEdge router you need the following parts and tools A transceiver slot dust cover An antistatic mat or an electrostatic bag A rubber safety cap for the transceiver To remove any type of transceiver from a vEdge router see Figure 1 1 Place the antistatic mat or the electrostatic bag o...

Page 160: ...t changes to the default configuration a new configuration file is created This new configuration file then becomes the active configuration If desired you can revert to the default factory configuration vEdge request software reset Reset the Router You can reset the vEdge router by doing either a hard press or a soft press To perform either type of press locate the Reset button on the front panel...

Page 161: ...mber Label for a vEdge Router Obtain an RMA Number If you are returning a vEdge router or a hardware component to Viptela for repair or replacement contact the Viptela Customer Support team to open a support case and obtain a Return Materials Authorization RMA number Before you open a case and request an RMA number keep the following information ready Your existing service contract number if you h...

Page 162: ...ing 1 If you do not have a vEdge 1000 router skip this step Otherwise 1 If the router is installed in a rack using the rack mount kit from Viptela remove the front stopper screwed along the front side of the rack mount tray 2 Then remove the rack mount tray from the rack by having one person support the weight of the rack mount tray while a second person unscrews the rack mount screws 3 Place the ...

Page 163: ...al packing material If you do not have the original packing material ensure that the component is packed adequately with packing material to prevent any damage in transit 4 Place the component in the original cardboard box or another cardboard box if the original is not available 5 Secure the box with tape 6 Write the RMA number on top of the box for purposes of tracking Hardware Installation Guid...

Page 164: ...Hardware Installation Guide for vEdge Routers 158 vEdge 1000 Router Return Hardware ...

Page 165: ...x1 Gigabit Ethernet Two ports of 10 Gigabit Ethernet 2x10 Gigabit Ethernet Encryption and QoS support 10 Gbps forwarding throughput inclusive of encryption Secure identification chip for anti counterfeit and secure authentication Redundant hot swappable fan tray modules Dual redundant hot swappable power supply slots Front to back cooling Chassis Views Figure 1 and Figure 2 show the front and back...

Page 166: ...d 5E002 The vEdge hardware and software products and the Viptela encryption technology can be delivered to most end users and destinations worldwide without a licensing requirement The Viptela solution and products have undergone a one time review by the Government of the United States of America and qualify for License Exception ENC As such they are eligible for export according to Section 740 17...

Page 167: ... Components and Specifications This article provides the chassis specifications of the vEdge 2000 router and lists the other router components Chassis Specifications Table 1 lists the specifications for the vEdge 2000 router chassis Table 1 vEdge 2000 Router Chassis Specifications Table 50 Specification Item Services and Slot Density 4 Fixed SFP based traffic ports max 1 Gbps 2 Pluggable Interface...

Page 168: ...wer supplies installed 15 lb 6 8 kg Weight Front to back Airflow Packaging Specifications 8 5 in 21 6 cm Package height 22 in 55 88 cm Package width 23 5 in 59 7 cm Package depth Operating Condition 0 to 40 C 32 to 104 F at sea level temperature de rating of 1 5 deg C per 1000 feet of altitude applicable up to max of 10000 feet or 3000 m Temperature Max 3000 m 10000 ft Altitude 10 to 85 RH Humidit...

Page 169: ... and Cooling System Field Replaceable Units Front Panel Components This article describes the LEDs reset button and the SD card slot on the front panel of the vEdge 2000 router See At a Glance for the exact location of these components on the front panel of the router LEDs The vEdge 2000 router has four chassis status LEDs located in the center of the front panel next to the USB ports See Figure 1...

Page 170: ... supply unit 1 Green Red PWR 1 Reset Button The front panel of the vEdge 2000 router has a reset button The reset button is recessed to avoid accidentally pressing it while the router is operational To press the reset button use a sharp narrow tool Table 2 describes the effects of pressing the reset button Table 52 Behavior Press Duration Pressing for two seconds resets and reboots the router Shor...

Page 171: ... of PIMs 8x1 Gigabit Ethernet SFP PIM Model PIM 8x1GE SFP 2x10 Gigabit Ethernet SFP PIM Model PIM 2x10GE SFP The two PIM slots are labeled PIM Slot 0 and PIM Slot 1 Figure 1 and Figure 2 show the front panel of the 8x1 Gigabit Ethernet SFP PIM and the 2x10 Gigabit Ethernet SFP PIM respectively Figure 1 Front Panel of 8x1 Gigabit Ethernet SFP PIM Figure 2 Front Panel of 2x10 Gigabit Ethernet SFP PI...

Page 172: ... Slot 1 all eight ports are usable There is no such restriction with the 2x10 Gigabit Ethernet SFP PIM For details see Interface Port Combinations for the vEdge 2000 Router below Interface Port Combinations for the vEdge 2000 Router A vEdge 2000 router has four fixed 1 Gigabit Ethernet interfaces and you can install one or two PIM modules for additional interfaces You can combine the fixed interfa...

Page 173: ...router slot from a 1 Gigabit Ethernet to a 10 Gigabit Ethernet PIM or vice versa possibly as part of an RMA process follow these steps 1 Delete the configuration for the old PIM the PIM you are removing or returning as part of the RMA process 2 Remove the old PIM 3 Insert the new PIM the PIM you received as part of the RMA process 4 Reboot the vEdge 2000 router 5 Configure the interfaces for the n...

Page 174: ... available DOM Support SFP 1GE SX Model Number 1000 BASE SX 1000 Mbps Rate LC Connector Type Dual Fiber Count 850 nm Transmitter Wavelength 9 5 dBm Minimum Launch Power 3 dBm Maximum Launch Power 21 dBm Minimum Receiver Sensitivity 0 dBm Maximum Input Power MMF Fiber Type 220 m 721 ft to 550 m 1804 ft depending on fiber core size modal bandwidth specification Distance Available DOM Support SFP 1GE...

Page 175: ...DOM Support SFP 1GE EX Model Number 1000 BASE EX 1000 Mbps Rate LC Connector Type Dual Fiber Count 1310 nm Transmitter Wavelength 14 dBm Minimum Launch Power 8 dBm Maximum Launch Power 45 dBm Minimum Receiver Sensitivity 3 dBm Maximum Input Power SMF Fiber Type 40 km 24 8 miles Distance Available DOM Support Table 56 Value Specification Ethernet Standard SFP 1GE SR Model Number 10G BASE SR Hardwar...

Page 176: ...ending on fiber core size modal bandwidth specification Distance Available DOM Support SFP 1GE LR Model Number 10G BASE LR 10 Gbps Rate LC Connector Type Dual Fiber Count 1310 nm Transmitter Wavelength 8 2 dBm Minimum Launch Power 0 5 dBm Maximum Launch Power 18 dBm Minimum Receiver Sensitivity 0 5 dBm Maximum Input Power SMF Fiber Type 10 km 6 2 miles Distance Available DOM Support Hardware Insta...

Page 177: ...5 type connector 10 100 1000 Mbps Ethernet X X X SFP 1GE Base T Finisar FCLF 8521 3 SFP transceiver RJ45 type connector 10 100 1000 Mbps Ethernet X X X SFP 1GE Base T Finisar FCLF8521P2BTL SFP transceiver RJ45 type connector 10 100 1000 Mbps Ethernet X X X Cisco Avago SFBR 5766PZ CS2 SFP transceiver RJ45 type connector 10 100 1000 Mbps Ethernet X X X Bel Fuse 1GBT SFP05 SFP transceiver RJ45 type c...

Page 178: ...ctor Long reach 1310 nm optics for single mode fiber up to 10 km for 1 Gbps applications X X X SFP 1GE LX Finisar FTLF1318P3BTL SFP transceiver LC type connector Short reach 850 nm optics over multimode fiber for 1 Gbps applications X X X Cisco Finisar FTLF8519P2BCL C4 SFP transceiver LC type connector Short reach 850 nm optics for multi mode fiber for 1 Gbps applications X X X SFP 1GE SX Finisar ...

Page 179: ... supported X X Finisar FTLX1471D3BCV SFP transceiver LC type connector Long reach 1310 nm optics for single mode fiber up to 10 km for 10 Gbps applications X X SFP 10GE LR Finisar FTLX1471D3BCL Ports and Connectors The vEdge 2000 router supports three types of ports network ports also called SFP ports management port and console port Network Ports SFP Ports The built in network ports on the vEdge ...

Page 180: ...VeeR 1 1 Receiver inverted data output RD 1 2 Receiver non inverted data output RD 1 3 Module receiver ground VeeR 1 4 Module receiver 3 3 V supply VccR 1 5 Module transmitter 3 3 V supply VccT 1 6 Module transmitter ground VeeT 1 7 Transmitter non inverted data input TD 1 8 Transmitter inverted data input TD 1 9 Module transmitter ground VeeT 2 0 Network Port LEDs Each network port on the vEdge 2...

Page 181: ...Figure 2 LEDs on the Network Ports on an 8x1GE SFP PIM Figure 3 LEDs on the Network Ports on a 2x10GE SFP PIM Hardware Installation Guide for vEdge Routers 175 vEdge 2000 Router Ports and Connectors ...

Page 182: ... is negotiated and active at a speed of 10M 100M but there is no link activity Yellow SFP ports only An SFP has been detected in the port but the link is not active Alternating green and yellow There is no SFP present in the port and the link is not active Off Table 3 describes the LAN WAN LED on the network ports Table 61 State Description Color On steadily The port is configured as a WAN port Of...

Page 183: ...ctor for the management port Table 62 Description Signal P i n Transmit receive data pair 1 TRP1 1 Transmit receive data pair 1 TRP1 2 Transmit receive data pair 2 TRP2 3 Transmit receive data pair 3 TRP3 4 Transmit receive data pair 3 TRP3 5 Transmit receive data pair 2 TRP2 6 Transmit receive data pair 4 TRP4 7 Transmit receive data pair 4 TRP4 8 Management Port LEDs The management port on the v...

Page 184: ... external interfaces An RS 232 serial interface that uses an RJ 45 connector to connect to a console management device A USB serial interface that uses a standard USB Type B connector to connect to a console management device See Figure 5 Figure 5 USB Type B Connector At any given time you can activate only one of the external interfaces The default baud rate for the console port is 115 200 baud T...

Page 185: ...5 connector to connect to a management device such as a PC or a laptop If your PC or laptop does not have a DB 9 male connector pin and you want to connect your PC or laptop to a vEdge 2000 router use a combination of the RJ 45 to DB 9 female adapter along with a USB to DB 9 male adapter See Figure 6 Figure 6 vEdge 2000 Router Connected to a Laptop via RJ 45 to DB 9 Cable Table 8 provides the wiri...

Page 186: ...2000 router is a stiff sheet metal structure that houses the hardware components Field replaceable units FRUs are hardware components that you can remove and replace at your site Table 1 lists the FRUs in the vEdge routers The power supply PIMs transceivers and fan tray are hot removable and hot insertable You can remove and replace these components without powering off the router or disrupting ro...

Page 187: ...he second power supply is for redundancy and load balancing If one of the AC power supplies fails due to device failure or input power line failure a single unit is sufficient to power the entire router The AC power supply in a vEdge 2000 router is a hot insertable and hot removable field replacement unit FRU You can remove and replace the power supply in the rear of the chassis without powering o...

Page 188: ... vEdge 2000 router consists of four individual fan trays each comprising a double stacked fan module see Figure 1 The fan trays cool the router itself except the power supply units which have their own fans for cooling The fan tray is a hot insertable and hot removable field replaceable unit FRU The fan trays provide front to back cooling as shown in Figure 4 If one of the fans in a fan tray fails...

Page 189: ... threshold temperature the router shuts down automatically Planning and Installation This article provides general safety standards to adhere to when installing or connecting a vEdge 2000 router or its components General Safety Standards Install your vEdge router in compliance with the following local national and international electrical codes United States National Fire Protection Association NF...

Page 190: ...ct Failure to use an ESD grounding strap could result in damage to the router Note Some router components are hot swappable and hot insertable You can remove and replace them without powering off or disconnecting power to the router Do not however install the router or any of its component if they appear to be damaged Prepare for Router Installation This article provide guidelines and requirements...

Page 191: ... spaced widely enough to accommodate the external dimensions of the chassis and that the outer edges of the front mount brackets extend the width of the chassis to 19 in 48 2 cm You must also ensure that the spacing of rails and adjacent racks allows for the proper clearance around the router and rack Rack size For maximum stability secure the rack to ceiling brackets and to floor brackets Rack se...

Page 192: ...foam holding the router and the accessories in place See Figure 1 4 Take out the router and each accessory 5 Verify the router components against the packing list included in the box Figure 1 Unpacking the vEdge 2000 Router Note It is recommended that you do not discard the shipping carton and packing material when you unpack the router Flatten and store the box in case you need to move or return ...

Page 193: ... preinstalled 2 AC power supply preinstalled 2 AC power cord appropriate for your geographical location AC router models only 2 1 per PIM slot Blanking cover panel for PIM slots preinstalled 1 per port both built in and PIM ports included Dust covers for ports attached to router ports 1 USB console cable 1 Short mounting ear Right 1 Short mounting ear Left 1 Extended mounting ear Right 1 Extended ...

Page 194: ...re the two extended mounting ears marked Left and Right to either side of the router chassis using the eight screws for mounting ears four on each side in the packet marked B plus the four additional screws for extended mounting ears two on each side in the packet marked C Figure 2 Attaching the Extended Mounting Ears to the vEdge 2000 Router Chassis 1 Grasp both sides of the router then lift and ...

Page 195: ...is is installed straight and that all screws on one side of the rack are aligned with the screws on the other side Tip It is recommended that you retain the dust covers in any unused ports Mount the vEdge 2000 Router on Four Posts To mount a vEdge 2000 router on four posts in a 19 inch rack 1 Place the router chassis on the floor or on a sturdy table near the rack Hardware Installation Guide for v...

Page 196: ...he two interchangeable 1U sliders and secure to either side of the router chassis using the eight screws for sliders four on each side in the packet marked D Figure 6 Attaching the 1U Sliders to the vEdge 2000 Router Chassis 1 Grasp both sides of the router then lift and position it in the rack aligning the front bracket holes with the threaded holes in the front post of the rack rail Align the bo...

Page 197: ...cket marked A Tighten the screws Figure 8 Attaching the Short Mounting Ears to the Rack 1 Secure the 1U sliders to the rear post using the remaining four rack mount screws two on each side in the packet marked A Tighten the screws Figure 9 Attaching the 1U Sliders to the Rear of the Rack Hardware Installation Guide for vEdge Routers 191 vEdge 2000 Router Install the vEdge 2000 Router ...

Page 198: ... mounting or servicing the vEdge 2000 router in a rack you must take special precautions to ensure that the system remains stable The following guidelines are provided to ensure your safety If this is the only router in the rack mount it at the bottom of the rack If you are mounting the router in a partially filled rack start to load the rack from the bottom placing the heaviest component at the b...

Page 199: ...packet marked B Figure 11 Attaching the Short Mounting Ears to the Center of the Router Chassis 1 Grasp both sides of the router then lift and position it in the rack making sure that the mounting ear holes are aligned with the threaded holes in the rack rail Align the bottom hole in both the mounting ears with a hole in each rack rail making sure the chassis is level Figure 12 Positioning the vEd...

Page 200: ...ble to a proper earth ground such as the rack in which the vEdge 2000 router is mounted 2 Secure the grounding lug to the protective grounding terminal with the washers and screws 3 Dress the grounding cable and make sure that it does not touch or block access to other router components Figure 1 Connecting a Grounding Cable to a vEdge 2000 Router Note If you plan to mount the vEdge 2000 router on ...

Page 201: ...econd power supply Figure 2 Connecting AC Power Supply to a vEdge 2000 Router Warning Only qualified personnel should be allowed to install and connect power to the vEdge router Note It is strongly recommended that you use the power cord supplied with the vEdge 2000 router Caution If you are connecting AC power to the router it is recommended that the building have an external surge protective dev...

Page 202: ...nsole To use the USB console from a Windows device 1 Go to the Device Manager to determine which COM port is being used for the USB serial port 2 In the PuTTY SSH Telnet client in Connection Type select Serial Then specify the COM port and a speed of 115200 Hardware Installation Guide for vEdge Routers 196 vEdge 2000 Router Connect the vEdge 2000 Router ...

Page 203: ... to the console port Note The management console is also accessible via a USB Type B interface on the front panel of the vEdge 2000 router The USB Type B interface can be connected to a computer using a USB Type A or Type B cable that is shipped with the router Step 4 Connect the Router to a Network for Out of Band Management You can monitor and manage the vEdge 2000 router using a dedicated manag...

Page 204: ...ing the components see Remove Router Components Caution Before you install any components in the router chassis make sure that you understand how to prevent electrostatic discharge ESD damage See General Safety Standards Note Before you install any components in the router chassis ensure that you have an ESD grounding strap and a number 2 Phillips screwdriver Install an AC Power Supply in a vEdge ...

Page 205: ...ield replaceable unit FRU You can remove and replace an individual fan tray without powering off the router or disrupting normal functioning The fan tray installs horizontally in the rear of the router chassis Handles on each side facilitate installing and removing of the fan tray To install a fan tray in a vEdge 2000 router 1 Attach the ESD grounding strap to your bare wrist Then connect the stra...

Page 206: ...ts pins leads or solder connections 2 Remove the black plastic protective cover that covers the gold plated contact pins Figure 3 Removing the Black Plastic Protective Cover 1 Using both hands place the PIM in the empty slot and slide it in gently until it is fully seated Figure 4 Installing a PIM in a vEdge 2000 Router Hardware Installation Guide for vEdge Routers 200 vEdge 2000 Router Install vE...

Page 207: ...a Transceiver in a vEdge 2000 Router The transceivers for the vEdge 2000 router are hot removable and hot insertable field replaceable units FRUs You can remove and replace them without powering off the router or disrupting router functions To install any type of transceiver in a vEdge 2000 router 1 Gently remove the new transceiver from the plastic bag in which it was shipped 2 Cover the transcei...

Page 208: ...configuration file looks like this vEdge2000 show running config system vbond ztp viptela com aaa auth order local radius tacacs usergroup basic task system read write task interface read write usergroup netadmin usergroup operator task system read task interface read task policy read task routing read task security read user admin password 6 t vzhbSwOUaaCnRu wbr AiJYG3VFR1NurXPY7YXSputMMv4hg3 wbr...

Page 209: ... the router Alarm Severity Levels The system alarms on the vEdge 2000 router have two types of severity levels Major red Indicates a critical situation on the router resulting from one of two conditions One or more hardware components on the router has failed One or more hardware components on the router has exceeded the temperature threshold A major alarm condition requires immediate attention If...

Page 210: ... operating at the lowest possible temperature in the green temperature threshold If a fan stops running the system triggers an alarm Also if a fan starts to run below a predefined RPM threshold the system triggers an alarm Power supply alarm The router has two power supplies for redundancy reasons If one of the power supplies is not plugged in or there is a failure on a power supply input the syst...

Page 211: ...er the SYS LED is lit amber See Front Panel Components for details of the LEDs and the status they indicate Additional Information show hardware alarms show hardware environment show notification stream show hardware temperature thresholds Front Panel Components Check Alarms and Events Remove vEdge 2000 Router Components The vEdge 2000 router is a stiff sheet metal structure that houses the hardwa...

Page 212: ...pply in the antistatic bag or on the antistatic mat Figure 1 Removing an AC Power Supply from a vEdge 2000 Router Caution Make sure that you do not leave the power supply slot in the rear of the chassis empty for a long time while the router is operational Once you remove the power supply either replace it promptly or install a cover panel over the empty slot Remove a Fan Tray from a vEdge 2000 Ro...

Page 213: ...ight still be spinning Remove a PIM from a vEdge 2000 Router The vEdge 2000 router supports two flavors of the Pluggable Interface Modules PIMs Both modules install horizontally on the front of the chassis See Front Panel of the vEdge 2000 Router To remove a PIM from a PIM slot in a vEdge 2000 router you need the following parts and tools Number 2 Phillips screwdriver A replacement PIM or cover pa...

Page 214: ...le field replaceable units FRUs You can remove and replace them without powering off the router or disrupting router functions To remove any type of transceiver from a vEdge 2000 router you need the following parts and tools A transceiver slot dust cover An antistatic mat or an electrostatic bag A rubber safety cap for the transceiver To remove any type of from a vEdge router 1 Place the antistati...

Page 215: ...to the factory default values It also explains how to do a soft and hard reset of the router Reverting to the vEdge Router Factory Default Configuration After you set up and start the virtual machines VMs for the vEdge Cloud routers and set up and start the hardware vEdge routers in your overlay network they come up with a factory default configuration When you make and commit changes to the defau...

Page 216: ...tela you need the serial and model number of the router or the component being returned You can locate the serial and model number of a vEdge router in one of the following ways In vManage NMS select the Configuration Devices screen The device table lists the serial and model numbers of the routers in the network Enter the show hardware inventory command at the CLI prompt The serial number sample ...

Page 217: ...ou need to move or return the vEdge router repack the router in its original packing Before you repack the router follow these steps 1 Shut down the vEdge router by issuing the poweroff command at the CLI prompt 2 Disconnect power to the router 3 Remove the cables and transceivers You will need the following tools to repack the router Phillips Number 2 screwdriver Cardboard carton and original pac...

Page 218: ...Repack Router Components If you need to return any router components follow these steps 1 Ensure that you have the antistatic bag for each component and an ESD grounding strap 2 Place each component in its antistatic bag 3 Pack each component in its original packing material If you do not have the original packing material ensure that the component is packed adequately with packing material to pre...

Page 219: ...Model NIM 8 1GE RJ45 4x10 Gigabit Ethernet SFP NIM Model NIM 4 10GE SFPP Encryption and QoS support 20 Gbps forwarding throughput inclusive of encryption Secure identification chip for anti counterfeit and secure authentication Redundant hot swappable fan tray modules Dual redundant hot swappable power supply slots Front to back cooling Chassis Views Figure 1 and Figure 2 show the front and back p...

Page 220: ...nance and Troubleshooting on page 243 Declaration of Conformity The Viptela products are controlled under the Commerce Control List CCL of the U S Export Administration Regulations EAR as networking equipment within the following U S Export Control Classification Numbers ECCN 5A002 5D002 and 5E002 Hardware Installation Guide for vEdge Routers 214 vEdge 5000 Router Declaration of Conformity ...

Page 221: ...ion policy allows only authenticated users to download the Viptela encryption software Recipients of controlled technology are obliged to maintain adequate controls to prevent nationals from outside the U S and Canada from accessing Viptela information subject to ECCN5E002 without first obtaining authorization from the U S government For additional information on controlled technologies please con...

Page 222: ...n 48 2 cm Chassis width 22 83 in 58 cm Chassis depth 1 RU Rack height Provided with the unit Rack mount accessory kit 19 in 48 3 cm Chassis only 36 3 lb 16 5 kg Chassis with packaging 40 lb 18 kg Weight Front to back Airflow Packaging Specifications 9 in 22 86 cm Package height 24 in 60 96 cm Package width 31 in 78 74 cm Package depth Operating Condition 0 to 40 C 32 to 104 F at sea level temperat...

Page 223: ...read these articles Front Panel Components NIM and Transceiver Modules Supported Transceivers Ports and Connectors Field Replaceable Units Power Supply and Cooling System Front and Rear Panel Components This article describes the components on the front and rear panels of the vEdge 5000 router For the exact location of these components on the router see At a Glance Front Panel The front panel of t...

Page 224: ...sent Green Amber ST A Off System is not powered on Green System is powered on Green P W R Off System is not powered on or there is no HDD activity Blinking Green SSD disk activity is ongoing Green H D D Reset Button The front panel of the vEdge 5000 router has a reset button see Figure 2 The reset button is recessed to avoid accidentally pressing it while the router is operational Figure 2 Reset B...

Page 225: ...ey pad consists of the following buttons Up arrow Down arrow Back Enter Rear Panel The rear panel of the vEdge 5000 router has a power button and an alarm reset button Power Button To gracefully shutdown the vEdge 5000 router briefly press the power button on the rear panel If pressed for 5 seconds the router will be forced to shutdown ungracefully Alarm Button The alarm button is located directly...

Page 226: ... NIM 8 1GE RJ45 4x10 Gigabit Ethernet SFP NIM Model NIM 4 10GE SFPP The four NIM slots are labeled NIM Slot 0 to NIM Slot 3 You can install any combination of the above three NIM types in the four available NIM slots Figure 1 Figure 2 and Figure 3 show the front panel of the 8x1 Gigabit Ethernet SFP NIM 8x1 Gigabit Ethernet Copper Rj45 NIM and 4x10 Gigabit Ethernet SFP NIM respectively Figure 1 Fr...

Page 227: ...he SFP and SFP transceivers and the copper interfaces supported for the SFP transceivers Note It is recommended that you use the optical transceivers and optical connectors purchased from Cisco for your vEdge routers The tables below describe the optical interface support over single mode fiber optic SMF and multimode fiber optic MMF cables for SFP and SFP transceivers and over the copper interfac...

Page 228: ... available DOM Support SFP 1GE SX Model Number 1000 BASE SX 1000 Mbps Rate LC Connector Type Dual Fiber Count 850 nm Transmitter Wavelength 9 5 dBm Minimum Launch Power 3 dBm Maximum Launch Power 21 dBm Minimum Receiver Sensitivity 0 dBm Maximum Input Power MMF Fiber Type 220 m 721 ft to 550 m 1804 ft depending on fiber core size modal bandwidth specification Distance Available DOM Support SFP 1GE...

Page 229: ...DOM Support SFP 1GE EX Model Number 1000 BASE EX 1000 Mbps Rate LC Connector Type Dual Fiber Count 1310 nm Transmitter Wavelength 14 dBm Minimum Launch Power 8 dBm Maximum Launch Power 45 dBm Minimum Receiver Sensitivity 3 dBm Maximum Input Power SMF Fiber Type 40 km 24 8 miles Distance Available DOM Support Table 76 Value Specification Ethernet Standard SFP 1GE SR Model Number 10G BASE SR Hardwar...

Page 230: ...ending on fiber core size modal bandwidth specification Distance Available DOM Support SFP 1GE LR Model Number 10G BASE LR 10 Gbps Rate LC Connector Type Dual Fiber Count 1310 nm Transmitter Wavelength 8 2 dBm Minimum Launch Power 0 5 dBm Maximum Launch Power 18 dBm Minimum Receiver Sensitivity 0 5 dBm Maximum Input Power SMF Fiber Type 10 km 6 2 miles Distance Available DOM Support Hardware Insta...

Page 231: ...5 type connector 10 100 1000 Mbps Ethernet X X X SFP 1GE Base T Finisar FCLF 8521 3 SFP transceiver RJ45 type connector 10 100 1000 Mbps Ethernet X X X SFP 1GE Base T Finisar FCLF8521P2BTL SFP transceiver RJ45 type connector 10 100 1000 Mbps Ethernet X X X Cisco Avago SFBR 5766PZ CS2 SFP transceiver RJ45 type connector 10 100 1000 Mbps Ethernet X X X Bel Fuse 1GBT SFP05 SFP transceiver RJ45 type c...

Page 232: ...ctor Long reach 1310 nm optics for single mode fiber up to 10 km for 1 Gbps applications X X X SFP 1GE LX Finisar FTLF1318P3BTL SFP transceiver LC type connector Short reach 850 nm optics over multimode fiber for 1 Gbps applications X X X Cisco Finisar FTLF8519P2BCL C4 SFP transceiver LC type connector Short reach 850 nm optics for multi mode fiber for 1 Gbps applications X X X SFP 1GE SX Finisar ...

Page 233: ... only 1 Gbps is not supported X X Finisar FTLX1471D3BCV SFP transceiver LC type connector Long reach 1310 nm optics for single mode fiber up to 10 km for 10 Gbps applications X X SFP 10GE LR Finisar FTLX1471D3BCL Ports and Connectors The vEdge 5000 router supports three types of ports network ports management port and console port Network Ports SFP Ports The 8x1 Gigabit Ethernet SFP NIM module sup...

Page 234: ... VeeR 1 1 Receiver inverted data output RD 1 2 Receiver non inverted data output RD 1 3 Module receiver ground VeeR 1 4 Module receiver 3 3 V supply VccR 1 5 Module transmitter 3 3 V supply VccT 1 6 Module transmitter ground VeeT 1 7 Transmitter non inverted data input TD 1 8 Transmitter inverted data input TD 1 9 Module transmitter ground VeeT 2 0 Network Port LEDs Each network port on the vEdge ...

Page 235: ...Figure 2 LEDs on the Network Ports on an 8x1GE SFP NIM Figure 3 LEDs on the Network Ports on a 4x10GE SFP NIM Hardware Installation Guide for vEdge Routers 229 vEdge 5000 Router Ports and Connectors ...

Page 236: ... is down or is up at the rate of 10 Mbps Amber Green Off 8x1 Gigabit Ethernet Copper Rj45 NIM Link is up at the rate of 1 000 Mbps Link is down Amber Off 8x1GE SFP NIM Link is up at the rate of 10 Gbps Link is down Green Off 4x10GE SFP NIM Management Port The management port on a vEdge 5000 router uses an RJ 45 connector to connect to a management device for out of band management Hardware Install...

Page 237: ...receive data pair 1 TRP1 1 Transmit receive data pair 1 TRP1 2 Transmit receive data pair 2 TRP2 3 Transmit receive data pair 3 TRP3 4 Transmit receive data pair 3 TRP3 5 Transmit receive data pair 2 TRP2 6 Transmit receive data pair 4 TRP4 7 Transmit receive data pair 4 TRP4 8 Management Port LEDs The management port on the vEdge 5000 router has two LEDs that indicate link activity and port statu...

Page 238: ...router is accessible via the following external interface An RS 232 serial interface that uses an RJ 45 connector to connect to a console management device See Figure 5 Figure 5 RJ 45 Connector The default baud rate for the console port is 115 200 baud Table 6 provides the pinout information for the RJ 45 console port connector Table 84 Description Signal P i n Request to send RTS Output 1 No conn...

Page 239: ... have a DB 9 male connector pin and you want to connect your PC or laptop to a vEdge 5000 router use a combination of the RJ 45 to DB 9 female adapter along with a USB to DB 9 male adapter See Figure 6 Figure 6 vEdge 5000 Router Connected to a Laptop via RJ 45 to DB 9 Cable Table 7 provides the wiring and pinout information for the RJ 45 to DB 9 serial port adapter cable Table 85 Signal DB9 Pin Si...

Page 240: ... Gigabit Ethernet SFP NIM NCS2 ISM802A VV1 NIM 8 1GE SFP 8 Port Gigabit Ethernet SFP NIM VIP SFP 1GE SX VIP SFP 1GE LX VIP SFP 1GE BASET Gigabit Ethernet transceivers VIP SFP 10GE SR VIP SFP 10GE LR 10 Gigabit Ethernet transceivers VEDGE 5000 FAN Fan tray Power Supply and Cooling in Cisco vEdge 5000 Routers The vEdge 5000 router ships with two AC power supplies installed Read this article to learn...

Page 241: ...ower Supply Unit PSU in the system OFF No AC power to this PSU only 0 5Hz Flashing Red AC present but only standby output on 1Hz Flashing Green Power supply DC output ON and OK Green Power supply has failed Red Power supply warning 0 5Hz Flashing Red Green Flashing frequency 1Hz 0 5 seconds Red 0 5 seconds Green AC Power Cord Specifications The vEdge 5000 router ships with a detachable AC power co...

Page 242: ...re the fan tray to the main chassis The air intake to cool the chassis flows through the perforations in the front of the chassis Hot air exits from the rear of the chassis via the vents provided near the fans See Figure 2 Figure 2 vEdge 5000 Router Airflow Temperature sensors in the chassis monitor the internal chassis temperature When a single fan fan tray fails at room temperature the system ca...

Page 243: ...ns are made Do not work alone if hazardous conditions exist Always check that power is disconnected from a circuit Never assume that it is disconnected Carefully inspect your work area for possible hazards such as moist floors worn out power cords ungrounded power extension cords and missing safety grounds Operate the device within marked electrical ratings and product usage instructions To ensure...

Page 244: ...igh humidity conditions can cause moisture to penetrate into the chassis The device supports 10 to 85 humidity levels non condensing Rack Requirements You can mount the vEdge 5000 router in a four post rack using slide rails Table 1 provides the rack requirements for the router Table 89 Guidelines Rack Requirement Use a four post rack that meets the size requirements for the router provides bracke...

Page 245: ...nnect the router to earth ground before you power it on To do so you need the following tools Number 2 Phillips screwdriver To connect system ground to the vEdge 5000 router see Figure 1 1 Connect one end of the grounding cable to a proper earth ground such as the rack in which the vEdge 5000 router is mounted 2 Secure the grounding lug to the protective grounding terminal with the washers and scr...

Page 246: ...r switch at the back of the vEdge 4000 router chassis to the ON position 8 Check that the LED on the power supply faceplate is lit and is on steadily 9 Repeat Steps 2 through 7 for the second power supply Figure 2 Connecting AC Power Supply to a vEdge 5000 Router Warning Only qualified personnel should be allowed to install and connect power to the vEdge router Note It is strongly recommended that...

Page 247: ...nt channel To connect the vEdge 5000 router to a network for out of band management 1 Connect one end of the Ethernet cable to the management port labeled MGMT on the vEdge 5000 router see Figure 4 The management Ethernet port is a 10 100 1000 Mbps port that supports autonegotiation 2 Connect the other end of the Ethernet cable to the management device Figure 4 Connecting a vEdge 5000 Router to a ...

Page 248: ...shutdown graceful restart advertise connected advertise static security ipsec authentication type ah sha1 hmac sha1 hmac vpn 0 interface ge0 0 ip dhcp client tunnel interface encapsulation ipsec no allow service bgp allow service dhcp allow service dns allow service icmp no allow service sshd no allow service netconf no allow service ntp no allow service ospf no allow service stun no shutdown vpn ...

Page 249: ...f the temperature of the sensor location crosses the predefined threshold level the system triggers an alarm CPU Junction temperature alarm If the temperature of the system CPU crosses the predefined threshold level the system triggers an alarm PIM temperature alarm If the temperature of the PIM modules crosses the predefined threshold level the system triggers an alarm Fan alarm The router has mo...

Page 250: ...ormation for a mother board in the router and for the router s CPU To view all other events on a Viptela device enter the show notification stream command The system displays notifications about events that have occurred on the Viptela device LEDs and LCD Panel The chassis LED located on the front panel of the vEdge 5000 router indicates the status of the router See Front Panel Components for deta...

Page 251: ...ower supply slot To remove an AC power supply from the router 1 Place the antistatic bag or the antistatic mat on a firm flat surface 2 Attach the ESD grounding strap to your bare wrist Then connect the strap to the ESD point on the rack 3 Turn the power switch on the outlet if one exists to the OFF 0 position 4 Disconnect the power cord from the power source 5 Press the release latch on the right...

Page 252: ...owing parts and tools An antistatic bag or an antistatic mat A replacement fan tray To remove a fan tray from a vEdge 5000 router 1 Place the antistatic bag or the antistatic mat on a firm flat surface 2 Attach the ESD grounding strap to your bare wrist Then connect the strap to the ESD point on the rack 3 Unscrew the two thumb screws on the fan tray to release it from the router chassis Then remo...

Page 253: ...o if there are any transceivers installed in the PIM remove them before you remove the PIM For instructions on removing a transceiver from a vEdge router see below Caution Make sure that you do not leave the PIM slot in the front of the chassis empty for a long time while the router is operational Once you remove the PIM either replace it promptly or install a cover panel over the empty slot Remov...

Page 254: ...moving a Transceiver from a vEdge 5000 Router Note It is recommended that you purchase the optical transceivers and optical connectors for your vEdge routers from Viptela Warning Do not look directly into a fiber optic transceiver or into the ends of fiber optic cables Fiber optic transceivers and fiber optic cables connected to a transceiver emit laser light that can damage your eyes Restore a vE...

Page 255: ...ame as entering the reboot command at the CLI prompt To perform a short press reset press the Reset button for two seconds The short press reset takes effect almost instantaneously and reboots the router Return Hardware This article describes how to return a vEdge router or a hardware component to Viptela for repair or replacement Locate Serial and Model Number To return a vEdge router or a hardwa...

Page 256: ...com support Send email to support viptela com Call toll free 800 525 5033 1 A Viptela Customer Support representative validates your request and issues an RMA number for returning the router or a hardware component Note Do not return the router or any component to Viptela before first obtaining an RMA number Viptela reserves the right to refuse to take any shipment that does not have an RMA number...

Page 257: ...al it with packing tape 7 Write the RMA number on top of the box for purposes of tracking If you are returning any field replaceable units with the router repack them as described in Repack Router Components below Repack Router Components If you need to return any router components follow these steps 1 Ensure that you have the antistatic bag for each component and an ESD grounding strap 2 Place ea...

Page 258: ...Hardware Installation Guide for vEdge Routers 252 vEdge 5000 Router Return Hardware ...

Page 259: ... Default Configuration Each vEdge Cloud router has a default configuration The default configuration file sets the default CLI prompt to vEdge configures OMP and enables logging of syslog messages to a file The default configuration file looks like this vEdge show running configsystem host name vedge vbond ztp viptela com aaa auth order local radius tacacs usergroup basic task system read write ta...

Page 260: ...nd users in the following countries Cuba Iran North Korea Sudan and Syria Controlled Technologies Viptela manages technology subject to the U S Export Administration Regulations EAR These controlled technologies may include items under U S ECCN 5E002 encryption technology The Viptela encryption technology is for the development production and use of Viptela products that implement or use encryptio...

Reviews: