4
Guided Setup
Connect Cables
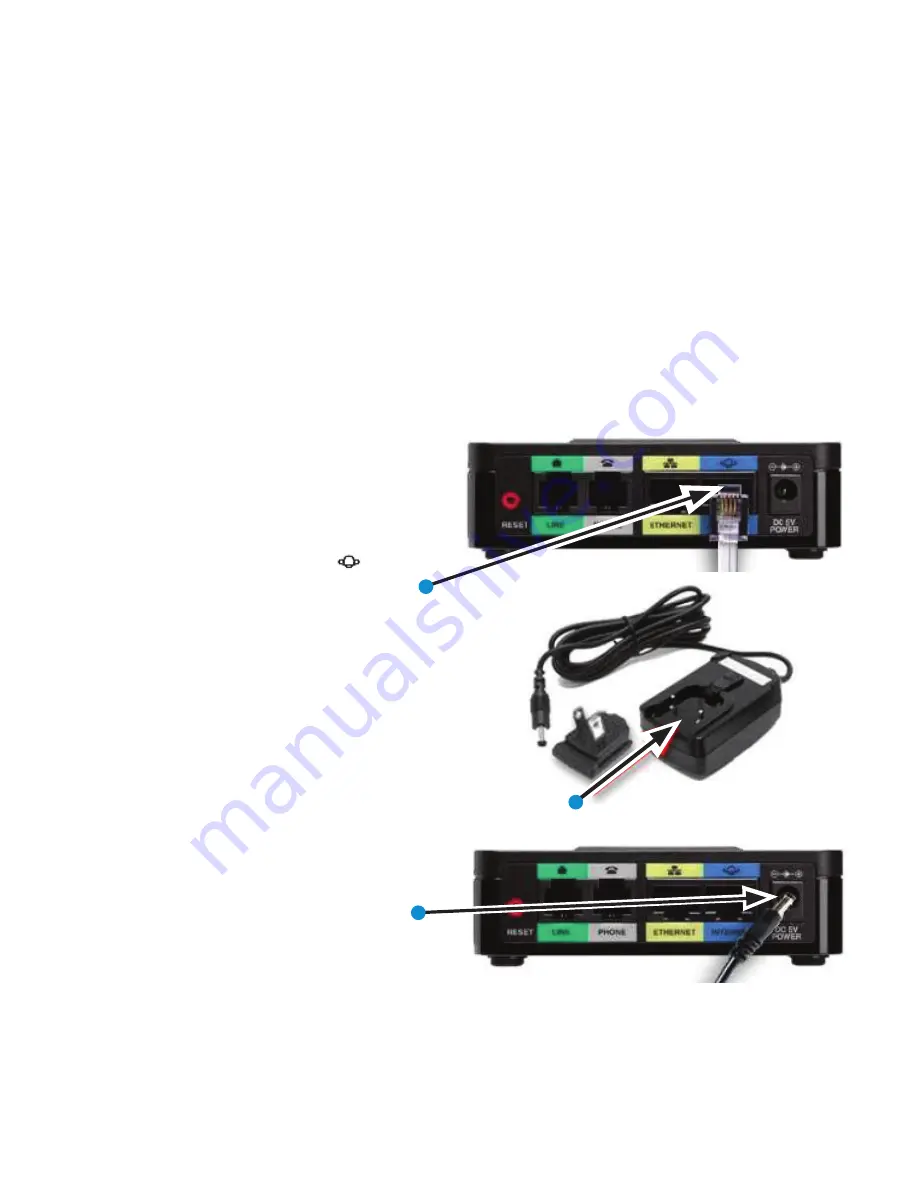
Please follow the diagram to install your phone. Once plugged in, the
phone will automatically download its configuration and start to work.
Connecting the Cordless Base:
1. Open the Cordless Base box and
remove the Cordless Base, Power Clip,
Power Adapter and blue Ethernet cable.
Connect one end of the blue Ethernet
cable to the blue INTERNET port on
the rear of the Cordless Base.
2. Connect the other end of the blue
Ethernet cable to any free port on your
existing router or anywhere on your
existing data network.
3. Insert the Power Clip into the Power
Adapter.
4. Connect the Cordless Base Power
Adapter to the “DC 5V Power” connector
at the rear of the Cordless Base, and
then plug the Power Adaptor into a
power outlet.
Owner’s Manual
14
3
INSTALLING YOUR Hosted PBX PHONE SYSTEM
Cordless Handsets can be installed in the following ways
• You may use up to 3 Cordless Handsets per Cordless Base.
Connecting the Cordless Base:
1. Open the Cordless Base box and remove the cordless base,
power clip, power adapter and blue Ethernet cable.
Connect one end of the blue Ethernet cable to the blue INTERNET
port on the rear of the Cordless Base
Installing Cordless Base and Handsets
2. Connect the other end of the blue Ethernet cable to any free
port on your existing router or anywhere on your existing data
network.
3. Connect the Cordless Base power adapter to the “DC 5V
Power” connector at the rear of the Cordless Base
, and then plug the power adaptor into a power outlet.
Owner’s Manual
16
8. Insert the power clip into the power adapter.
9. Insert the power adapter into the power source or wall outlet.
10. Connect the power adapter to the charging cradle in the port
shown below.
Only use the 1Amp power adapter designed for use with
Cisco Cordless Handset SPA300 Series devices.DO NOT
USE THE POWER ADPATER FOR THE CISCO CORDLESS
BASE
11. Place the handset into the charging cradle. The light on the
charging cradle appears solid green when the handset is
charging.
Charge the Handset for a minimum of 10 hours before using the
Handset for the first time to ensure that the Handset is fully
charged
12. After handset is fully charged or while the handset is in the
cradle do the following.
13. On the Cisco Cordless Handset, press and hold the End Call.
button for 5 seconds.
14. Release the End Call button and wait up to 10
seconds for the screen to illuminate.
Note
WARNING
Owner’s Manual
14
3
INSTALLING YOUR Hosted PBX PHONE SYSTEM
Cordless Handsets can be installed in the following ways
• You may use up to 3 Cordless Handsets per Cordless Base.
Connecting the Cordless Base:
1. Open the Cordless Base box and remove the cordless base,
power clip, power adapter and blue Ethernet cable.
Connect one end of the blue Ethernet cable to the blue INTERNET
port on the rear of the Cordless Base
Installing Cordless Base and Handsets
2. Connect the other end of the blue Ethernet cable to any free
port on your existing router or anywhere on your existing data
network.
3. Connect the Cordless Base power adapter to the “DC 5V
Power” connector at the rear of the Cordless Base
, and then plug the power adaptor into a power outlet.


