


4-55
Cisco ONS 15454 DWDM Installation and Operations Guide, R6.0
September 2005
Chapter 4 Perform Node Acceptance Tests
DLP-G93 Verify Add and Drop Connections on an OADM Node with OSCM Cards
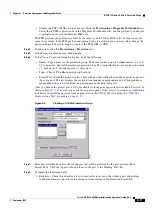
Step 11
(Optional) Connect a power meter to the proper 15xx.x TX port on the front panel (the dual port
compared with the port where the tunable laser or TXP_MR_2.5G card is connected). Verify that the
physical optical power value from that port is consistent with the value displayed on the Provisioning >
Optical Chn > Parameters tab for the proper CHAN TX power value, +/– 0.5 dB.
Step 12
Repeat Steps
through
for all add paths of any west AD-xC-xx.x or 4MD-xx.x cards along the
east-to-west direction.
Step 13
Remove the loopback on the west OPT-BST amplifier and create a loopback on the east OPT-BST
amplifier.
Step 14
Verify that the OSC link becomes active on the east OSCM card. (The OSC termination must be already
provisioned. If not, complete the
“NTP-G38 Provision OSC Terminations” procedure on page 3-84
.) If
the OSC link becomes active, continue with
. If the OSC link does not become active, perform
the following steps:
a.
Modify the OSC Fail Low thresholds by clicking the
Provisioning > Optical Line >
Optics Thresholds
tabs and changing the Port 2 opwrMin (minimum power) to –40 dBm.
b.
If the OSC link turns up, continue with
. If the OSC link remains down, disconnect the
OSCM card from the OPT-BST.
c.
Create a loopback on the OSCM card by connecting patch cable from the OSC TX port to the
OSC RX port using a 10-dB bulk attenuator.
d.
If the OSC link turns up, replace the OPT-BST card. If the OSC link does not turn up, replace the
OSCM card. See the
“NTP-G30 Install the DWDM Cards” procedure on page 3-39
.
Note
Due to the OSC signal loopback, an SDCC Termination Failure alarm might be raised.
Step 15
Based on the Cisco MetroPlanner site configuration file, tune the tunable laser or TXP_MR_2.5G card
to a wavelength (belonging to the 100-GHz ITU-T grid) of the channel running on the first add path of
the first add path of the first AD-xC-xx.x-E or 4MD-xx.x-E card on the west-to-east direction. Refer to
the tunable laser manufacturer’s documentation or the
“DLP-G268 Provision TXP_MR_2.5G Cards for
Acceptance Testing” task on page 4-4
Step 16
Connect the tunable laser transmitter or the TXP_MR_2.5G card DWDM TX port to the correspondent
15xx.x RX port (on the card front panel) of the east AD-xC-xx.x-E or east 4MD-xx.x-E card.
Step 17
Repeat Steps
through
, applying the steps to the west-to-east direction.
Step 18
Remove the loopback connection and Restore the default administrative state (IS,AINS or
Unlocked,automaticInService) on all the ports previously set to OOS,MT (ANSI) or
Locked,maintenance (ETSI).
Step 19
Launch Automatic Node Setup (ANS) to recover the correct node configuration.
Step 20
Return to your originating procedure (NTP).
Summary of Contents for ONS 15454 DWDM
Page 38: ...Figures xxxviii Cisco ONS 15454 DWDM Installation and Operations Guide R6 0 August 2005 ...
Page 54: ...Procedures liv Cisco ONS 15454 DWDM Installation and Operations Guide R6 0 August 2005 ...
Page 64: ... 64 Cisco ONS 15454 DWDM Installation and Operations Guide R6 0 August 2005 Chapter ...


