background image

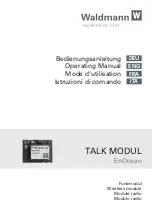
4. Attach the mount cradle to the T-rail clips using the mount cradle holes (marked with a “T“).

Tip: Pre-assemble rubber spacers and screws to the mount cradle. The mount cradle can then be held with one hand while the other hand holds a screwdriver. If
mounting your AP to a dropped ceiling, skip to the "Power the AP" section.

Electrical Junction Box Mount Using Mount Cradle

The access point can be mounted to a 4” square cable junction box, a 3.5 or 4” round cable junction box, or various U.S. and European outlet boxes (mounting
screws are not included).
Using appropriate mounting hardware for your specific type of junction box, attach the mount cradle to the junction box.

Getting Power to the AP

If mounting to an electrical junction box, feed the Ethernet cable through the cable access hole in the mount cradle. If mounting to a wall or ceiling, the Ethernet
cable will feed from behind the AP. The "

Power Source Options

" section of this document lists the different powering options and their unique characteristics.

Mount the AP

Attach the MR56 AP to the Mount Cradle

(This section applies to wall and/or solid ceiling, drop ceiling or electrical junction box mount where you have already installed the mount cradle.)

The MR56 AP attaches to the mount cradle with two tabs on the cradle that insert into the MR56 AP, and is secured to the cradle using one screw.

To attach the MR56 AP to the mount cradle properly, line up the top edge of the AP with the top tab of the mount cradle. Since the cradle is already mounted to
the wall, guide the MR56 AP towards the top tab and insert the top tab into the MR56 AP’s slot.

14

Summary of Contents for Meraki MR56

Page 1: ... limited troubleshooting procedures For more wireless installation guides refer to the wireless installation guides section on our documentation website Product Overview Physical Specifications MR56 Interfaces 1x 1000 2 5G 5G BASE T Ethernet RJ45 1x DC power connector 5 5 mm x 2 5 mm center positive Power Power over Ethernet 42 5 57 V 802 at compliant Alternative 12 V DC input Power consumption 22...

Page 2: ... Concealed mount plate with anti tamper cable bay Product View and Physical Features Your MR56 has the following features 2 ...

Page 3: ...The mount cradle has the following features 3 ...

Page 4: ... to the mount cradle Engaging the security screw prevents accidental dislodging and theft 2 Kensington lock The access point contains a hard point that allows it to be secured to any nearby permanent structure using a standard Kensington lock Ethernet Ports The MR56 features a Gigabit Ethernet RJ45 port that accepts 802 3af power labeled Eth0 PoE This port should be used for uplink to your WAN con...

Page 5: ...ont of the unit to convey information about system functionality and performance Orange AP is booting permanent Orange suggests hardware issue Rainbow AP is initializing scanning Blinking Blue AP is upgrading Green AP in Gateway mode with no clients Blue AP in Gateway mode with clients Blinking Orange AP can t find uplink The MR56 access point may be operated in Run Dark mode for additional securi...

Page 6: ...Mount cradle including built in level tool Drop ceiling mount kit 6 ...

Page 7: ...Wall screws wall screw anchors and security screws 7 ...

Page 8: ...familiar with standard practices for preventing accidents Read the wall mounting instructions carefully before beginning installation Failure to use the correct hardware or to follow the correct procedures could result in a hazardous situation to people and damage to the system This product relies on the building s installation for short circuit overcurrent protection Ensure that the protective de...

Page 9: ...Ap section for details 2 The AP will turn on and the LED will glow solid orange If the unit does not require a firmware upgrade the LED will turn either green no clients associated or blue clients associated within thirty seconds If the unit requires an upgrade the LED will begin blinking orange until the upgrade is complete at which point the LED will turn solid green or blue You should allow at l...

Page 10: ...http 10 128 128 128 Click on the Uplink Configuration tab Log in The default login is the serial number e g Qxxx xxxx xxxx with no password e g Q2DD 551C ZYW3 Configure the static IP address net mask gateway IP address and DNS servers that this AP will use on its wired connection If necessary reconnect the AP to the LAN Static IP via DHCP Reservations Instead of associating to each Meraki AP indivi...

Page 11: ...0 ft 100 m 3 If being used in a mesh deployment the AP should have line of sight to at least two other Meraki devices A Cisco Partner can help ensure that your AP placement is ideal Install the AP For most mounting scenarios the access point mount cradle provides a quick simple and flexible means of mounting your device The installation should be done in two steps First install the mount cradle to ...

Page 12: ... Wall or Solid Ceiling Mount Using Mount Cradle Using included wall anchors and screws attach the mount cradle to your mounting wall or ceiling It is recommended that the AP be mounted to a wall or solid ceiling using the mount cradle for physical security reasons Drop Ceiling Mount using Mount Cradle To mount your AP on a drop ceiling T rail use the included drop ceiling mounting accessory kit Th...

Page 13: ...shown The black foam pads should be compressed slightly after installation 2 Using the dashed lines on the mount cradle template as a guide set the proper spacing of the T rail clips on the T rail 3 Tighten the set screws on the T rail clips to secure the clips using a 5 64 2 mm hex key 13 ...

Page 14: ...o an electrical junction box feed the Ethernet cable through the cable access hole in the mount cradle If mounting to a wall or ceiling the Ethernet cable will feed from behind the AP The Power Source Options section of this document lists the different powering options and their unique characteristics Mount the AP Attach the MR56 AP to the Mount Cradle This section applies to wall and or solid ce...

Page 15: ...MR56 AP to guide the AP s bottom slot into the cradle s bottom tab until it clicks into place Once in place the MR56 AP should be secured to the cradle by using one of the included screws in the cradle s bottom tab 15 ...

Page 16: ...ount cradle it should be secured via security screw Torx security screws are included and or Kensington lock If the mount cradle was not used the AP can still be secured using a Kensington lock Security Screw The accessory kit includes screws that can be used to secure the access point to the mount cradle Engaging the security screw prevents accidental dislodging and theft Kensington Lock The acce...

Page 17: ...will begin broadcasting an SSID appended with scanning If you are able to connect to this SSID and go to my meraki com from your web browser then your radio is working 2 Physically place the repeater AP AP with disconnected LAN next to a working gateway AP 3 Connect the power adapter or PoE The radio and signal strength LEDs on the AP will turn solid green or blue once the access point boots up an...

Page 18: ...m MR for additional information and troubleshooting tips If you are still experiencing hardware issues please contact Cisco Meraki support by logging in to dashboard and using the Help option near the top of the page then opening and email case or calling using the contact information on that page Warranty MR Warranty coverage periods are as follows Indoor MR 56 AP Lifetime Applies to MR device an...

Page 19: ...ation guides please refer to documentation meraki com Meraki MR56 devices have been tested and found to comply with the limits for a Class B digital device pursuant to part 15 of the FCC rules These limits are designed to provide reasonable protection against harmful interference in a residential installation This equipment generates uses and can radiate radio frequency energy and if not installed...

Reviews: