


14
Network Analysis Module Memory Upgrade Installation Note
78-18630-01B0
Installing the NAM
c.
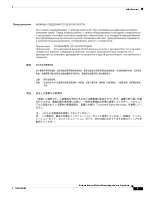
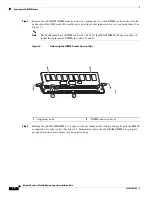
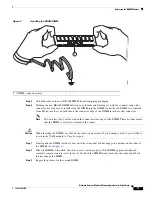
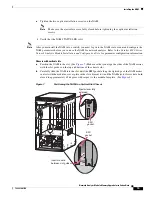
Using the thumb and forefinger of each hand, grasp the two ejector levers and gently press down to
create a small 0.040 inch (1 mm) gap between the NAM’s EMI gasket and the module or cover plate
above it. (See
Note
Do not press down too forcefully on the levers because they will bend and get damaged.
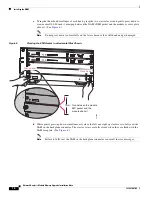
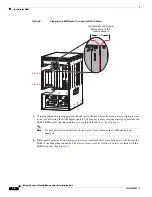
Figure 6
Clearing the EMI Gasket in a Horizontal Slot Chassis
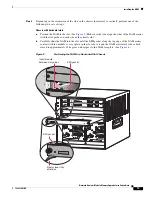
d.
While gently pressing down, simultaneously close the left and right ejector levers to fully seat the
NAM in the backplane connector. The ejector levers are fully closed when they are flush with the
NAM faceplate. (See
.)
Note
Failure to fully seat the NAM in the backplane connector can result in error messages.
1
2
3
FAN
STATUS
4
5
6
SUPERVISOR2
WS-X6K-SUP2-2GE
ST
ATUS
SYSTEMCONSOLEPWR MGMT
RESET
CONSOLE
CONSOLE
PORT
MODE
PCMCIA
EJECT
PORT 1
PORT 2
Switch Load
100%
1%
LINK
LINK
SUPERVISOR2
WS-X6K-SUP2-2GE
ST
AT
U
S
SY
ST
EM
C
O
N
SO
LE
PW
R
M
G
M
T
R
ES
ET
CONSOLE
CONSOLE
PORT
MODE
PCMCIA
EJECT
PORT 1
PORT 2
Switch Load
100%
1%
LINK
LINK
1 mm
4
3
5
5
4
6
6
Gap between the module
EMI gasket and the
module above it
Press down
Press down
187448
NETWORK ANALYSIS MODULE
SHUTDOWN
WS-SVC-NAM-2
WS-SVC-NAM-2
ST
AT
U
S
NETWORK ANALYSIS MODULE
ST
ATUS


