background image


IMPORTANT SAFETY INSTRUCTIONS 

vi 

4022345 Rev B 

Outdoor Grounding System 

If this product connects to an outdoor antenna or cable system, be sure the antenna or cable system is 
grounded (earthed). This provides some protection against voltage surges and built-up static charges. 
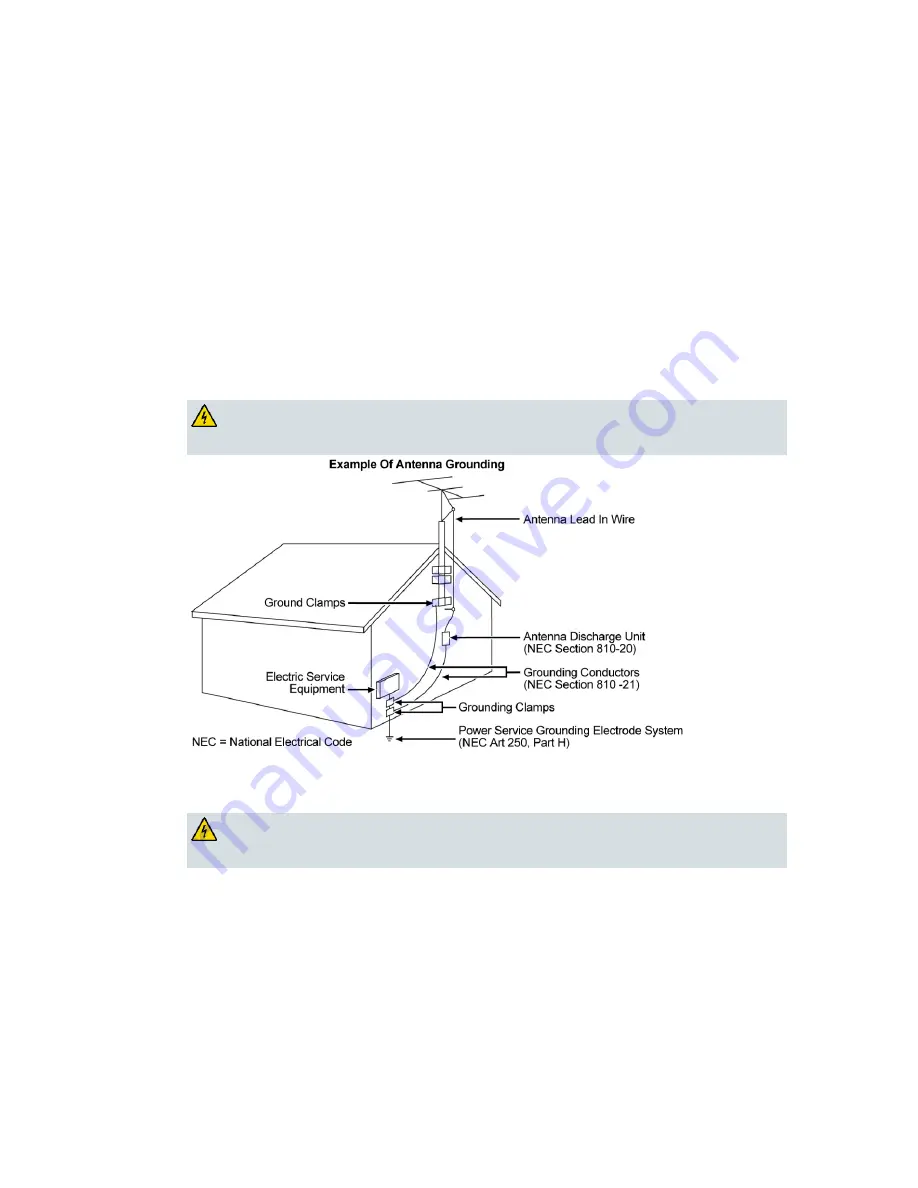
Article 810 of the National Electric Code (NEC) ANSI/NFPA No. 70-1990, provides the following 
information: 


Grounding of the mast and supporting structure 


Grounding the lead-in wire to an antenna discharge unit 


Size of the grounding conductors 


Location of the antenna-discharge unit 


Connection to grounding electrodes 


Requirements for the grounding electrodes (see the following antenna grounding diagram as 
recommended by NEC ANSI/NFPA 70) 


WARNING: Avoid electric shock and fire hazard! Do not locate an outside antenna 
system in the vicinity of overhead power lines or power circuits. Touching power lines 
or circuits might be fatal. 


Ground the Product 


WARNING: Avoid electric shock and fire hazard! If this product connects to coaxial 
cable wiring, be sure the cable system is grounded (earthed). Grounding provides 
some protection against voltage surges and built-up static charges.


Protect the Product from Lightning 

In addition to disconnecting the AC power from the wall outlet, disconnect the signal inputs. 

Verify the Power Source from the On/Off Power Light 

When the on/off power light is not illuminated, the apparatus may still be connected to the power 
source. The light may go out when the apparatus is turned off, regardless of whether it is still plugged 
into an AC power source. 

Summary of Contents for Linksys DPC3008

Page 1: ...4022345 Rev B Cisco Model DPC3008 and EPC3008 8x4 DOCSIS 3 0 Cable Modem User Guide ...

Page 2: ......

Page 3: ...Please Read Important Please read this entire guide If this guide provides installation or operation instructions give particular attention to all safety statements included in this guide ...

Page 4: ... right under any copyright or patent whether or not the use of any information in this document employs an invention claimed in any existing or later issued patent Software and Firmware Use The software described in this document is protected by copyright law and furnished to you under a license agreement You may only use or copy this software in accordance with the terms of your license agreement...

Page 5: ...e qualified to do so Notice à l attention des installateurs de réseaux câblés Les instructions relatives aux interventions d entretien fournies dans la présente notice s adressent exclusivement au personnel technique qualifié Pour réduire les risques de chocs électriques n effectuer aucune intervention autre que celles décrites dans le mode d emploi et les instructions relatives au fonctionnement ...

Page 6: ...geführt sind außer Sie sind zur Durchführung solcher Arbeiten qualifiziert Aviso a los instaladores de sistemas CATV Las instrucciones de reparación contenidas en el presente aviso son para uso exclusivo por parte de personal de mantenimiento cualificado Con el fin de reducir el riesgo de descarga eléctrica no realice ninguna otra operación de reparación distinta a las contenidas en las instruccio...

Page 7: ...hapter 2 Installing the DOCSIS 3 0 Cable Modem 7 Installation Preparations 8 Install the Cable Modem 13 Chapter 3 Operation of Front Panel Indicators 15 Initial Power Up Calibration and Registration AC Power applied 16 Normal Operations AC Power Applied 17 Special Conditions 18 Chapter 4 Troubleshooting the DOCSIS 3 0 Cable Modem 19 Frequently Asked Questions 20 Common Troubleshooting Issues 25 Ti...

Page 8: ......

Page 9: ...with the cart stand tripod bracket or table specified by the manufacturer or sold with the apparatus When a cart is used use caution when moving the cart apparatus combination to avoid injury from tip over 13 Unplug this apparatus during lightning storms or when unused for long periods of time 14 Refer all servicing to qualified service personnel Servicing is required when the apparatus has been d...

Page 10: ...as recommended by NEC ANSI NFPA 70 WARNING Avoid electric shock and fire hazard Do not locate an outside antenna system in the vicinity of overhead power lines or power circuits Touching power lines or circuits might be fatal Ground the Product WARNING Avoid electric shock and fire hazard If this product connects to coaxial cable wiring be sure the cable system is grounded earthed Grounding provid...

Page 11: ... expose this product to dripping or splashing liquids rain or moisture Objects filled with liquids such as vases should not be placed on this apparatus WARNING Avoid electric shock and fire hazard Unplug this product before cleaning Do not use a liquid cleaner or an aerosol cleaner Do not use a magnetic static cleaning device dust remover to clean this product WARNING Avoid electric shock and fire...

Page 12: ...vice provider or an experienced radio television technician for help Any changes or modifications not expressly approved by Cisco Systems Inc could void the user s authority to operate the equipment The information shown in the FCC Declaration of Conformity paragraph below is a requirement of the FCC and is intended to supply you with information regarding the FCC approval of this device The phone...

Page 13: ... RSS 102 Rev 4 The minimum separation distance from the antenna to general bystander is 7 9 inches 20 cm to maintain compliance EU This system has been evaluated for RF exposure for humans in reference to the ICNIRP International Commission on Non Ionizing Radiation Protection limits The evaluation was based on the EN 50385 Product Standard to Demonstrate Compliance of Radio Base Stations and Fixe...

Page 14: ...tive This declaration is only valid for configurations combinations of software firmware and hardware supported or provided by Cisco Systems for use within the EU The use of software or firmware not supported or provided by Cisco Systems may result in the equipment no longer being compliant with the regulatory requirements ...

Page 15: ...the appropriate product hardware installation guide which is available on Cisco com The following standards were applied during the assessment of the product against the requirements of the Directive 1999 5 EC EMC EN 55022 and EN 55024 EN 61000 3 2 and EN 61000 3 3 Safety EN 60950 1 This product conforms to the following European directives 1999 5 EC 20090724 CE_Modem EMTA ...

Page 16: ...s DPC3008 DOCSIS 3 0 Cable Modem EPC3008 DOCSIS 3 0 Cable Modem All features described in this guide are standard to these models of cable modems unless otherwise noted For the purpose of this guide whenever a feature or option applies to only a specific model the model number is specified If a model number is not specified then the feature or option applies to both of the models Audience This gui...

Page 17: ... the cable modem and the benefits it offers This chapter also lists the accessories and equipment that are provided with the cable modem so you can verify that you received all of these items 1 Chapter 1 Introducing the DOCSIS 3 0 Cable Modem In This Chapter Introduction 2 What s In the Carton 3 Front Panel Description 4 Back Panel Description 5 ...

Page 18: ...atures DOCSIS Eight 8 bonded downstream channels with data rates in excess of 340 Mbps DPC or 440 Mbps EPC Four 4 bonded upstream channels with data rates in excess of 120 Mbps Designed to meet DOCSIS and EuroDOCSIS 3 0 specifications as well as backward compatibility with existing DOCSIS and EuroDOCSIS 2 0 1 1 and 1 0 networks Enhanced packet processing technology to maximize performance Expanded...

Page 19: ... 3 0 Cable Modem One AC power adapter with power cord image may vary from actual product One Ethernet cable One CD ROM containing the user guide If any of these items are missing or damaged please contact your service provider for assistance Note You need an optional cable signal splitter and additional standard RF coaxial cables if you want to connect a VCR a Digital Home Communications Terminal ...

Page 20: ... cable modem is receiving data from the cable network 3 US ON the cable modem is sending data to the cable network 4 ONLINE ON the cable modem is registered on the network and fully operational 5 LINK ON the Ethernet connection is operational BLINKING indicates that data is being transferred over the Ethernet connection OFF indicates that the Ethernet connection is not connected or has been disabl...

Page 21: ...rovided with your cable modem 2 POWER Connects the cable modem to the AC power adapter that is provided with your cable modem 3 ETHERNET One RJ 45 Ethernet port connects to the Ethernet port on your PC or your home network 4 RESET A momentary pressing 1 2 seconds of this switch causes a reset to factory default of all settings and then reboots the cable modem CAUTION The RESET button is for mainte...

Page 22: ......

Page 23: ...pter describes how to properly install the cable modem and to connect the cable modem to a computer and other devices 2 Chapter 2 Installing the DOCSIS 3 0 Cable Modem In This Chapter Installation Preparations 8 Install the Cable Modem 13 ...

Page 24: ...ake full advantage of these features I Do Not Have a High Speed Internet Access Account If you do not have a high speed Internet access account your service provider will set up your account and become your Internet Service Provider ISP Internet access enables you to send and receive e mail access the World Wide Web and receive other Internet services You will need to give your service provider in...

Page 25: ...s in the spaces provided Serial Number _______________________ CM MAC Address ________________________ Where Is the Best Location for My Cable Modem The ideal location for your cable modem is where it has access to outlets and other devices Think about the layout of your home or office and consult with your service provider to select the best location for your cable modem Read this user guide thor...

Page 26: ... made of cement wood or drywall When choosing an appropriate mounting place refer to the following recommendations Ensure that the mounting location is free of obstructions on all sides and the cables should be able to easily reach the cable modem without strain Leave sufficient clearance between the bottom of the cable modem and any flooring or shelving underneath to allow access to cabling Allow...

Page 27: ... in positioning the cable modem on the wall Location and Dimensions of the Wall Mounting Slots The following illustration shows the location and dimensions of the wall mounting slots on the bottom of the cable modem Use this illustration as a guide for mounting the cable modem to the wall Note Image not to scale ...

Page 28: ...all the mounting screws into the anchor bolts leave a gap of about 1 4 inch between the screw head and the wall Then go to step 4 3 Install the mounting screws into the wall leave a gap of about 1 4 inch between the screw head and the wall Then go to step 4 4 Verify that no cables or wires are connected to the cable modem 5 Lift the cable modem into position Slip the large end of both mounting slo...

Page 29: ...s services Although your model may not support all of the services pictured you can determine which services your model supports by referring to the Benefits and Features list in Introduction on page 2 If your cable modem to supports high speed Internet service you can share that Internet connection with other Internet devices in your home or office Sharing one connection among many devices is cal...

Page 30: ... end to the yellow ETHERNET port on the back of the cable modem Note To install more than one Ethernet device use an external multi port Ethernet switch s or a cable router not provided 5 Locate the AC power adapter provided with your cable modem Connect the barrel connector end of the power adapter into the POWER input on the back of the cable modem Then plug the AC power adapter into an AC outle...

Page 31: ...icators when the cable modem is first powered up during normal operations and in special conditions 3 Chapter 3 Operation of Front Panel Indicators In This Chapter Initial Power Up Calibration and Registration AC Power applied 16 Normal Operations AC Power Applied 17 Special Conditions 18 ...

Page 32: ... Note After the cable modem completes Step 7 Data Network Registration Complete the cable modem proceeds immediately to Normal Operations See Normal Operations AC Power applied on page 17 Front Panel LED Status Indicators During Initial Power Up Calibration and Registration High Speed Data Registration Step 1 2 3 4 5 6 Front Panel Indicator Self Test Downstream Scan Downstream Signal Lock Ranging ...

Page 33: ... US On 4 ONLINE On 5 LINK On When a single device is connected to the Ethernet port and no data is being sent to or from the cable modem Blinks When only one Ethernet device is connected and data is being transferred between the consumer premise equipment CPE and the wireless home gateway Off When no devices are connected to the Ethernet ports Note In addition to the above indicators some service ...

Page 34: ...ndicators during special conditions to show when you have been denied network access Front Panel LED Status Indicators During Special Conditions Front Panel Indicator Network Access Denied 1 POWER Slow Blinking once per second 2 DS Slow Blinking once per second 3 US Slow Blinking once per second 4 ONLINE Slow Blinking once per second 5 LINK Slow Blinking once per second ...

Page 35: ...ur after the cable modem is installed and provides possible solutions and tips for improved performance of the cable modem 4 Chapter 4 Troubleshooting the DOCSIS 3 0 Cable Modem In This Chapter Frequently Asked Questions 20 Common Troubleshooting Issues 25 Tips for Improved Performance 26 ...

Page 36: ... Sharing Center click View network connections 3 Right click the connection that you want to change and then click Properties If you are prompted for an administrator password or confirmation type the password or provide confirmation The Local Area Connection Properties window opens 4 Click the Networking tab 5 Under This connection uses the following items click either Internet Protocol Version 4...

Page 37: ...Windows XP Default Start Menu select Connect to choose Show all connections and then go to step 2 If you are using the Windows XP Classic Start Menu select Settings choose Network Connections click Local Area Connection and then go to step 3 2 Double click the Local Area Connection icon in the LAN or High Speed Internet section of the Network Connections window 3 Click Properties in the Local Area...

Page 38: ...P Control Panel window click File and then scroll down to click Close You have completed this procedure If no you must power off your Macintosh 8 With the power off simultaneously press and hold down the Command Apple Option P and R keys on your keyboard Keeping those keys pressed down power on your Macintosh but do not release these keys until you hear the Apple chime at least three times then re...

Page 39: ...d R keys on your keyboard Keeping those keys pressed down power on your Macintosh but do not release these keys until you hear the Apple chime at least three times then release the keys and let the computer restart 7 When your computer fully reboots click the Apple icon in the upper left corner of the Finder Scroll down to Control Panels and then click TCP IP 8 Click Edit on the Finder at the top ...

Page 40: ...l hardware and software settings Contact your service provider for more information about installation How Does the Cable Modem Connect to My Computer The cable modem connects to the 1000 100BASE T Ethernet port on your PC To use the Ethernet interface Ethernet cards available from your local PC or office supply retailer or from your service provider For best performance over an Ethernet connectio...

Page 41: ... If you purchase and install an Ethernet card follow the installation instructions very carefully Verify the status of the front panel status indicator lights The Cable Modem does not register an Ethernet connection after connecting to a hub If you are connecting multiple PCs to the cable modem you should first connect the cable modem to the uplink port of the hub using the correct crossover cable...

Page 42: ... Verify that your cable service is active and that it supports two way service Verify that all cables are properly connected and that you are using the correct cables If you are using the Ethernet connection verify that your TCP IP is properly installed and configured Verify that you have called your service provider and given them the serial number and MAC address of your cable modem If you are u...

Page 43: ... menu options to speak with a service engineer Access your company s extranet site to view or order additional technical publications For accessing instructions contact the representative who handles your account Check your extranet site often as the information is updated frequently 5 Chapter 5 Customer Information ...

Page 44: ......

Page 45: ...ion vii Internet how to access 24 surfing while watching TV 24 unable to access 22 IP address renewing 23 L LEDs 4 16 17 18 location selecting vii 9 O overview power switch 5 product 2 P performance tips to improve 26 product accessories 3 features 2 overview 2 S safety instructions v ground product v vi system requirements 8 T TCP IP configuring for Macintosh systems 22 configuring for Windows XP...

Page 46: ...des various trademarks of Cisco and or its affiliates Please see the Notices section of this document for a list of the Cisco trademarks used in this document Product and service availability are subject to change without notice 2011 2012 Cisco and or its affiliates All rights reserved May 2012 Printed in USA Part Number 4022345 Rev B ...

Reviews: