background image

Desktop-Mount the Chassis

You can mount the chassis on a desktop by placing it on a desk in a horizontal position. Make sure there are
no blockages or obstructions within one inch of the top of the chassis or within .5 inch of the sides and back,
so that nothing interferes with cooling. Do not remove the rubber feet included with the chassis. They are also
needed for proper cooling.

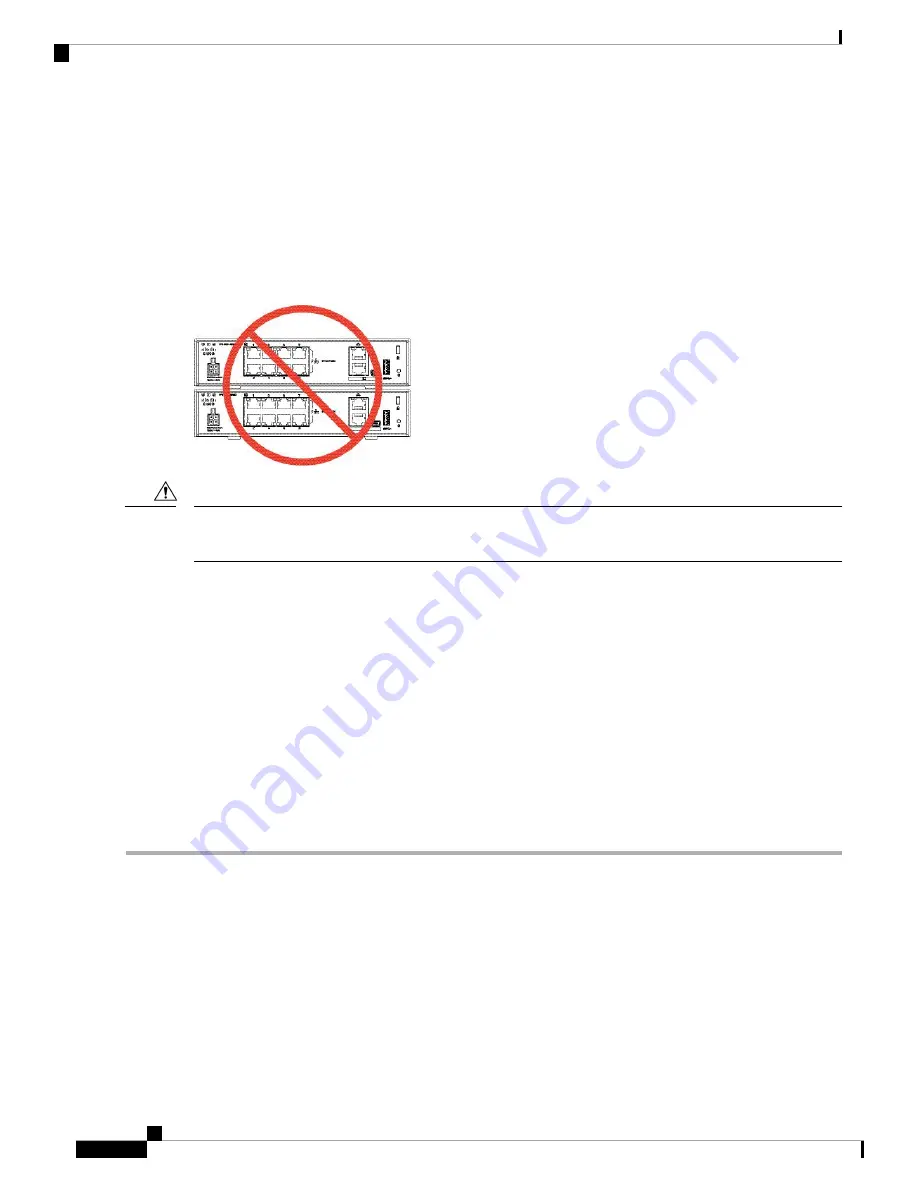
Figure 22: Desk Top Mount the Chassis

Do not stack one chassis on top of another chassis. If you stack the units, they will overheat, which causes
the units to power cycle.

Caution

What to do next

Install the cables according to your default software configuration as described in the

Getting Started Guide

for your software version.

Wall-Mount the Chassis

You can purchase an optional wall-mount kit (part number 69-100647-01). You can wall-mount the chassis
left-, right-, or rear panel-side up. You can use the wall-mount bracket to mark the holes for mounting it on
the wall. The wall-mount bracket is 7.682 x 6 inches. You need to make two level marks on the wall where
you want to hang the chassis. For vertical orientation (rear panel up), the holes should be 6.826 inches apart.
For side to side orientation, the holes should be 5.134 inches apart.

Follow these steps to mount your chassis on a wall.

Step 1

Choose an orientation (left-, right-, or rear panel-side up) and a location on the wall for the chassis.

Step 2

Use a pencil, ruler, and level to mark locations for the two mounting screws. You can use the wall-mount bracket itself
to mark either the top holes or the side holes.

Cisco Firepower 1010 Hardware Installation Guide

26

Mount the Chassis

Desktop-Mount the Chassis

Summary of Contents for LightStream 1010

Page 1: ... Installation Guide First Published 2019 07 24 Last Modified 2019 09 26 Americas Headquarters Cisco Systems Inc 170 West Tasman Drive San Jose CA 95134 1706 USA http www cisco com Tel 408 526 4000 800 553 NETS 6387 Fax 408 527 0883 ...

Page 2: ... WARRANTIES EXPRESSED OR IMPLIED INCLUDING WITHOUT LIMITATION THOSE OF MERCHANTABILITY FITNESS FOR A PARTICULAR PURPOSE AND NONINFRINGEMENT OR ARISING FROM A COURSE OF DEALING USAGE OR TRADE PRACTICE IN NO EVENT SHALL CISCO OR ITS SUPPLIERS BE LIABLE FOR ANY INDIRECT SPECIAL CONSEQUENTIAL OR INCIDENTAL DAMAGES INCLUDING WITHOUT LIMITATION LOST PROFITS OR LOSS OR DAMAGE TO DATA ARISING OUT OF THE U...

Page 3: ... 17 C H A P T E R 2 Installation Warnings 17 Position the Chassis 20 Safety Recommendations 20 Maintain Safety with Electricity 21 Prevent ESD Damage 21 Site Environment 22 Site Considerations 22 Power Supply Considerations 22 Rack Configuration Considerations 23 Mount the Chassis 25 C H A P T E R 3 Unpack and Inspect the Chassis 25 Desktop Mount the Chassis 26 Wall Mount the Chassis 26 Cisco Fire...

Page 4: ... the Console Port 33 C H A P T E R 4 Connect to the Console Port with Microsoft Windows 33 Connect to the Console Port with Mac OS X 35 Connect to the Console Port with Linux 35 Cisco Firepower 1010 Hardware Installation Guide iv Contents ...

Page 5: ...and L2 switch support The PoE and L2 switch features are supported starting with Firepower Version 6 5 Note The Firepower 1010 supports Cisco Firepower software version 6 4 and later See the Cisco Firepower Compatibility Guide which provides Cisco Firepower software and hardware compatibility including operating system and hosting environment requirements for each supported Firepower version See P...

Page 6: ...ory 8 GB internal Boot partition Marvell SOHO 88E6390 First supported in Firepower Verion 6 5 Note L2 switch One Gigabit Ethernet RJ 45 10 100 1000 BaseT Restricted to network management access connect with an RJ 45 cable Management port One RJ 45 Use to access management through an external system Console port One USB Mini B Use to access management through an external system USB Mini B port One ...

Page 7: ...hut down the Firepower 1010 gracefully see the Power Off the Device topic for FDM and FMC in the Cisco Firepower 1010 Getting Started Guide Note Power switch The chassis is powered on when you plug in the AC power supply Power cord socket One external AC power supply The power supply has a total of 115 W of power There is 55 W of 12 V system power and 60 W of 53 5 V PoE power PoE is first supporte...

Page 8: ...o the Console Port with Microsoft Windows on page 33 for information on installing the driver Note External Flash Storage The chassis contains a standard USB Type A port that you can use to attach an external device The USB port can provide output power of 5 V and up to a maximum of 1A 5 USB power units External USB drive optional You can use the external USB Type A port to attach a data storage d...

Page 9: ...010 for FTD with FDM and ASA with ASDM and it sends you to the online Useful Links document to continue your configuration 5 Serial Number Location You can view the serial number and additional model information on the compliance label located on the bottom of the chassis The following figure shows a sample compliance label Cisco Firepower 1010 Hardware Installation Guide 5 Overview Serial Number ...

Page 10: ...Firepower 1010 Note that there are no connectors or LEDs on the front panel Figure 4 Firepower 1010 Front Panel Rear Panel The following figure shows the rear panel of the Firepower 1010 See Status LEDs on page 7 for a description of the LEDs Cisco Firepower 1010 Hardware Installation Guide 6 Overview Front Panel ...

Page 11: ...ton 9 Status LEDs Facing the rear of the chassis the LEDs are located on the top left edge facing the front of the chassis they are in the back right corner of the top The network port LEDs are at the top sides of each network port The following figure shows the status LEDs on the rear panel and on the cover of the chassis Cisco Firepower 1010 Hardware Installation Guide 7 Overview Status LEDs ...

Page 12: ...Figure 7 Firepower 1010 Rear Panel LEDs Status System operating status Green Normal system function Amber Critical alarm indicating one or more of the following Major failure of a hardware or software component Over temperature condition Power voltage outside the tolerance range 2 Power Power supply status Off Power supply off Green Power supply on 1 Cisco Firepower 1010 Hardware Installation Guid...

Page 13: ... flashes 1000 Mbps 5 Hardware Specifications The following table contains hardware specifications for the Firepower 1010 Table 2 Firepower 1010 Hardware Specifications 1 82 x 7 85 x 8 07 in 4 62 x 19 94 x 20 50 cm Dimensions H x W x D 3 lb 1 36 kg Weight 30 W Not including any PoE devices connected to the chassis 55 W is the maximum power for the power supply PoE is first supported in Firepower Ve...

Page 14: ...power 1010 accessory kit FPR1K DT ACY KIT Cisco Firepower 1010 115 W power supply FPR1K DT PWR AC Cisco Firepower 1010 115 W power supply spare FPR1K DT PWR AC Cisco Firepower 1010 rack mount kit spare FPR1K DT RACK MNT Cisco Firepower 1010 wall mount kit spare FPR1K DT WALL MNT Power Cord Specifications Each power supply has a separate power cord Standard power cords or jumper power cords are ava...

Page 15: ...RG Cord set rating 2 5 A 250 V 2 Plug IRAM 2073 1 Connector IEC 60320 C5 3 Figure 9 Australia CAB AC C5 AUS Cord set rating 2 5 A 250 V 2 Plug AUS 10S3 1 Connector IEC 60320 C5 3 Figure 10 Brazil CAB AC C5 BRA Cord set rating 2 5 A 250 V 2 Plug NBR 14136 1 Connector IEC 60320 C5 3 Cisco Firepower 1010 Hardware Installation Guide 11 Overview Power Cord Specifications ...

Page 16: ...C5 3 Figure 12 China CAB AC C5 CHI Cord set rating 2 5 A 250 V 2 Plug GB 2099 1 1 Connector IEC 60320 C5 3 Figure 13 Europe CAB AC C5 EUR Cord set rating 2 5 A 250 V 2 Plug CEE 7 VII 1 Connector IEC 60320 C5 3 Cisco Firepower 1010 Hardware Installation Guide 12 Overview Power Cord Specifications ...

Page 17: ...C5 3 Figure 15 Italy CAB AC C5 ITA Cord set rating 2 5 A 250 V 2 Plug CEI 23 06 VII 1 Connector IEC 60320 C5 3 Figure 16 Japan CAB AC C5 JAP Cord set rating 3 A 125 V 2 Plug JIS C8303 1 Connector IEC 60320 C5 3 Cisco Firepower 1010 Hardware Installation Guide 13 Overview Power Cord Specifications ...

Page 18: ...Figure 18 South Africa CAB AC C5 SAF Cord set rating 2 5 A 250 V 2 Plug SABS 164 1 1 Connector IEC 60320 C5 3 Figure 19 Switzerland CAB AC C5 SWI Cord set rating 2 5 A 250 V 2 Plug SEV 1011 1 Connector IEC 60320 C5 3 Cisco Firepower 1010 Hardware Installation Guide 14 Overview Power Cord Specifications ...

Page 19: ... 125 V 2 Plug CNS 10917 2 1 Connector IEC 60320 C5 3 Figure 21 United Kingdom CAB AC C5 UK Cord set rating 2 5 A 250 V 2 Plug BS1363A SS145 1 Connector IEC 60320 C5 3 Cisco Firepower 1010 Hardware Installation Guide 15 Overview Power Cord Specifications ...

Page 20: ...Cisco Firepower 1010 Hardware Installation Guide 16 Overview Power Cord Specifications ...

Page 21: ... Definition IMPORTANT SAFETY INSTRUCTIONS This warning symbol means danger You are in a situation that could cause bodily injury Before you work on any equipment be aware of the hazards involved with electrical circuitry and be familiar with standard practices for preventing accidents Use the statement number provided at the end of each warning to locate its translation in the translated safety wa...

Page 22: ...e using installing or connecting the system to the power source Warning Statement 1005 Circuit Breaker This product relies on the building s installation for short circuit overcurrent protection Ensure that the protective device is rated not greater than 20 A 120 V and 16 A 250 V Warning Statement 1017 Restricted Area This unit is intended for installation in restricted access areas A restricted a...

Page 23: ...ght disrupt other equipment and they direct the flow of cooling air through the chassis Do not operate the system unless all cards faceplates front covers and rear covers are in place Warning Statement 1030 Equipment Installation Only trained and qualified personnel should be allowed to install replace or service this equipment Warning Statement 1040 Product Disposal Ultimate disposal of this prod...

Page 24: ...at might impede proper circulation Choose a location that lets you easily bring the power cord and Ethernet and console cables to the chassis with plenty of slack and yet tucked away so they cannot be inadvertently unplugged Safety Recommendations Observe these safety guidelines Keep the area clear and dust free before during and after installation Keep tools away from walkways where you and other...

Page 25: ...tion Use the chassis within its marked electrical ratings and product usage instructions The chassis is equipped with an AC input power supply which is shipped with a three wire electrical cord with a grounding type plug that fits into a grounding type power outlet only Do not circumvent this safety feature Equipment grounding should comply with local and national electrical codes Prevent ESD Dama...

Page 26: ...s Electrical equipment generates heat Ambient air temperature might not be adequate to cool equipment to acceptable operating temperatures without adequate circulation Make sure that the room in which you operate your system has adequate air circulation Ensure that the chassis cover is secure The chassis is designed to allow cooling air to flow effectively within it An open chassis allows air leak...

Page 27: ...ow Be sure enclosed racks have adequate ventilation Make sure that the rack is not overly congested as each chassis generates heat An enclosed rack should have louvered sides and a fan to provide cooling air In an enclosed rack with a ventilation fan in the top heat generated by equipment near the bottom of the rack can be drawn upward and into the intake ports of the equipment above it in the rac...

Page 28: ...Cisco Firepower 1010 Hardware Installation Guide 24 Installation Preparation Rack Configuration Considerations ...

Page 29: ...back due to damage Note See Package Contents on page 4 for a list of what shipped with the chassis Step 1 Remove the chassis from its cardboard container and save all packaging material Step 2 Compare the shipment to the equipment list provided by your customer service representative Verify that you have all items Step 3 Check for damage and report any discrepancies or damage to your customer serv...

Page 30: ...t the Chassis You can purchase an optional wall mount kit part number 69 100647 01 You can wall mount the chassis left right or rear panel side up You can use the wall mount bracket to mark the holes for mounting it on the wall The wall mount bracket is 7 682 x 6 inches You need to make two level marks on the wall where you want to hang the chassis For vertical orientation rear panel up the holes ...

Page 31: ...ntal mounting 2 Vertical mounting 1 Step 3 Attach the wall mount bracket to the chassis using the three M3 0 x 6 mmL screws that came in the kit Cisco Firepower 1010 Hardware Installation Guide 27 Mount the Chassis Wall Mount the Chassis ...

Page 32: ... into the holes if needed and be sure they are properly seated Step 7 Fasten each screw into its anchor until it protrudes about 1 4 inch Step 8 Pick up the chassis align the screws in the anchors with the holes in the bottom of the wall mount bracket move the chassis toward the wall until the screw heads are in the wall mount bracket and then slide it down until it rests on the screws Do not moun...

Page 33: ...ing holes in the bottom of the chassis Step 4 Tighten the captive screws to lock the chassis into place on the rack mount shelf Step 5 Carefully turn the rack mount shelf right side up Step 6 Install the power supply and bracket behind the chassis Tighten the three screws on the bracket to secure it to the rack shelf You can tighten the thumb screw on the top of the bracket to secure the power sup...

Page 34: ... supply 4 Power supply securing bracket 3 Step 7 Slide the rack mount shelf into the rack Figure 27 Slide Rack Mount Shelf into Rack Step 8 The chassis is now rack mounted Repeat Steps 1 through 7 to rack mount a second chassis Cisco Firepower 1010 Hardware Installation Guide 30 Mount the Chassis Rack Mount the Chassis ...

Page 35: ...o do next Install the cables according to your default software configuration as described in the Getting Started Guide for your software version Cisco Firepower 1010 Hardware Installation Guide 31 Mount the Chassis Rack Mount the Chassis ...

Page 36: ...Cisco Firepower 1010 Hardware Installation Guide 32 Mount the Chassis Rack Mount the Chassis ...

Page 37: ... USB console port on the chassis otherwise the connection fails To uninstall the driver use the Add Remove Programs utility or the Setup exe program Disconnect the console terminal before uninstalling the driver Note Step 1 Obtain the appropriate driver Cisco_usbconsole_driver_X_X_zip where X is a revision number for your model from the Cisco Download Software site USB Console Software category St...

Page 38: ...propriate adapter for that port The LED for the console port turns green and within a few moments the Found New Hardware Wizard appears Step 5 Follow the instructions to complete the driver installation Step 6 To communicate with the chassis start a terminal emulator application This software should be configured with the following parameters 9600 baud 8 data bits no parity 1 stop bit no flow cont...

Page 39: ...ep 5 Enter Ctrl a followed by d to disconnect the OS X USB console from the Terminal window Connect to the Console Port with Linux Follow these steps to connect a Linux system USB port to the console using the built in Linux Terminal utility Step 1 Open the Linux Terminal window Step 2 Connect the Linux USB port to the chassis Step 3 Enter the following commands to find the Linux USB port number E...

Page 40: ...Cisco Firepower 1010 Hardware Installation Guide 36 Connect to the Console Port Connect to the Console Port with Linux ...

Reviews: