background image

3-37

Cisco ISA 3000 Industrial Security Appliance Hardware Installation Guide

Chapter 3      Connecting the ISA 3000

  Connecting to DC Power

Step 4

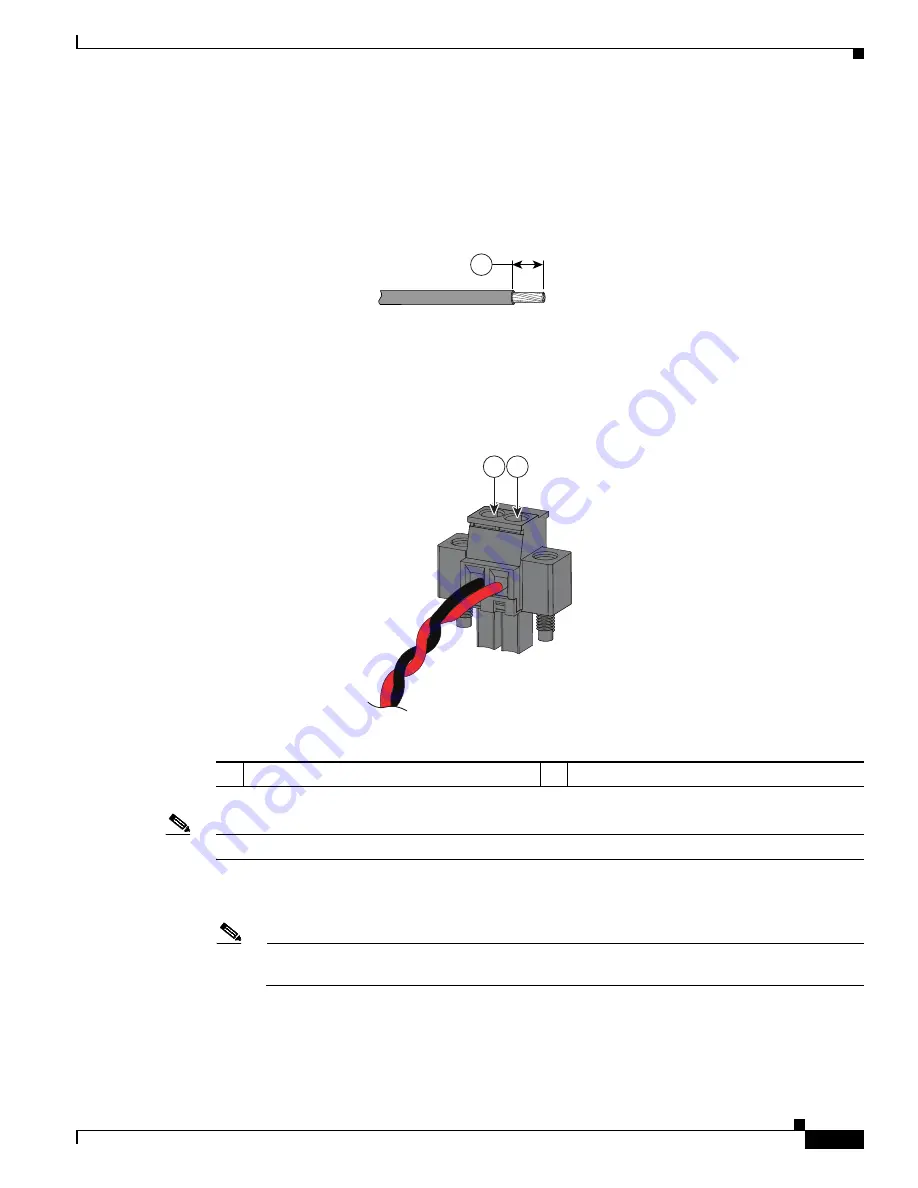
Using a 18-gauge (1.02mm) wire-stripping tool, strip the ground wire and both ends of the twisted pair 
wires to 0.25 inch (6.3 mm) ± 0.02 inch (0.5 mm). See 

Figure 3-4

, number 1. Do not strip more than 0.27 

inch (6.8 mm) of insulation from the wires. Stripping more than the recommended amount of wire can 
leave exposed wire from the power and relay connector after installation. 

Figure 3-4

Stripping the Power Connection Wire

Step 5

Remove the two captive screws that attach the power connector to the device, and remove the power 
connector. Remove both connectors if you are connecting to two power sources

Step 6

On the power connector, insert the exposed part of the positive wire into the connection labeled “+” and 
the exposed part of the return wire into the connection labeled “–”. See 

Figure 3-5

.

Figure 3-5

Inserting Wires into the Power Connector

Note

Ensure that you cannot see any wire lead. Only wire with insulation should extend from the connector.

Step 7

Use a ratcheting torque flathead screwdriver to torque the power connector captive screws (above the 
installed wire leads) to 2 in-lb (0.23 N-m). See 

Figure 3-6

.

Note

Do not over-torque the power connector’s captive screws. The torque should not exceed 2 
inch-lbs (0.23 N-m).

97489

1

406053

2

1

1

Power source positive connection

2

Power source return connection

Summary of Contents for ISA 3000

Page 1: ...uarters Cisco Systems Inc 170 West Tasman Drive San Jose CA 95134 1706 USA http www cisco com Tel 408 526 4000 800 553 NETS 6387 Fax 408 527 0883 Cisco ISA 3000 Hardware Installation Guide March 2018 Text Part Number ...

Page 2: ... to correct the interference by using one or more of the following measures Reorient or relocate the receiving antenna Increase the separation between the equipment and receiver Connect the equipment into an outlet on a circuit different from that to which the receiver is connected Consult the dealer or an experienced radio TV technician for help Modifications to this product not authorized by Cis...

Page 3: ...o ISA 3000 Industrial Security Appliance 2 25 Equipment Tools and Connections 2 25 Items Shipped with your Cisco ISA 3000 2 26 Additional Items 2 26 Ethernet Devices 2 26 Installing the Cisco ISA 3000 2 26 Installing a DIN Rail 2 27 Removing the Device from a DIN Rail 2 28 Mounting the ISA 3000 in a Rack 2 29 Installing the Cisco ISA 3000 Ground Connection 2 30 C H A P T E R 3 Connecting the ISA 3...

Page 4: ...Contents 4 Cisco ISA3000 Industrial Security Appliance Hardware Installation Guide C H A P T E R 4 Technical Specifications 4 45 Device Specifications 4 45 MIB Information 4 46 ...

Page 5: ...ons Objective page 5 Audience page 5 Organization page 6 Conventions page 6 Safety Warnings page 7 Related Documentation page 12 Searching Cisco Documents page 13 Obtaining Documentation and Submitting a Service Request page 13 Objective This guide provides an overview and explains how to install connect and perform initial configuration for the Cisco ISA 3000 Industrial Security Appliance Audienc...

Page 6: ...formation Chapter Name Description Chapter 1 Chapter 1 Product Overview Describes the security appliance models and the hardware features available Chapter 2 Chapter 2 Installing the Cisco ISA 3000 Industrial Security Appliance Lists the items shipped with the security appliance the equipment and tools necessary for installing the security appliance the safety warnings and guidelines and the proce...

Page 7: ...de standaard praktijken om ongelukken te voorkomen Gebruik het nummer van de verklaring onderaan de waarschuwing als u een vertaling van de waarschuwing die bij het apparaat wordt geleverd wilt raadplegen BEWAAR DEZE INSTRUCTIES Varoitus TÄRKEITÄ TURVALLISUUSOHJEITA Tämä varoitusmerkki merkitsee vaaraa Tilanne voi aiheuttaa ruumiillisia vammoja Ennen kuin käsittelet laitteistoa huomioi sähköpiirie...

Page 8: ...Dette advarselssymbolet betyr fare Du er i en situasjon som kan føre til skade på person Før du begynner å arbeide med noe av utstyret må du være oppmerksom på farene forbundet med elektriske kretser og kjenne til standardprosedyrer for å forhindre ulykker Bruk nummeret i slutten av hver advarsel for å finne oversettelsen i de oversatte sikkerhetsadvarslene som fulgte med denne enheten TA VARE PÅ ...

Page 9: ...al signalerar fara Du befinner dig i en situation som kan leda till personskada Innan du utför arbete på någon utrustning måste du vara medveten om farorna med elkretsar och känna till vanliga förfaranden för att förebygga olyckor Använd det nummer som finns i slutet av varje varning för att hitta dess översättning i de översatta säkerhetsvarningar som medföljer denna anordning SPARA DESSA ANVISNI...

Page 10: ... de acidentes Use o número da declaração fornecido ao final de cada aviso para localizar sua tradução nos avisos de segurança traduzidos que acompanham o dispositivo GUARDE ESTAS INSTRUÇÕES Advarsel VIGTIGE SIKKERHEDSANVISNINGER Dette advarselssymbol betyder fare Du befinder dig i en situation med risiko for legemesbeskadigelse Før du begynder arbejde på udstyr skal du være opmærksom på de involve...

Page 11: ...11 Cisco ISA 3000 Industrial Security Appliance Hardware Installation Guide Cisco ISA 3000 Industrial Security Appliance Hardware Installation Guide ...

Page 12: ...ment 1079 Related Documentation ISA 3000 product page http www cisco com c en us support security industrial security appliance 3000 model html ASA documentation Compatibility Matrix http www cisco com c en us td docs security asa compatibility asamatrx html Navigating the Cisco ASA Series Documentation http www cisco com c en us td docs security asa roadmap asaroadmap html ...

Page 13: ...r Cmd F Apple In most browsers the option to search whole words only invoke case sensitivity or search forward and backward is also available To search a PDF document in Adobe Reader use the basic Find toolbar Ctrl F or the Full Reader Search window Shift Ctrl F Use the Find toolbar to find words or phrases within a specific document Use the Full Reader Search window to search multiple PDF files s...

Page 14: ...14 Cisco ISA 3000 Industrial Security Appliance Hardware Installation Guide Cisco ISA 3000 Industrial Security Appliance Hardware Installation Guide ...

Page 15: ...IN Rail describes a metal rail of a standard type widely used for mounting circuit breakers and industrial control equipment inside equipment racks The term derives from the original specifications published by Deutsches Institut für Normung DIN in Germany The device can run either the ASA or Firepower Threat Defense operating system The Cisco ISA 3000 is low power fan less with Gigabit Ethernet a...

Page 16: ...1 16 Cisco ISA 3000 Industrial Security Appliance Hardware Installation Guide Chapter 1 Product Overview General Description Figure 1 1 Cisco ISA 3000 Copper SKU ...

Page 17: ...1 17 Cisco ISA 3000 Industrial Security Appliance Hardware Installation Guide Chapter 1 Product Overview General Description Figure 1 2 Cisco ISA 3000 Fiber SKU ...

Page 18: ...0 BaseT Connectors 1 2 2 Console LED 11 On the ISA 3000 2C2F SKU these are the SFP sockets On the ISA 3000 4C SKU these are RJ45 10 100 100 BaseT Connectors 3 4 3 System LED 12 1GB removable SD flash memory card slot 4 Console connector RJ 45 13 Alarm Connectors 5 Console connector mini USB 14 Grounding Point 6 USB connectors 15 Alarm LEDs 7 Management Interface 16 DC Power LEDs 8 DC power connect...

Page 19: ...Steady on Power is not present on the associated circuit and the system is configured for dual input power Alarm Out Alarm monitoring Off Alarm Out not configured or the system is off Default Green Steady on Alarm Out is configured no alarm detected Red Steady on Minor alarm detected Red Flashing Major alarm detected Alarm In 1 2 Alarm monitoring Off Alarm In not configured or the system is off De...

Page 20: ...s port is Management 1 1 in the configuration Console Port The Cisco ISA 3000 can be configured through a web interface or through the console port The console port is either a RJ45 or a Mini USB connector A standard management cable Part number 72 3383 01 can be used to convert the RJ45 to DB9 connector The default configuration settings for the RJ45 console port are 9600 baud 8 data bits no pari...

Page 21: ...ry Dedicated management only Gigabit Ethernet port Mini USB and RJ45 Console port All copper data ports have relay bypass when there is a loss of power or under software control 12 to 48VDC Rated 9 6 to 60VDC Maximum redundant power connectors with 24 12 AWG screw cage terminals Two external USB A ports for addition of memory cards security tokens modems or other USB 2 0 compliant devices DIN Rail...

Page 22: ... redundant external power connector the connector supports 12 48 VDC The connectors are Molex 5 00mm Pitch Eurostyle Horizontal Plug with Retention Screws The power supply does not support reverse polarity but does have reverse polarity protection This means if you reverse connections the system will not power on but there will be no damage The terminal always has to be greater than the terminal f...

Page 23: ...t Loosen the captive screw at the top of the door using a Phillips screwdriver to open the door To install a card slide it into the slot and press it in until it clicks in place The card is keyed so that you cannot insert it the wrong way To remove the card push it in until it releases for it to pop out Place it in an antistatic bag to protect it from static discharge Step 2 After the card is inst...

Page 24: ...ing for information on dual power supply configuration and support When configured for dual power supply and a failure occurs the Alarm Out LED turns red The alarm relay is also energized A syslog message is generated Syslog ASA 1 735006 Power Supply Unit Redundancy Lost When configured for dual power supply and a failure recovers the Alarm Out LED turns off A syslog message is generated Syslog AS...

Page 25: ...plies with the safety extra low voltage SELV requirements in IEC 60950 based safety standards Statement 1033 Warning Only trained and qualified personnel should be allowed to install replace or service this equipment Statement 1030 Warning The covers are an integral part of the safety design of the product Do not operate the unit without the covers installed Statement 1077 Warning This equipment m...

Page 26: ...r installation ESD preventive cord and wrist strap Wire crimper for chassis grounding Wire for connecting the chassis to an earth ground AWG 14 2 mm or larger wire for NEC compliant chassis grounding Ethernet cables for connecting to the Gigabit Ethernet ports Fiber optic cables and SFP transceivers for connecting to fiber LAN ports Ratcheting torque flathead screwdriver that exerts up to 15 in lb...

Page 27: ...rature outside the enclosure The temperature inside the enclosure cannot exceed 140 F 60 C which is the maximum ambient enclosure temperature of the device Cabling is away from sources of electrical noise such as radios power lines and fluorescent lighting fixtures Connect the unit only to a Class 2 DC power source Contact your Cisco TAC if tighter spacings are required This section contains the f...

Page 28: ...vice away from the DIN rail place the two hooks 1 on the back of the device over the top of the DIN rail Step 3 Push the device toward the DIN rail to cause the spring loaded latch 2 at the bottom rear of the device to move down and snap into place Removing the Device from a DIN Rail To remove the device from a DIN rail follow these steps Step 1 Ensure that power is removed from the device and dis...

Page 29: ...et rack with the optional kit part number STK RACKMNT 2955 This kit includes a bracket and mounting screws see Figure 2 2 Figure 2 2 Mounting Bracket To install the ISA 3000 in a cabinet or rack perform the following steps Step 1 Install the bracket in the cabinet or rack using the 4 front screws included in the kit Place the screws through the mounting holes 1 Step 2 Attach The device to the DIN ...

Page 30: ...ent 242 Warning This equipment must be grounded Never defeat the ground conductor or operate the equipment in the absence of a suitably installed ground conductor Contact the appropriate electrical inspection authority or an electrician if you are uncertain that suitable grounding is available Statement 1024 Warning When installing or replacing the unit the ground connection must always be made fi...

Page 31: ...t panel Step 6 Attach the ring terminal to the chassis using the screw set aside in step 1 Use a ratcheting torque screwdriver to tighten the ground screws and ring terminal to the device front panel to 3 5 in lb 0 4 N m See Figure 2 4 Figure 2 4 Grounding Location Step 7 Connect the other end of the ground wire to a known reliable earth ground point at your site Step 8 Move on to the next chapter...

Page 32: ...2 32 Cisco ISA 3000 Industrial Security Appliance Hardware Installation Guide Chapter 2 Installing the Cisco ISA 3000 Industrial Security Appliance Installing the Cisco ISA 3000 ...

Page 33: ...s install the ISA 3000 according to the instructions in Chapter 2 Installing the Cisco ISA 3000 Industrial Security Appliance Caution If this product will be installed in a hazardous location read the Getting Started Printed Document of Compliance included in the package Warning To avoid electric shock do not connect safety extra low voltage SELV circuits to telephone network voltage TNV circuits ...

Page 34: ...hen receive an IP address through DHCP Note This section describes connecting to the console port Refer to documentation that is provided for your operating system for connecting through the management port To connect a PC to the console port on the Cisco ISA 3000 and access the CLI follow these steps Step 1 Choose which console connection will be used In Figure 3 1 Item 1 is the RJ 45 console con...

Page 35: ...vers to communicate with the router you can obtain them from your computers manufacturer or go here https www silabs com products mcu Pages USBtoUARTBridgeVCPDrivers aspx Step 6 Start up a console terminal Step 7 See the initial configuration section for more details Connecting to DC Power Warning This product relies on the building s installation for short circuit overcurrent protection Ensure th...

Page 36: ...with the provided captive screws The power connector labeling is on the panel The positive DC power connection is labeled and the return connection is labeled The device can operate with a single power source or with dual power sources When both power sources are operational the device draws power from the DC source with the higher voltage If one of the two power sources fail the other continues t...

Page 37: ...ctor to the device and remove the power connector Remove both connectors if you are connecting to two power sources Step 6 On the power connector insert the exposed part of the positive wire into the connection labeled and the exposed part of the return wire into the connection labeled See Figure 3 5 Figure 3 5 Inserting Wires into the Power Connector Note Ensure that you cannot see any wire lead ...

Page 38: ...ay connector Statement 122 Step 8 Connect the other end of the positive wire to the positive terminal on the DC power source and connect the other end of the return wire to the return terminal on the DC power source Note When you are testing the device one power connection is sufficient If you are installing the device and are using a second power source repeat steps 4 through 8 using the second p...

Page 39: ...sufficient If you are installing the device and are using a second power source repeat this procedure for the second power connector DC B which installs just below the primary power connector DC A Step 4 When you are installing the device secure the wires coming from the power connector so that they cannot be disturbed by casual contact For example use tie wraps to secure the wires to the rack Ver...

Page 40: ...it a normally open output a normally closed output and a common signal An alarm output and the common wiring connection are required to complete a single alarm output circuit The alarm connectors are on the device panel and are detailed in Table 3 2 Alarm Out Alarm monitoring Off Alarm Out not configured or the system is off Default Green Steady on Alarm Out is configured no alarm detected Red Ste...

Page 41: ...hat hold the alarm connector on the device and remove the connector from the device chassis Step 2 Measure two strands of twisted pair wire 18 to 20 AWG long enough to connect to the external alarm device You can choose between setting up an external alarm input or output circuit Step 3 Use a wire stripper to remove the casing from both ends of each wire to 0 25 inch 6 3 mm 0 02 inch 0 5 mm Do not...

Page 42: ... captive screws Do not exceed 2 inch lbs 0 23 N m torque Step 6 Repeat the above steps to insert the input and output wires of one additional external alarm device into the alarm connector Figure 3 8 shows the completed wiring for two external alarm devices The first alarm device circuit is wired as an alarm input circuit the IN1 and REF connections complete the circuit The second alarm device cir...

Page 43: ...er applied an electrical arc can occur This could cause an explosion in hazardous area installations Be sure that all power is removed from the device and any other circuits Be sure that power cannot be accidentally turned on or verify that the area is nonhazardous before proceeding Statement 1058 To attach the alarm connector to the front panel of the device Step 1 Insert the alarm connector into...

Page 44: ...3 44 Cisco ISA 3000 Industrial Security Appliance Hardware Installation Guide Chapter 3 Connecting the ISA 3000 Connecting Alarm Circuits ...

Page 45: ...pecifications Table 4 1 lists the operational limits of the Cisco ISA 3000 Operating the device outside of the limits specified is not supported Table 4 1 Cisco ISA 3000 Specifications Description Design Specification Dimensions H x W x D height x width x depth x are 5 13 x 4 42 x 6 31 in 13 cm x 11 2 x 16 cm Weight 4 75 lbs Operating Temperature 40C to 60C 0 LFM 40C to 70C 40 LFM 34C to 75C 200 L...

Page 46: ...an find the network management MIBS URL http www cisco com public sw center netmgmt cmtk mibs shtml Shock Vibration IEC60068 2 6 and IEC60068 2 27 MIL STD 810 Method 514 4 Marine EN60945 Industrial EN61131 2 IEC61131 2 Railway EN50155 Smart Grid EN61850 3 IEEE 1613 DC input voltage Maximum operating range 9 6 to 60 VDC Rated 12 to 48 VDC Note The DC input power supply is an SELV circuit and it can...

Reviews: