5
Mounting Bracket Installation on Cisco 2691, Cisco 3631, and Cisco 3725 Routers
78-15162-01
Attaching Brackets to Router Chassis
Attaching Brackets to Router Chassis
Attach the mounting brackets to the chassis in one of the following ways, using the screws provided in
the bracket kit:
•
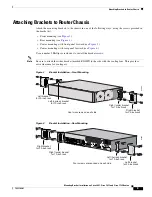
Front mounting (see
Figure 3
.)
•
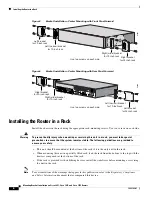
Rear mounting (see
Figure 4
.)
•
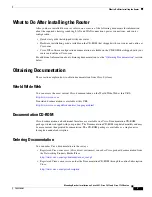
Center mounting with front panel forward (see
Figure 5
.)
•
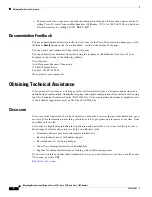
Center mounting with rear panel forward (see
Figure 6
.)
Use a number 2 Phillips screwdriver to install the bracket screws.
Note
Be sure to attach the wider bracket (marked RIGHT) to the side with the cooling fans. This provides
extra clearance for cooling air.
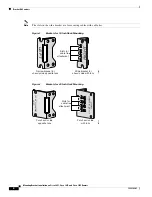
Figure 3
Bracket Installation—Front Mounting
Figure 4
Bracket Installation—Rear Mounting
23" ETSI, NEBS
LEFT
LEFT
Left bracket
for 23-inch rack
82802
Right (wide) bracket
for 19-inch rack
RIGHT
23" ETSI, NEBS
RIGHT
Right bracket
for 23-inch rack
Use two screws on each side.
Left (narrow) bracket
for 19-inch rack
23" ETSI, NEBS
RIGHT
RIGHT
Right (wide) bracket
for 19-inch rack
Right bracket
for 23-inch rack
82692
SEE MANU
AL BEF
ORE INSTALLA
TION
AL
CD
LP
RD
TD
SEE MANUA
L BEFORE IN
STALLATIO
N
DSU
56K
AL
CD
LP
RD
TD
SEE MANUA
L BEFO
RE INSTALLA
TION
DSU
56K
EN
V0
BANK 4
BANK 3
BANK 2
BANK 1
BANK 0
NM-HDV
VWIC
2MFT-E1
SEE
MANUAL
BEFORE
INSTALLATIO
N
CTRLR E2
CTRLR E1
AL
LP
CD
Left (narrow) bracket
for 19-inch rack
Left bracket
for 23-inch rack
LEFT
23" ETSI, NEBS
LEFT
Four screws are required on each side.

