background image

7

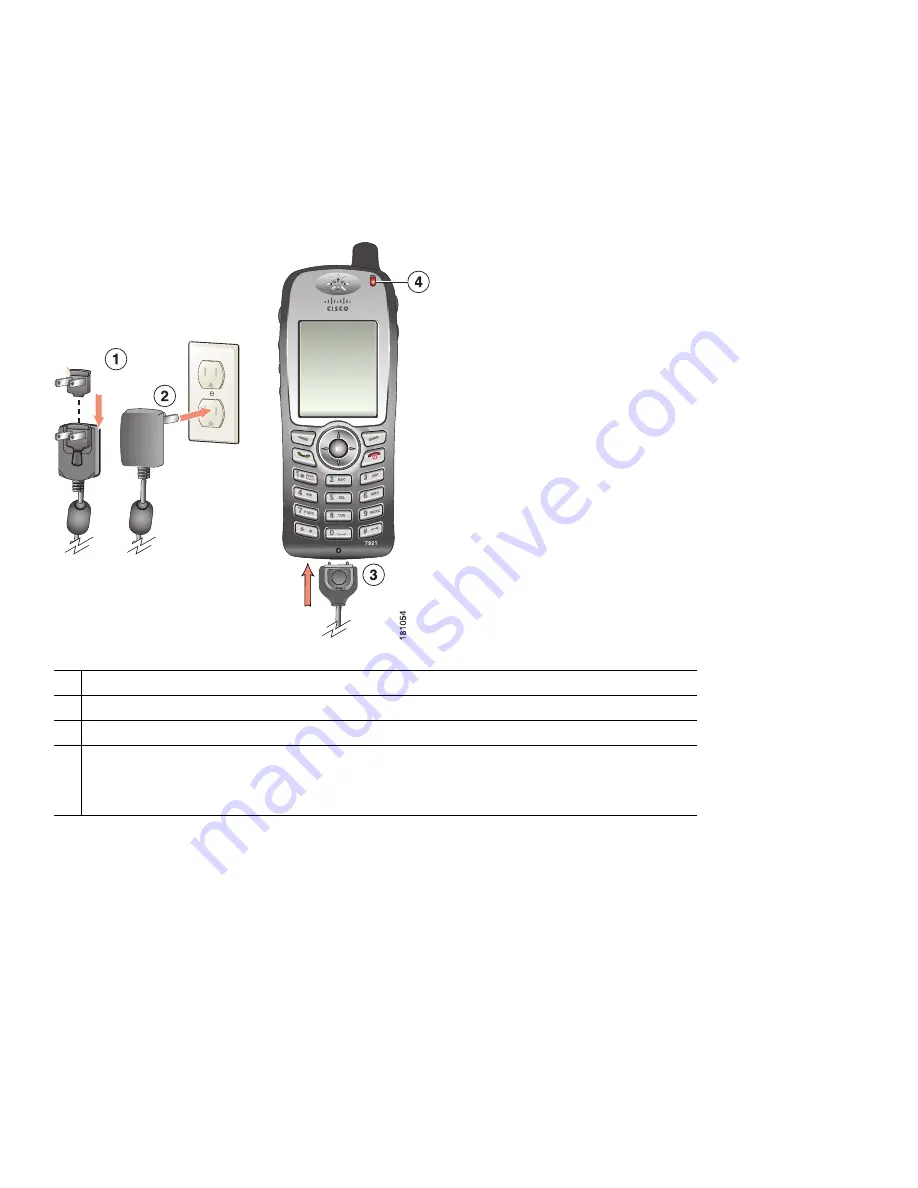
Using the AC Power Supply to Charge the Battery

You can charge your battery quickly by connecting the AC power supply to the phone. To accommodate different AC power 
receptacles, you must insert the appropriate AC plug adapter on the AC power supply. 

You can use the phone while the battery is being charged. After the battery is charged, you can unplug the power supply cord, 
or you can leave the phone plugged into the power cord.

To charge the battery in the phone using the AC power supply, use this diagram: 

Using the USB Cable and PC Port to Charge the Battery 

You can charge the battery in the phone by connecting your phone with a USB cable to a USB port on you PC. Charging takes 
longer when you use the USB port on the PC to charge the battery.

To use the USB cable and USB port to charge the battery, use this diagram and follow the steps:

1

AC plug adapter—Insert the AC plug adapter into the slot on the power supply.

2

AC Power supply—Insert into an AC outlet.

3

Phone connector on AC power supply cable—Insert into the connector slot at bottom of phone.

4

Indicator light—Indicates the charging status: 

Red—Battery charging in process

Green—Battery charging is completed

Summary of Contents for 7921

Page 1: ...USER GUIDE Cisco Unified IP Phone 7921 SCCP for Cisco Unified Communications Manager Express 4 3 1 Overview 2 Operating Your Phone 3 Phone Features and Functions ...

Page 2: ...y charged Fast blinking red Incoming call Phone can be charging or fully charged Slow blinking red Voice message When phone is connected to AC power source red light displays longer than when using only the battery Slow blinking green Phone is using only battery power Phone is registered with the wireless network and is within service coverage area 2 Headset port Port for plugging in a headset or ...

Page 3: ... ends a connected call If there is no voice messaging system then silences the ring When using menus acts as a shortcut to return to the main screen 8 Pound key Toggles between locking and unlocking the key pad Allows you to enter these special characters when you are entering text 9 Zero 0 key Enters 0 when dialing a number Allows you to enter a space or these special characters when you are ente...

Page 4: ...ions list open 13 Answer Send button green Allows you to answer a ringing call or after dialing a number to place the call 14 Left softkey button Activates the softkey option displayed on the screen 15 Mute button Toggles the mute feature on or off 16 Volume button When the phone is idle controls the ring volume vibrate option or turns off the ring During a call controls the speaker volume for the...

Page 5: ...ock icon Indicates the keypad is locked Speaker icon Indicates speaker mode is active Mute icon Indicates mute is active Headset icon Indicates headset is plugged in to phone Ringer Off icon Indicates the phone alert is silent Vibrate icon Indicates the phone alert is vibrate only Vibrate and ring icon Indicates the phone alert is ring and vibrate Desk Top Charger icon Indicates the phone is docke...

Page 6: ...one Battery You can charge the battery in your wireless IP phone by connecting the AC power supply or the USB cable to your phone For more information see these sections Using the AC Power Supply to Charge the Battery page 7 Using the USB Cable and PC Port to Charge the Battery page 7 1 Locking catch Push up to release the battery 2 Battery catches Insert these into the slots near the bottom of th...

Page 7: ...pply use this diagram Using the USB Cable and PC Port to Charge the Battery You can charge the battery in the phone by connecting your phone with a USB cable to a USB port on you PC Charging takes longer when you use the USB port on the PC to charge the battery To use the USB cable and USB port to charge the battery use this diagram and follow the steps 1 AC plug adapter Insert the AC plug adapter...

Page 8: ...ll the Software automatically Recommended and click Next 4 After a few moments the Cannot Install This Hardware dialog displays Click Don t prompt me again to install this software 5 Click Finish to close the dialog box Powering On the Phone After charging the battery you must power on the phone to make and receive calls 1 Press and hold the red button until the phone powers on 2 You might need to...

Page 9: ...mmends the use of good quality external devices like headsets that are screened against unwanted radio frequency RF and audio frequency AF signals Depending on the quality of these devices and their proximity to other devices such as cell phones and two way radios some audio noise may still occur The primary reason that a particular headset would be inappropriate for the Cisco Unified IP Phone is ...

Page 10: ...secure the ends of the C ring around cable loops and phone The phone is secured to the desktop area 4 To secure the desktop charger use a laptop cable lock You can secure your Cisco Unified Wireless IP Phone 7921G Desktop Charger by using a laptop cable lock The lock connects to the security slot on the side of the desktop charger and the cable can be secured to a desktop The diagram shows where t...

Page 11: ...emote in Use 21 Secure Calls 21 Prioritizing Critical Calls 21 Transferring Calls 22 Cisco Extension Mobility 22 Push to Talk Service 23 Entering and Editing Text You can enter characters numbers and special characters for passwords When you press a numeric key on the keypad a text bubble shows all the characters and symbols that this key controls Each press moves to another character option Enter...

Page 12: ...se the Navigation button to press one of these arrows that open a menu Accesses these menus and lists from the main screen Directory Line View Settings Services Scroll through a menu or list Press the Navigation button up or down Select a menu option Do one of these actions Press the keypad number key for the item Scroll to highlight the item and then press the button center of the navigation butt...

Page 13: ...Buttons The phone keypad and buttons provide these shortcuts to frequently used functions Lock or unlock the phone keypad Press and hold the key 3 seconds The screen displays Keypad Locked and the icon displays at the top of the Main screen Press any key and the screen displays Unlock Keypad Press Yes the icon disappears and the screen displays Keypad Unlocked or press No to retain the keypad lock...

Page 14: ... additional network profiles or change settings in a profile View an enabled Network Profile 1 Choose Settings Network Profiles 2 Press The enabled profile has a next to it Choose a different profile 1 Choose Settings Network Profiles 2 Press The locked icon displays by Network Profiles you must unlock the options 3 Scroll to a different profile 4 Press The appears next to the enabled profile 5 Pr...

Page 15: ... Received Calls or Placed Calls Dial from a call log 1 Press Directory 2 Choose Missed Calls or Received Calls or Placed Calls 3 Scroll to a phone number Note To edit the displayed number to add or to remove a prefix press Options EditDial followed by or to reposition the cursor Use the keypad to enter digits or press to delete numbers 4 Press Dial or Delete a call record 1 Press Directory 2 Choos...

Page 16: ...l followed by or to reposition the cursor Use the keypad to enter digits or press to delete numbers 5 Press Dial or Tips Use the numbers on your keypad to enter characters on your phone screen See Entering and Editing Text page 11 Use the Navigation button on your phone to move between input fields Personal Directory The Personal Directory feature set contains your Personal Address Book PAB and Fa...

Page 17: ...e sure to include any necessary access codes such as a 9 or 1 6 Press Submit to add the entry to the database Assign a Fast Dial code to a PAB entry 1 Search for a PAB entry 2 Scroll to the listing and press Select or 3 Choose Options Fast Dial 4 Scroll to the Fast Dial code that you want to assign to the number and press Select or Add a new Fast Dial code not using a PAB entry 1 Choose Services P...

Page 18: ...th the speakerphone in the desktop charger Use the handset Press the green button press red button to hang up Use a headset Plug the headset connector into the headset port The icon displays on the phone status line Place and answer calls as usual You can use the headset with all the controls on your phone including and The headset audio remains active when the headset is connected to the phone Us...

Page 19: ... handle calls on behalf of others Your system administrator configures AutoAnswer to work with either your speaker mode or headset Use AutoAnswer with a headset Keep headset mode active by ensuring the headset is plugged into the phone even when not on a call If your phone is set up to use AutoAnswer in headset mode calls are answered automatically only if the icon is in the phone status line Othe...

Page 20: ...you might receive an audio and or visual alert about a call to your pickup group Pressing PickUp and GPickUp connects you to the call that has been ringing for the longest time Pressing OPickUp connects you to the call in the pickup group with the highest priority If you have multiple lines and want to pick up the call on a non primary line first press Line View to switch to the desired line then ...

Page 21: ... place and receive calls as usual on the shared line even when the In Use Remote message or icon displays Secure Calls Depending on how your system administrator has configured your phone system your phone might support making and receiving secure calls Your phone can support these types of calls Authenticated call The identities of all phones participating in the call have been verified Encrypted...

Page 22: ...s the priority level of the call Want to view priority level of a call Look for an MLPP icon on your phone screen Priority Call Medium priority immediate call High priority flash call Highest priority flash override or Executive Override call Higher priority calls are displayed at the top of your call list If you do not see an MLPP icon the priority level of the call is normal routine Want to acce...

Page 23: ...ter a certain amount of time You system administrator establishes this time limit Changes that you make to your EM profile from the User Options web pages take effect the next time that you log in to EM on a phone Settings that are controlled on the phone only are not maintained in your EM profile Push to Talk Service The Push to Talk service provides immediate communication similar to a two way r...

Page 24: ...and activates the cursor for editing EditDial Selects a number and activates the cursor for editing EndCall Ends the current call Exit Exits from the current selection or screen Flash Provides hookflash functionality for three way calling and call waiting services provided by the PSTN or Centrex service GPickUp Selectively picks up calls to a phone number that is a member of a pickup group Hold Pl...

Page 25: ...h Initiates a search in the local directory Select Selects the highlighted option Settings Provides access to phone settings such as display contrast ring volume and ring type Trnsfer Transfers selected calls to an alternate number TrnsfrVM Transfers the call to voicemail Up Increases the LCD screen contrast URL Enter alphanumeric characters for call forwarding Soft Key Description continued ...

Page 26: ... Your Phone 5 Directory Dialing 16 Entering and Editing Text 11 Feature Buttons and Menus 12 Handset Headset and Speakerphone 18 Headset Information 9 Help System 13 Installing or Removing the Phone Battery 6 Logging Out of Hunt Groups 21 Parked Calls 20 Personal Directory 16 Phone Buttons 13 Phone Screen Features 4 Physical Layout 2 Powering On the Phone 8 Prioritizing Critical Calls 22 Push to T...

Page 27: ...ay and Learn is a service mark of Cisco Systems Inc and Access Registrar Aironet Catalyst CCDA CCDP CCIE CCIP CCNA CCNP CCSP Cisco the Cisco Certified Internetwork Expert logo Cisco IOS Cisco Press Cisco Systems Cisco Systems Capital the Cisco Systems logo Cisco Unity Enterprise Solver EtherChannel EtherFast EtherSwitch Fast Step Follow Me Browsing FormShare GigaDrive HomeLink Internet Quotient IO...

Page 28: ...28 ...

Reviews: