background image

2-19

Cisco ONS 15530 Hardware Installation Guide

OL-7706-01

Chapter 2      Installing the Cisco ONS 15530

Installing and Removing Line Cards or Motherboards

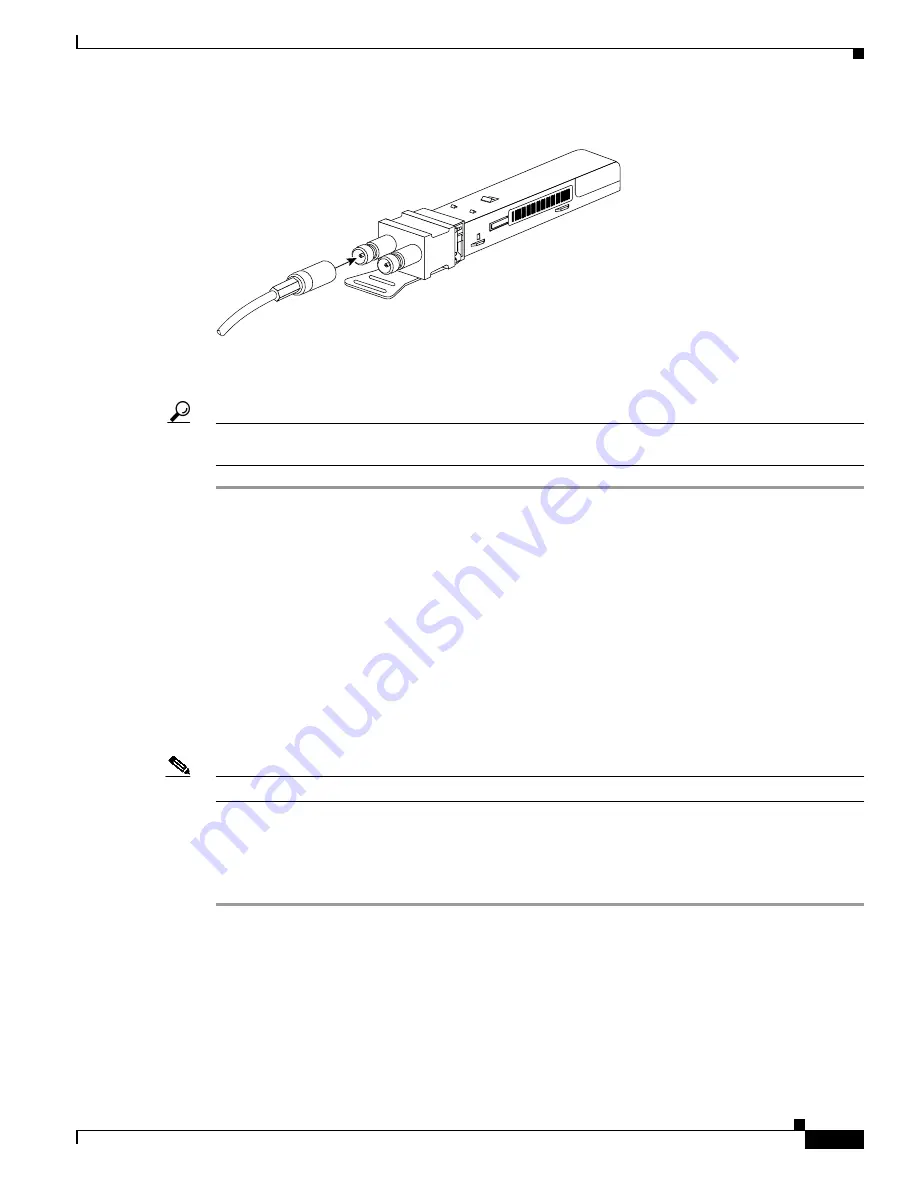
Figure 2-14

Installing the 15500-XVRA-10E1 SFP

Step 3

Twist the cable to secure it in the SFP.

Step 4

Install the SFP by inserting it in the muxponder.

Tip

In an unlikely event of the pull-tab is damaged or missing, use a screwdriver to push on the hinge pin to
unlock the SFP cage latch and pull the SFP out from SFP port

Removing SFP from Aggregation Cards and Muxponders

The SFPs used on the aggregation cards and muxponders have different types of connectors. The
different connector types on the SFP optics are:

RJ-45 connector (for 8-port multi-service muxponders)

MT-RJ connector (for ESCON aggregation cards)

LC connector (for 8-port FC/GE aggregation cards)

Mini SMB coax connector (for 8-port multi-service muxponders)

Each connector requires a different method of removal.

Note

Use the show hardware command to see what SFP you have currently installed in your module.

Removing Pull Tab SFPs with RJ-45 Connectors

To remove an SFP with an RJ-45 connector from the muxponder, follow these steps:

Step 1

Remove the cable from the desired SFP.

Step 2

Use the thumb on your left hand to push against the RJ-45 connector.

Step 3

Use your right hand to pull the pull tab on the SFP.

Step 4

Rotate the SFP while simultaneously pushing against the connector and pulling the pull tab. This
releases the SFP from the latch lock of the cage. (See

Figure 2-15

.)

113974

Summary of Contents for 15530-LCMB-0200 - ESCON Multiplexing Line Card Multiplexor

Page 1: ... 2 27 Power Guidelines page 2 29 Powering Up the Shelf page 2 31 Note Before you install operate or service the system read the Regulatory Compliance and Safety Information for the Cisco ONS 15500 Series for important safety information you should know before working with the system Note To ensure that your Cisco IOS software release supports your hardware see the New and Changed Information secti...

Page 2: ...ve the following information ready Invoice number of shipper see packing slip Model and serial number of the damaged unit Description of damage Effect of damage on the installation Keep a record of all of your hardware configuration options and network settings Mounting the Shelf The unit is designed for rack mounting in a cabinet rack Use star type lock washers on the rack screws to ensure a good...

Page 3: ...co ONS 15530 CHAS E 77694 FASTENER S MUST BE FULLY ENGAGED PRIOR TO OPERATING THE POWER SUPPLY FAIL 100 240V 8 0 3 5A 50 60HZ GOOD STA TUS T X R X T X R X T X R X T X R X T X R X T X R X T X R X T X R X T X R X T X R X 15530 LCMB 0200 0 1 2 3 4 5 6 7 8 9 STA TUS T X R X T X R X T X R X T X R X T X R X T X R X T X R X T X R X T X R X T X R X 15530 LCMB 0200 0 1 2 3 4 5 6 7 8 9 STA TUS T X R X T X R...

Page 4: ... R X T X R X T X R X T X R X T X R X T X R X 15530 LCMB 0200 0 1 2 3 4 5 6 7 8 9 STA TUS T X R X T X R X T X R X T X R X T X R X T X R X T X R X T X R X T X R X T X R X 15530 LCMB 0200 0 1 2 3 4 5 6 7 8 9 STA TUS T X R X T X R X T X R X T X R X T X R X T X R X T X R X T X R X T X R X T X R X 15530 LCMB 0200 0 1 2 3 4 5 6 7 8 9 STA TUS T X R X T X R X T X R X T X R X T X R X T X R X T X R X T X R X...

Page 5: ...the front top and sides of the chassis for the cooling air inlet and exhaust ports respectively Avoid placing the chassis in an overly congested rack or directly next to another equipment rack otherwise the heated exhaust air from other equipment can enter the inlet air vents and cause an over temperature condition inside the chassis Caution To prevent chassis overheating never install a Cisco ONS...

Page 6: ...S MUST BE FULLY ENGAGED PRIOR TO OPERATING THE POWER SUPPLY FAIL 100 240V 8 0 3 5A 50 60HZ GOOD ST AT US T X R X T X R X T X R X T X R X T X R X T X R X T X R X T X R X T X R X T X R X 15530 LCMB 0200 0 1 2 3 4 5 6 7 8 9 ST AT US T X R X T X R X T X R X T X R X T X R X T X R X T X R X T X R X T X R X T X R X 15530 LCMB 0200 0 1 2 3 4 5 6 7 8 9 ST AT US T X R X T X R X T X R X T X R X T X R X T X R...

Page 7: ...PRIOR TO OPERATING THE POWER SUPPLY FAIL 100 240V 8 0 3 5A 50 60HZ GOOD ST AT US T X R X T X R X T X R X T X R X T X R X T X R X T X R X T X R X T X R X T X R X 15530 LCMB 0200 0 1 2 3 4 5 6 7 8 9 ST AT US T X R X T X R X T X R X T X R X T X R X T X R X T X R X T X R X T X R X T X R X 15530 LCMB 0200 0 1 2 3 4 5 6 7 8 9 ST AT US T X R X T X R X T X R X T X R X T X R X T X R X T X R X T X R X T X R...

Page 8: ...kets to the shelf see Figure 2 5 Step 2 Lift the shelf into position between the rack posts requires two people Step 3 Align the mounting bracket holes with the rack post holes see Figure 2 6 and attach the shelf to the rack performed by the third person Figure 2 5 Attaching Mounting Brackets to Shelf 91396 15530 FCGE 8P 1 3 6 15530 C 000 0 1 3 5 8 15530 C 000 0 1 3 5 8 15530 C 000 0 1 3 5 8 15530...

Page 9: ...ttaching the Air Ramp Baffle section on page 2 10 15530 FCGE 8P FASTENERS MUST BE FULLY ENGAGED PRIOR TO OPERATING THE POWER SUPPLY FAIL A H GOOD ST AT US 15530 C 000 0 1 3 5 8 ST AT US 15530 C 000 0 1 3 5 8 ST AT US 15530 C 000 0 1 3 5 8 ST AT US 15530 C 000 0 1 3 5 8 ST AT US ST AT US RE SE T AT IE OM PA T FL AS H IR TIA L MA OR FD MB PS UT OF F HI ST LR 15530 CP RE SE T AT IE OM PA T FL AS H IR...

Page 10: ...30 CHAS E chassis while deflecting hot exhaust air from equipment installed below To attach the air ramp baffle to the Cisco ONS 15530 CHAS E chassis follow these steps Step 1 Attach the mounting brackets to the air ramp baffle as shown in Figure 2 7 Figure 2 7 Air Ramp Baffle Mounting Brackets Step 2 Position the air ramp baffle directly under the Cisco ONS 15530 CHAS E chassis Step 3 Screw the a...

Page 11: ...1 Chapter 2 Installing the Cisco ONS 15530 Rack Mounting the Shelf Figure 2 8 Installing the Air Ramp Baffle 79544 15530 FCGE 8P 4 5 5 15530 C 000 0 1 3 5 8 15530 C 000 0 1 3 5 8 15530 C 000 0 1 3 5 8 15530 C 000 0 1 3 5 8 15530 CP 15530 CP E E E E 0 1 3 5 E E ...

Page 12: ...he cable routing tray and the cable routing drawer The fiber routing tray is installed directly over the fan assembly and the fiber routing drawer is installed below the Cisco ONS 15530 chassis See Figure 2 9 Figure 2 9 Fiber Management System 85009 T X R X T X R X 15530 LCMB 0200 T X R X T X R X 15530 LCMB 0200 T X R X T X R X 15530 LCMB 0200 T X R X T X R X 15530 LCMB 0200 T X R X T X R X 15530 ...

Page 13: ...ing tray to the rack with four 12 24 screws two on each side Step 3 Hold the fiber routing drawer with both hands and position it in the rack beneath the chassis See Figure 2 9 Step 4 Align the mounting holes on the bracket with the mounting holes in the equipment rack Step 5 Install the 12 24 or 10 32 screws through the elongated holes in the brackets and into the threaded holes in the mounting p...

Page 14: ...Shelf Two system earth grounding holes are provided under the power supplies at the bottom right of the shelf Shelf Grounding Guidelines To make an adequate grounding connection you need the following parts and tools Grounding lug Two M4 metric hex head screws with locking washers One grounding wire 6 AWG recommended Number 2 Philips head screwdriver Crimping tool This tool must be large enough to...

Page 15: ... X R X T X R X T X R X T X R X T X R X T X R X T X R X T X R X T X R X 15530 LCMB 0200 0 1 2 3 4 5 6 7 8 9 ST AT US T X R X T X R X T X R X T X R X T X R X T X R X T X R X T X R X T X R X T X R X 15530 LCMB 0200 0 1 2 3 4 5 6 7 8 9 ST AT US T X R X T X R X T X R X T X R X T X R X T X R X T X R X T X R X T X R X T X R X 15530 LCMB 0200 0 1 2 3 4 5 6 7 8 9 ST AT US T X R X T X R X T X R X T X R X T ...

Page 16: ... T X R X T X R X 15530 LCMB 0200 0 1 2 3 4 5 6 7 8 9 ST AT US T X R X T X R X T X R X T X R X T X R X T X R X T X R X T X R X T X R X T X R X 15530 LCMB 0200 0 1 2 3 4 5 6 7 8 9 ST AT US T X R X T X R X T X R X T X R X T X R X T X R X T X R X T X R X T X R X T X R X 15530 LCMB 0200 0 1 2 3 4 5 6 7 8 9 ST AT US T X R X T X R X T X R X T X R X T X R X T X R X T X R X T X R X T X R X T X R X 15530 LC...

Page 17: ... voltages on clothing can still cause damage Note For safety periodically check the resistance value of the antistatic strap The measurement should be between 1 and 10 megohms Mohms Installing and Removing Line Cards or Motherboards The line cards and modules used on the Cisco ONS 15530 are hot swappable This section describes the procedures for installing and removing the following line cards and...

Page 18: ...o release the line card or motherboard from the slot in the chassis Step 5 Use the release levers to pull the line card or motherboard out of the chassis Step 6 Place the removed line cards in a container appropriate for shipping and storage Installing SFPs into Aggregation Cards and Muxponders To install SFPs into the ESCON aggregation cards 8 port FC GE aggregation cards and 8 port multi service...

Page 19: ...he SFP optics are RJ 45 connector for 8 port multi service muxponders MT RJ connector for ESCON aggregation cards LC connector for 8 port FC GE aggregation cards Mini SMB coax connector for 8 port multi service muxponders Each connector requires a different method of removal Note Use the show hardware command to see what SFP you have currently installed in your module Removing Pull Tab SFPs with R...

Page 20: ... to push on the hinge pin to unlock the SFP cage latch and pull the SFP out from SFP port Note SFPs with RJ 45 connectors require cabling after it is installed and removal of cables is required before removing the SFP from the card Removing Non Pull Tab SFPs with RJ 45 Connectors To remove an SFP with an RJ 45 connector from the muxponder follow these steps Step 1 Remove the cable from the desired...

Page 21: ... before removing the SFP from the card Removing SFP Optics with MT RJ Connectors Note You need the SFP extraction and cable installation and removal tool to remove the SFP with the MT RJ connector To remove an SFP with an MT RJ connector from the ESCON aggregation card follow these steps Step 1 Remove the cable from the desired SFP Step 2 Remove the SFP from the module by pushing against the lever...

Page 22: ...e of the transceiver and pulling it out of the module See Figure 2 17 Step 4 Place the removed SFP in a container appropriate for shipping and storage 1 SFP placement in the module 3 Hole where the SFP extraction end of the tool is inserted two views 2 Lever on the SFP two views 4 SFP extraction and cable installation and removal tool 94102 4 2 3 2 S T A T U S T X R X T X R X T X R X T X R X T X R...

Page 23: ...SFP Step 2 Remove the SFP from the module by pulling the latch on top of the SFP to release it from the module See Figure 2 18 Figure 2 18 Removing the Transceiver with the LC Connector Step 3 Continue to pull the latch down and use the latch to pull the SFP out of the module See Figure 2 18 Step 4 Place the removed SFP in a container appropriate for shipping and storage 1 Release the latch 2 Pull...

Page 24: ...are hot swappable This section describes the procedures for installing and removing the OADM optical add drop multiplexing module the PSM protection switch modules the OSC optical supervisory channel module the WB VOA wide band variable optical attenuator module and the PB OE per band power equalizer module Warning During this procedure wear grounding wrist straps to avoid ESD damage to the card D...

Page 25: ...d in the carrier motherboard To install the OSC module the WB VOA module or the PB OE module follow these steps Step 1 Disconnect all optical fiber connections from the WB VOA and PB OE modules Step 2 Remove the module or the filler module from the carrier motherboard Step 3 Take a new module from the shipping container Step 4 Insert the module carefully into the carrier motherboard see Figure 2 1...

Page 26: ...ging material Removing Modules Warning High performance devices on this card can get hot during operation To remove the card hold it by the faceplate and bottom edge Allow the card to cool before touching any other part of it or before placing it in an antistatic bag Warning Invisible laser radiation may be emitted from disconnected fibers or connectors Do not stare into beams or view directly wit...

Page 27: ...igure 2 19 Step 3 Remove the module by carefully pulling it out of its slot Step 4 Reinstall the blank filler module Step 5 Place the removed module in a container appropriate for shipping and storage Replacing the Fan Assembly To replace the fan assembly in the Cisco ONS 15530 follow these steps Step 1 Open and pull out the cable storage drawer installed immediately beneath the chassis that holds...

Page 28: ...ment tray up so that it no longer covers the fan tray See Figure 2 22 Figure 2 22 Hooking the Cable Management Tray Step 6 Attach the hook on the tray to the rack mount part of the tray on the rack so that it stays in the up position Step 7 Unscrew the captive installation screws on the fan assembly Step 8 Grasp the fan assembly captive installation screws and pull them towards you 1 Fasteners 2 S...

Page 29: ...n screws Step 13 Power up the system and verify fan assembly operation by checking the fan assembly status The fan status is normal when the fan assembly LED is green Power Guidelines Follow these precautions and recommendations when planning power connections to the Cisco ONS 15530 Check the power at your site before installation and periodically after installation to ensure that you are receivin...

Page 30: ...ssible disconnect device must be incorporated in the building s installation wiring Warning This product relies on the building s installation for short circuit overcurrent protection Ensure that a Listed and Certified fuse or circuit breaker 25A minimum 60 VDC is used on all current carrying conductors Plant Wiring Guidelines Following are guidelines for setting up the plant wiring and cabling at...

Page 31: ...V 35 is 2 Mbps but it is commonly used at 4 Mbps without any problems If you understand the electrical problems that might arise and can compensate for them you should get good results with rates and distances greater than those shown here however do so at your own risk When preparing your site for network connections to the Cisco ONS 15530 you must consider a number of factors related to each typ...

Page 32: ...t carrying conductors To apply DC input power to your Cisco ONS 15530 follow these steps Step 1 Strip not more than 0 4 inches 10 mm of insulation off the ends of the DC power leads see Figure 2 24 Figure 2 24 Stripping Insulation Step 2 Connect the ground wire to the power supply ground terminal see Figure 2 25 Note The ground connections should always be connected first and disconnected last Ste...

Page 33: ...to the power supply Figure 2 26 120 240 VAC Power Supply Note The AC power cord that connects to the Cisco ONS 15530 120 240 VAC power supply power cord and then to the building AC is not shipped with the Cisco ONS 15530 You must order this power cord separately The AC input power supply differ in plug type make sure you have the correct style for your site see Figure 2 27 and Table 2 1 All AC inp...

Page 34: ...500 CAB ACR Australian 240 VAC 50 Hz AC power cord 15500 CAB ACA European 230 VAC 50 Hz AC power cord 15500 CAB ACE Italian 220 VAC 50 Hz AC power cord 15500 CAB ACI United Kingdom 240 VAC 50 Hz AC power cord 15500 CAB ACU Switzerland not shown 240 VAC 50 Hz AC power cord 15500E CAB ACS 85600 Australian plug AS 3112 10A European plug CEE 7 7 16A Appliance coupler Hot IEC 320 C 15 10A Italian plug ...

Page 35: ...supply installation by securing the captive installation screws at the top of the power supply To power on the chassis see the Powering Up the Shelf section on page 2 31 To remove an AC or DC power supply follow these steps Step 1 Unplug the power cord on an AC power supply or remove the negative positive and ground connections from the DC power supply Note The ground connections should always be ...

Page 36: ...2 36 Cisco ONS 15530 Hardware Installation Guide OL 7706 01 Chapter 2 Installing the Cisco ONS 15530 Powering Up the Shelf ...

Reviews: