Cirris Touch1 LV Performance Verification Manual Download Page 6

Touch1 LV Checkout Manual -  Page 4 
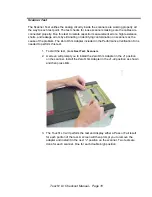


Tester 

Checkout 

Tests 


1.  From the Main Menu, press 

System Setup

2.  At the System Setup screen, press 

Tester Checkout

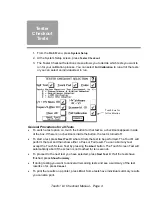
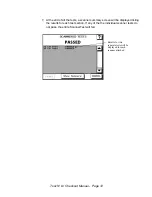
3.  The Tester Checkout Selection screen allows you to decide which tests you want to 

run for your calibration process. You can select 

Full Calibration

 to run all of the tests 

or you can select an individual test to run. 


Touch here for 
full calibration 

General Procedures for all Tests 

  To switch a test option on, touch the button for that test so a checkmark appears inside 

of the box. If there is no checkmark inside the button, the test is turned off. 

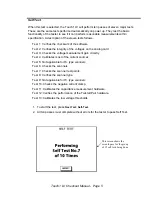
  To start a test, press 

Next Test X

 where X lists the test to be performed. The Touch1 will 

perform the test and then show either a Pass or Fail result. You can abort any test 
except the Touch Screen Test by pressing the 

Abort

 button. The Touch Screen Test will 

automatically abort if the screen is not touched for ten seconds. 

  To proceed to the next test you have selected, press 

Next Test X

. If all the tests have 

finished, press 

Show Summary

  If during testing you want to cancel all remaining tests and see a summary of the test 

results so far, press 

Cancel

  To print the results on a printer, press 

Print

. Some tests have individual summary results 

you can also print. 

Summary of Contents for Touch1 LV

Page 1: ...Touch1 LV Performance Verification Manual Version 1 0 January 28 2010 ISO 9001 Certified...

Page 2: ...erformance Verification Manual Version 1 0 Editor Karen Johnson Copyright 2004 by Cirris Systems Corporation All Rights Reserved Cirris Systems Corporation 1991 W Parkway Boulevard Salt Lake City Utah...

Page 3: ...ble of Contents Introduction 2 Set Up 3 Tester Checkout Tests 4 Self Test Touch Pad Test Probe Test Low Voltage Threshold Tests Capacitance and 4 Wire Tests Scanner Tests Tester Checkout Summary 4 App...

Page 4: ...th instruments traceable to the National Institute of Standards and Technology NIST Calibration should be performed on your Touch1 LV tester at least once a year You should also check the calibration...

Page 5: ...tion on how to do this see the online help system or your users manual Note The examples in this manual show a Touch1 LV with no expansion boxes Connect the power cord to the tester Plug the tester in...

Page 6: ...If there is no checkmark inside the button the test is turned off To start a test press Next Test X where X lists the test to be performed The Touch1 will perform the test and then show either a Pass...

Page 7: ...the voltage measurement gain circuitry Test 4 Calibrates most of the current sources Test 5 Not applicable for R type scanners Test 6 Checks the scanners Test 7 Checks the scanner test points Test 8 V...

Page 8: ...er of the picture inside the button 4 A screen with five buttons will be displayed Press each button to check the calibration You must press a button within ten seconds or the test will fail A star sh...

Page 9: ...e probe to any test point s on the adapter If the probe is working correctly a pop up window will display the correct point s touched by the probe If no pop up window is displayed when the test point...

Page 10: ...he Performance Verification Kit is needed to perform this test 1 To start the test press Next Test LV HV Meas 2 A screen will prompt you to install the Resistance Adapter in the J1 position on the sca...

Page 11: ...ce 4 Wire Adapter included in the Performance Verification Kit is needed to perform this test 1 To start the test press Next Test Cap 4W 2 A screen will prompt you to install the Capacitance 4 Wire Ad...

Page 12: ...of the problem The Zero Ohm Adapter included in the Performance Verification Kit is needed to perform this test 1 To start the test press Next Test Scanners 2 A screen will prompt you to install the...

Page 13: ...apter was removed you must press the NO RESPONSE button Remove the adapter to automatically proceed to the next test 5 Remove the Zero Ohm Adapter and place it in the J3 J4 position as shown 6 If the...

Page 14: ...e tests a scanner summary screen will be displayed listing the results for each test section If any of the the individual scanner tests do not pass the entire ScannerTest will fail Results for two sep...

Page 15: ...display SKIPPED for any skipped tests The summary will display FAILED for any failed tests 2 To save the Test Summary results you must either print them or copy them to paper by hand If you have a pr...

Page 16: ...tional standards for measurements in the United States Good Calibration Practices The calibration standards such as ANSI NCSL Z540 1 and ISO 10012 1 require several good practices for the calibration...

Page 17: ...can be used as a calibration data report This report can be printed or copied to paper by hand Traceability Did qualified personnel perform the calibration procedure under controlled conditions using...

Page 18: ...umber Calibrated by Calibration Date Due Date Applicable Calibration Standard s Procedure Touch1 LV Performance Verification Version 1 0 Temperature Relative Humidity Tester Serial Number Instruments...

Reviews: