

CIRO ACCESSORY PERCH MOUNT
1
Perch Mount
1
Installation Kit
2 1/4-20 SHCS
2 M6 SHCS
2 Spacers
WARNING:
This indication alerts you to the fact
that ignoring the contents described
herein can result in potential serious
injury or death if not followed.
CAUTION:
This indication alerts you to the fact
that ignoring the contents described
herein can or will result in material
damage and/or personal injury.
ATTENTION:
This indication alerts you to the fact
if you ignore this detail you will affect
the performance or functionality of
the product.
All Ciro products are designed for
"easy assembly" and/or "plug and
play". We recommend a competent
mechanic install our products, using
standard mechanical procedures to
assure a safe and successful
installation.
G0050110 REV. C
NOTE:
Ciro® warrants that products sold
hereunder to the original purchaser,
if maintained and operated under
normal conditions, shall be free from
any defects in materials and
workmanship for a period of (3)
years from date of purchase, and a
lifetime warranty against LED failure.
Ciro will have no obligation if the
customer cannot show proof of
purchase.
Warranty will not be granted unless
the part is properly installed and
maintained.
Ciro will not be liable for any
consequential and incidental
damages, including labor, or non-Ciro
products.
Please visit our website Ciro3d.com
for our complete warranty policy.
parts included
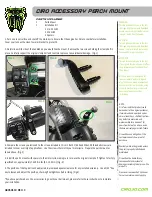
1. Park on a level surface and shut off the motorcycle. Ensure that the engine has time to cool before installation.
Cover your tank with a clean towel or blanket to protect it.
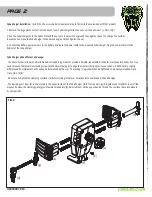
2. Determine which side of the handlebars you would like the mount. Remove the two screws holding the clamp half in
place. Carefully support the original clamp half and controls to prevent any accidental damage. (Fig. 1)
FIG.1
FIG.3
FIG.2
3. Compare the screws you removed to the screws included in this kit. Both 1/4-20 and M6x1.00 threaded screws are
included to cover a variety of applications. Use the screws that match your motorcycle. Prepare the perch mount as
shown above. (Fig. 2)
4. Install the perch mount with spacers to the motorcycle, making sure to re-use the original clamp half. Tighten to factory
specifications; approximately 72-108 in-lbs (8.1-12.2 Nm). (Fig. 3)
5. The position of the top ball can be adjusted to provide adequate clearance for any installed accessory. Use a 5/32” hex
key to loosen and adjust the position, checking final tightness before riding. (Fig.4)
*If you have purchased any Ciro accessories to go with your ball mount, please refer to those instructions to complete
your installation.
FIG.4
FIG.3