background image

2

TABLE OF CONTENTS                          

1.   Foreword                                                   
2.   First steps 

3

  2.1 Mounting 

3

    2.1.1   Cockpit handlebar bracket  

3

    2.1.2   Handlebar bracket 

3

    2.1.3   Adapter  

3

    2.1.4   Speedsensor 

3

    2.1.5   Cadence sensor   

3

  2.1.6 Spoke 

magnet 

3

  2.1.7 Cadence 

magnet 

4

  2.1.8 Heartrate 

belt 

4

  2.2  Before you start 

4

    2.2.1  Mounting of battery 

4

  2.2.2 Update 


4

    2.2.3  Connecting the sensors 

4

    2.2.4  Set the circumference 

4

  2.2.5 Go 

cycling 

4

3.  Operations 

4

4.  Menu     

5

  4.1 Start   

5

  4.2  Short menue 

5

  4.2.1 Profiles 

5

  4.2.2 Sensors 

5

  4.2.3 Altitude 

5

      4.2.3.1  Actual altitude 

5

      4.2.3.2  Home altitude 

5  

    4.2.4  Cellphone connection  

5

  4.3 Historie 

5

  4.4  Setting 

5

  4.4.1 General 

5

   4.4.1.1 


Language 

5

   4.4.1.2 


Units 

5

   4.4.1.3 


Intervall 

5

   4.4.1.4 


Display 

5

    4.4.1.4.1 

Contrast 

5

        4.4.1.4.2  Light MGR  

5

      4.4.1.5  Weight  

5

      4.4.1.6  Tones  

5

   4.4.1.7 


Date 

5

      4.4.1.8  Time  

5

  4.4.2 Profiles 


5

   4.4.2.1 


Name 

      4.4.2.2  Wheel circumference  

6

      4.4.2.3  Wheel weight 

6

      4.4.2.4  Zones  

6

    4.4.3  Display 

6

  4.4.4 Device 


6

   4.4.4.1 


Version 

6

      4.4.4.2  Memory  

6

      4.4.4.3  Reset  

6

      4.4.4.4  Factory settings  

6

5 CicloApp & Komoot  

6

  5.1 CicloApp 

6

  5.2  Komoot App   

6

  5.3  Android insert 

6

6 Solving problems  

7

  6.1  Elimination of interferences 

7

  6.1.1 Wrong 

datas 

7

    6.1.2  No speed/cadence or heartrate 

7

    6.1.3  Speed is wrong 

7

    6.1.4  Altitude is wrong 

7

    6.1.5  Heartrate is wrong or not shown 

7

    6.1.6  Altitude changes although I am not moving 

7

  6.2  Sending the HAC 1.x for service/repair 

7

  6.3 Warranty 

7

  6.4  Warranty card 

8

  6.5  Technical datas 

8

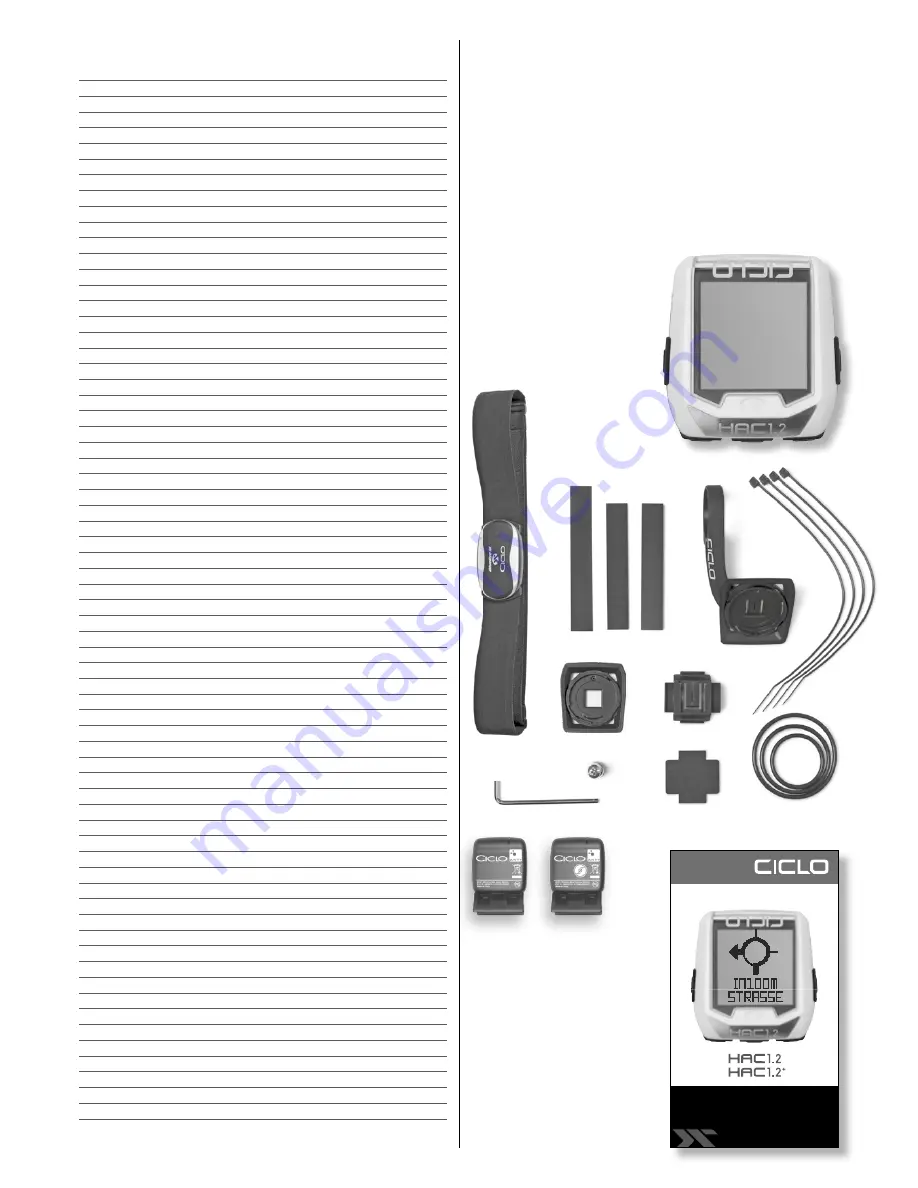
DELIVERY                               

HAC 1.2 / HAC 1.2+

1

  Hac 1.2 Cycling Computer

2

  Cockpit handlebar bracket

3

  Handlebar bracket

4

 Adapter 

5

 Speedsensor

6

  Cadence  sensor *

7

  Heartrate  belt *

8

  Mounting material

9

  Quick start guide

J

  Komoot code (not shown)

*Only in HAC 1.2+ 

8

6

5

4

2

1

9

KURZANLEITUNG

SHORTMANUAL

KA_HAC_65x115_240518.indd   1

24.05.18   17:17

8

8

3

7

8

Summary of Contents for HAC 1.2+

Page 1: ...1 OPERATION MANUAL ...

Page 2: ...5 4 4 1 8 Time 5 4 4 2 Profiles 5 4 4 2 1 Name 5 4 4 2 2 Wheel circumference 6 4 4 2 3 Wheel weight 6 4 4 2 4 Zones 6 4 4 3 Display 6 4 4 4 Device 6 4 4 4 1 Version 6 4 4 4 2 Memory 6 4 4 4 3 Reset 6 4 4 4 4 Factory settings 6 5 CicloApp Komoot 6 5 1 CicloApp 6 5 2 Komoot App 6 5 3 Android insert 6 6 Solving problems 7 6 1 Elimination of interferences 7 6 1 1 Wrong datas 7 6 1 2 No speed cadence o...

Page 3: ... side cutter If you like to mount the with the rubber o rings you have to fix those at the holding noses 2 1 3 ADAPTER Please press the adapter into the holder of the handle bar or cockpit handlebar bracket You can also mount the adapter if It is turned around in 90 to fix the handlebar bracket to the stem 2 1 4 SPEEDSENSOR Attach the transmitter to the fork or the left chain stay Pull the cable t...

Page 4: ...nstructions to connect a device to the CicloApp please choose device left side and activate searching open the short menu in the HAC1 2 choose cell phone connection and press the middle button both devices are in the mode searching as soon as both devices have recognized each other you can see the Smartphone name in the HAC1 2 and the HAC 1 2 named in the CicloApp now you can do the update as soon...

Page 5: ... You can choose a recording to see basic data You can transfer your recording to the CicloApp and then get a link to download the tour If you possess an account at Ciclosport your recording can be stored on the CicloApp 4 4 SETTING 4 4 1 GENERAL Here you can make the general settings that are not profile related 4 4 1 1 LANGUAGE Here you can change the system language of the device 4 4 1 2 UNITS H...

Page 6: ... 4 4 2 MEMORY Here you can see the current memory allocation on the device 4 4 4 3 RESET Here you can set all stored values to 0 Records and settings are saved 4 4 4 4 FACTORY SETTINGS Here you can reset the device to factory settings 5 CICLOAPP KOMOOT 5 1 CICLO APP Install the Ciclo App You can use the app with or without registration but without registration your routes will not be taken save Ac...

Page 7: ...se always send in the complete product If the device is sent in for repair or if a warranty claim is not accepted repair will be carried out up to Euro 30 with out consultation Please enclose the following with the package Copy of invoice warranty certificate widget Please make sure to prepay the return shipment We regret that we cannot accept freight collect shipments Our service address Ciclospo...

Page 8: ...device must accept any interference received includ ing interference that may cause undesired operation The grantee is not responsible for any changes or modifi cations not expressly approved by the party responsible for compliance Such modifications could void the user s authority to operate the equipment The RF Exposure Compliance distance is 20 millimeters NOTE This equipment has been tested an...

Reviews: