background image

Getting Started

Congratulations on purchasing a chumby NeTV. In the box, you 
should find the NeTV device, a power supply, a micro-USB cable, a 
video cable, and this manual. The IR extender is an accessory which 
is sold separately. 

To get your device up and running, please follow these four simple 
steps:

1. Plug it in between two video devices.

The NeTV can go between most any HD digital video source and 
sink. Plug the video source into the front side of the NeTV device, 
and the video sink into the back side of the NeTV device. The 
NeTV can go between your DVD and A/V receiver, for example, or 
between your A/V receiver and your TV. It’s up to you!

2. Plug in the power.

Power up the NeTV device by plugging in the provided micro-USB 
cable, and then plugging the other end into the provided wall 
adapter. Once the wall adapter is plugged into an AC socket, you 
should see LEDs on the front panel light up.

3. Turn on your AV system.

Make sure your TV and other peripherals are active now, so you can 
see the on-screen instructions provided by the NeTV.

4. Follow the on-screen instructions.

The NeTV will guide you through the remainder of the process 
with its on-screen configuration wizard. Configuration is faster and 
easier with a smartphone or laptop nearby, but you can also do it 
with the included remote control.

Summary of Contents for NeTV

Page 1: ...chumby NeTV Quickstart Guide chumby com You ll never read this and we d rather not kill the trees but it s required by law ...

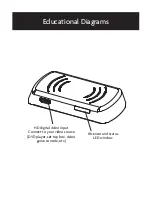
Page 2: ...HD digital video input Connect to your video source DVD player set top box video game console etc IR sensor and status LED window Educational Diagrams ...

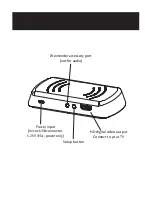
Page 3: ...Power input micro USB connector 5 25V 1A power only IR extender accessory port not for audio Setup button HD digital video output Connect to your TV ...

Page 4: ...r DVD and A V receiver for example or between your A V receiver and your TV It s up to you 2 Plug in the power Power up the NeTV device by plugging in the provided micro USB cable and then plugging the other end into the provided wall adapter Once the wall adapter is plugged into an AC socket you should see LEDs on the front panel light up 3 Turn on your AV system Make sure your TV and other perip...

Page 5: ...ly A power supply and cable has been provided with the unit Please don t use a different one or if you must check the voltage first and make sure it is rated for at least 1A of current Many phone chargers and USB ports are only rated for 0 5A and many phone charger cables are made of cheap thin wire that can t handle 1A of current gracefully Just as a pet would be unhealthy if you didn t feed it en...

Page 6: ... This Limited Warranty applies only to the hardware Product manufactured by or for chumby that can be identified by the chumby trademark trade name or logo affixed to it The Limited Warranty does not applyto any a chumby products and services other than the Product b non chumby hardware product c consumables such as batteries or d software even if packaged or sold with the Product or embedded in the...

Page 7: ...NOT A SALE For good and valuable consideration the receipt and sufficiency of which is hereby acknowledged the parties agree as follows 1 Definitions As used in this Agreement chumby Product or Product means the chumby hardware product distributed by chumby including the housing fabric or other material that encases the electronics Intellectual Property Rights means all present and future worldwide ...

Page 8: ...rty chumby may freely assign this Agreement This Agreement will terminate immediately upon occurrence of any prohibited assignment and any attempted assignment or transfer in violation of the foregoing will be null and void This Agreement is the final complete and exclusive agreement between the parties relating to the Software and supersedes all prior or contemporaneous proposals representations u...

Page 9: ...ollowing standards and methods Health Safety Art 3 1 a EN 50371 2002 EN 60950 1 2006 A11 2009 EMC requirements Art 3 1 b EN 301489 1V1 8 1 EN 301489 17V2 2 1 ERM Spectrum Art 3 2 EN 300328V1 7 1 Emissions EN 55022 2006 A1 2007 CISPR 22 2005 Class B Conducted Emissions EN 55022 2006 A1 2007 CISPR 22 2005 Class B Radiated Emissions EN 61000 3 2 2006 A1 2009 A2 2009 Power Line Harmonics EN 61000 3 3 ...

Page 10: ...terference to radio communications However there is no guarantee that interfer ence will not occur in a particular installation If this equipment does cause harmful interference to radio or television reception which can be determined by turning the equipment off and on the user is encouraged to try to correct the interference by one or more of the following measures Reorient or relocate the recei...

Page 11: ...Fold here and tear Wasn t that fun ...

Page 12: ... ...

Reviews: